Chapter 4: Importing Profiles from Other Sources
Importing Profiles from Other Sources
This section details the importing of Client, Vendor, Agent and Other profiles from other software programs using ASCII (.txt) files. The routine of importing either appends one database of profile information to an existing database (or an empty one) without checking for duplicates, or updates existing profiles if certain parameters are setup.
Importing Customer Profiles via ASCII (.txt) Files
Agencies may use many different software programs to maintain customer data such as names, addresses, phone numbers and marketing information. Ideally, most agencies implementing Trams Back Office build their database using the interface process, but they may prefer to electronically "import" customer information to the Trams Back Office/ClientBase profiles rather than manually entering it. Later, when the Trams database is up and running, agencies may want to import other miscellaneous electronic files as well, such as a purchased mailing list. Although Trams can’t anticipate every possible program used, if your agency has a database of customer information in a program that can put that information into an ASCII (American Standard Code for Information Interchange) file (.txt), chances are an electronic “import” is possible…and easy!
ASCII Delimited Text Files
Regardless of the specific program used to maintain your database, if the program can create an ASCII-comma or tab delimited file (and most programs currently can using File|Save As or File|Export), that file can be imported using the Trams Import/Update Utility. An ASCII format uses a standardized coding scheme enabling different computer programs to exchange information.
Each record in the file includes information such as Name, Address 1, Address 2, City, etc. To recognize when one field ends and another field begins, a delimiter is used, separating each field. This delimiter is a character and the most commonly used are a tab or a comma.
If your existing database program can create an ASCII file, create your file and save it to a floppy disk or to a drive accessible to a workstation that can run Trams Back Office/ClientBase. (The file must be created prior to running the Trams Import program.) Find instructions on creating the file from the vendor supporting that software program.
Using the Trams Import/Update Utility
The Trams Import/Update Utility is a separate program that is run from outside of Trams Back Office or ClientBase. To access this utility, go to Start|Programs|Trams Back Office (or Trams)|Trams Profile Import and make sure you have a current backup of the database before starting the import. Access the program from your Trams program group or by going to Start|Run and browsing \Trams\common files\profimp.exe file. Upon running, an import wizard appears.
The wizard guides you though importing different classifications of profile data: address, communication, marketing and traveler. The basic steps to running the import are:
Step 1: Preparing your Database
Step 2: Connect to your Database
Step 3: Select Import File
Step 4: Import Data to Miscellaneous Profile Fields (in TBO Notes or Additional Notes)
Step 5: Import Data to Communications Fields
Step 6: Import Data to Address Fields
Step 7: Import Data to Marketing Fields (for ClientBase)
Step 8: Import Data to Travelers (formerly Passenger) Fields
Step 9: Import Data to Profile Groups
Step 10: Import Data to Special Dates (for ClientBase)
Step 11: Import Data to Profile Remarks (for ClientBase)
Step 12: View Profile Import/Update Summary Screen
Before giving details on each step, let’s review some basic concepts used through the Import Utility screens.
Updating Existing Profiles vs. Appending to Database
There are two methods of importing data - update or append. Update means you want to replace data that is currently in your database with new data. An example is John Jones is currently in the Trams database. He visits your website and updates his address, letting you know he moved. You import profiles from your website every week into Trams. Since the profile already exists in the Trams database, you want the import routine to find this profile and change the address instead of creating a new profile which would be a duplicate. If the entire import was updates, then the number of profiles would not increase.
Important Note: As you map the fields from the import file to the fields in Trams Back Office/ClientBase, it is important to remember that any fields that are being mapped to in the database will be replaced by the value of the field in the import file, even if it is empty.
Using the append method means you are adding profiles to the database and the number of profiles in the system increase after the import is complete. An example of this is if you purchase a mailing list and want to load all the profiles into ClientBase so you can monitor responses and follow up on these profiles.
Three Ways to Import Data
Notice three buttons listed on many of the screens in the Import Utility that are used to describe how that data should be imported.
|
Map |
Mapping is used when a data field exists and is populated in the file while importing. You want to bring the data in “as is” to a field in the database. Select the name of the field that exists in the source file, and indicate in the import wizard into which field you want the data to show in ClientBase/Trams Back Office. |
|
Constant |
Use this feature when using same value for every profile being imported. Going back to the mail list example, you are importing data exclusively for Leisure profiles. Set the Profile Type field as a constant with a value of Leisure. Now all the profiles imported from the mail list show as Leisure profiles In ClientBase/Trams Back Office. |
|
Rule |
Creating a rule to import fields allows you to apply some logic to the field being imported. Create rules that if the data meets certain criteria, then map to a certain field in the database, or set a constant for the field. Let’s say the mail list you have purchased has a field name type and the value in the data source is either Home or Business. You want to make the profiles that are marked "business" as Corporate profiles in your database. You create a rule that says if type is equal to “business” then set the Profile type field to Corporate when importing the profile into the database. Another rule would be set where if the type is equal to “home” then the set the profile type to Leisure when importing. |
Saving and Loading Mappings
If you plan to import profiles on a continual basis using a consistent source file structure, map settings at the end of the import wizard. Also, if you start the mappings, but don’t have time to finish, use Save Mappings to save what you’ve done so far. The next time you import a file, load the map which uses the same settings from the saved import. Now you do not have to go through the wizard field by field. Only use this feature when the files you are importing use the same files structure and fields in the same order.
Viewing the Data File
Once you have connected the import wizard with the source file to be imported, the wizard allows you to view the data. Click View any time to refresh your memory about the fields or data listed in the source file.
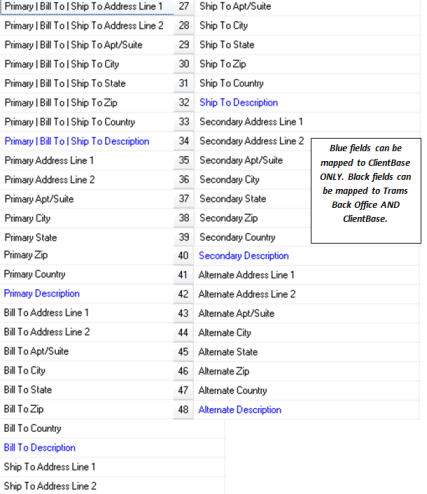
ClientBase and Trams Back Office Field Legends
A legend is included on the screens of the import wizard to help you figure out where the data you map is used. Each ClientBase field is color-coded so that you know which fields are Trams Back Office Only fields (lavender); ClientBase only fields (royal blue); or shared Trams Back Office/ClientBase fields (black).
Step-by-Step Instructions to Importing
Step 1: Preparing Your Database
When you use the import utility, you make permanent and automatic changes and therefore, we suggest you make a good backup of the database before using this feature. In doing so, you are covered in case something is changed unintentionally. By backing up, you have the option to restore back your original database.
Or, you may decide to setup a "test" Alias to test the import on a copy of your database before you import it live. (This procedure serves another purpose as well as it checks the integrity of the latest backup.) Here are steps to accomplish this:
1. Go to Start|Programs|Trams Back Office|Alias Utility.
2 Create an alias named Test and type: C:\Program Files\Trams\Database\test.ib (or use the same path as your current Trams database). Do not click Test as this database does not exist until you restore your backup to it.
3. Restore the last backup to the Test Alias (it creates the new test.ib when it does this). IMPORTANT: If you get any error message and cannot complete restore, call or e-mail support for help.
4. Log into Trams Back Office or ClientBase as this Alias, Test, and make sure all was restored correctly.
5. If you can look at the details of one profile, the copy of your database is viable and you are ready to do a test import into this database copy.
Step 2: Connect to Your Database
The first screen in the Trams Profile import wizard requires the following information:
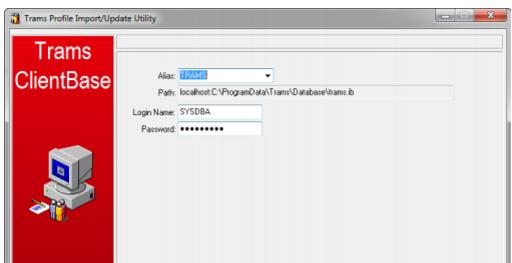
Alias: From the drop-down menu, choose the Alias used when logging into Trams Back Office or ClientBase.
Path: The Alias selected above sets the path to the Trams database.
Login Name/Password: Indicate the Login In Name and Password.
Click Next to continue.
Step 3: Select Import File
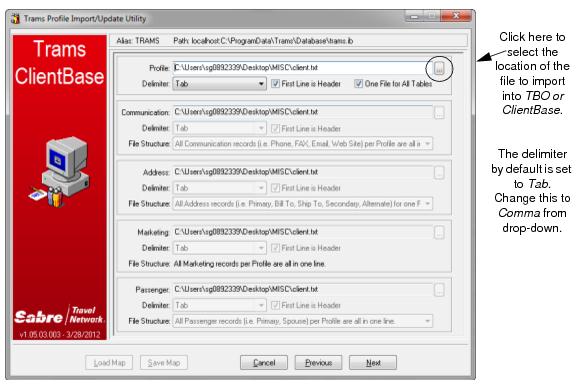
From this screen, select the file that has the profile information to import.
Profile: Click the three dots to select the location on your computer or network of the .txt file to import.
Delimiter: The default is set to Tab. From the drop-down menu, indicate whether the file to import is comma delimited.
First Line is Header: If the first line is a table header, check in this box to read the headers for the file.
One File for All Tables: If this box is checked, all of the data you are importing is in one file. The file updates not only the profile table, but also the communication, address, marketing and traveler tables as well. If this box is not checked, it opens up the ability to import multiple files, each a unique .txt file for each table - profile, communication, address, marketing, and traveler. This setup would be used when the source files are generated from a relational database which has separate tables in a program such as Access, dBase, or Paradox. Notice that as the checkmark is removed, the communication, address, marketing and traveler areas become active. For each selected .txt file for any table, specify a Delimiter from the drop-down menu (either tab or comma); check the box First Line is Header to create a header for the file; and select a File Structure.
File Structure: From the drop-down menu, designate if the .txt file that is being imported contains:
Multiple lines per Profile - This would be when the profile is listed in several rows with different information attached on each row. For example:
1030 John
1030 Smith
1030 123 Main St.
1030 Los Angeles
1030 CA
1030 90045
Where 1030 is the profile number or identifier.
All records in one line - This would be a file where for each profile, the specifics are in columns, or separated by comma which span a single line. For example: 1030,John,Smith,123 Main St.,Los Angeles,CA,90045.
Step 4: Importing Data for Miscellaneous Profile Fields
Once the file(s) you want to import is selected, click Next to get to the third screen in the import wizard, Profile Fields. By clicking View, preview the file to import. Review the profile data to import for accuracy.
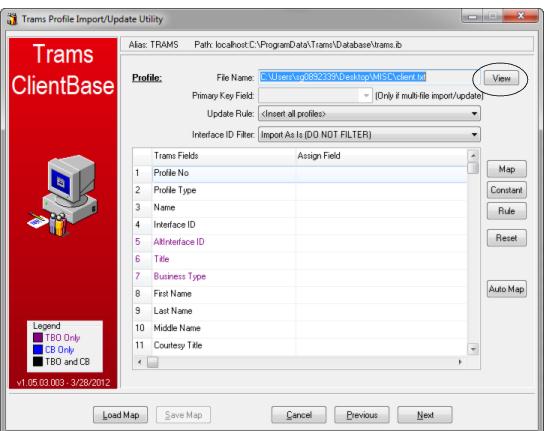
This is a very powerful part of the file import wizard. This area has the capability of stamping all records in the file with an indicated value so that they all appear with that value in Trams Back Office/ClientBase. Map a desired value using fields from the imported text file, assign a constant, or create rules to assign the desired value. The only required field in this area, is the Profile Type.
Load Map: Click Load Map to retrieve a previously saved mapping session so as not to setup everything all over again. What a time saver!
Primary Key Field: For those users who are bringing in multi-data import files, indicate the primary key field. This is the field that is common to both files that creates a link and tells our utility how to match the data for one profile.
Update Rules: This determines whether the information you are importing is appended to the database or updating existing data. Select Insert All Profiles to bring new profiles. Select Update If InterfaceID Matches to update existing profiles in Trams Back Office/ClientBase when data being imported has an Interface ID that matches an existing profile in Trams database. Be sure to map all fields that you want updated and a field must be mapped to the Interface ID.
Select Update If ProfileNO Matches to update existing profiles when data being imported has an Profile Number that matches an existing Profile Number in Trams database. The only time to select the Update if ProfileNO Matches option is if you are importing back into Trams database a .txt file that previously had been exported from Trams database.
Interface ID Filter: From the drop-down menu, select Import as is (DO NOT FILTER) which brings over all special characters such as dashes, parentheses, etc.; or Only Grab Alpha-Numeric Characters which strips all special characters from Interface ID. by dropping dashes, brackets, etc.
Important Note:As you are mapping the fields from the import file to the fields, it is important to remember that any fields that are being mapped to in Trams Back Office/ClientBase will be replaced by the value of the field in the import file, even if it is empty.
Map: By clicking Map, link a selected Trams Back Office/ClientBase field with a Source Column from the text file you are importing.
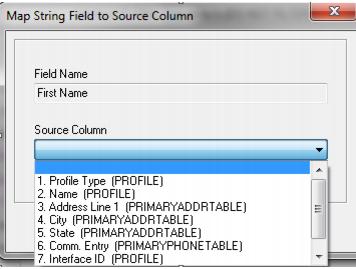
Field name represents the name of the field in Trams database. Source Column is the name of the data (or header) of the data being imported.
(Please note: Bolded field names are available only in Trams Back Office, not ClientBase and the maroon fields are in Trams Back Office only.) Fields which can be mapped include:
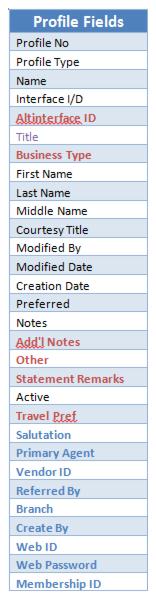
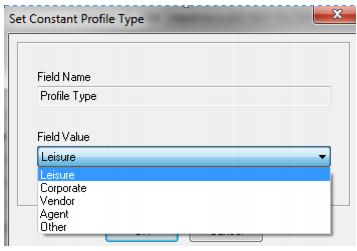
Constant: By clicking Constant after choosing a field from Trams Back Office/ClientBase, pick a value from a drop-down menu (if available); or type in a value to use for the selected field. For Profile Type below, the default Trams Back Office/ClientBase values are shown.
Reminder: If you have selected the Update If InterfaceID Matches above, be sure to map all fields that you want updated. If using a phone number as the profile Interface ID, map it at this time.
Rule: By clicking Rule, setup a conditional “if...then” statement/s for the file being imported.
Example: You have included in your import file a header called, Profile Type. For each profile type marked with an “A” in your import file, you want it to come into Trams database as an Agent profile. For each profile type marked with a “C”, you want it to come into Trams database as a Corporate profile, and so on. By setting up a Rule for each of these conditions, each record in the import file comes in correctly as the appropriate Profile Type.
Field Name: This field is hard-coded and is displaying the selected Trams Back Office/ClientBase field on which the rule is being written.
Default Value: Choose a value from a drop-down menu if this option is available. Otherwise, type in a value to use by choosing Constant, or Map a value from the import file for the selected field. This value is used if the data does not meet the condition you set up in the rule.
Add/Modify/Delete: To add a rule, click Add; to modify a rule, click Modify; to delete a rule, click Delete.
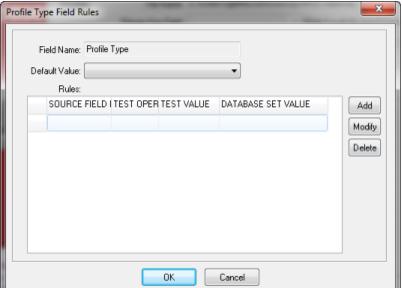
To add a rule:
If Source Field: The drop-down menu lists each column in the import file for selection. Choose the Source Field. Using our example, select Profile Type.
Source Operation: Choose the Source Operation, =, “equals,” or <>, “not equal” from the drop-down menu. Using our example, use =.
Source Test Value: Type a value from the file you are importing. In our example, we would insert an “A” (for Agent) and add a new rule for “C” (for Corporate), etc.
Then set Database Field to: From the drop-down menu, choose what value to use in this field if the source test value is met. If no drop-down menu is available, type out the value precisely as you want it in ClientBase.
Reset: To clear all settings, click Reset.
Automap: If the column header labels are exactly the same as the fields in Trams Back Office/ClientBase (this would happen if you previously exported out of Trams and now are importing), click Automap to have the import utility map all the fields for you.
Step 5: Importing Data to Communication Fields
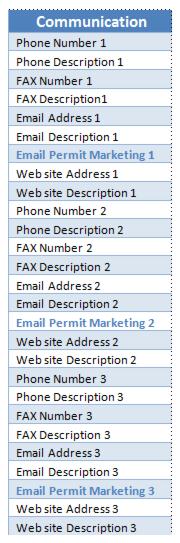
Click Next to get to the next screen in the import wizard, Communication Fields. Like the previous screen, this area has the capability of stamping all records in the file with an indicated value so that they all appear with that value in Trams Back Office/ClientBase. By clicking View, preview the file to import. Review the communication data to import for accuracy.
The only required fields in this area, are the Default Country Code and Default Area Code. For the United States and Canada, the country code is 1.
Map: By clicking Map, link a selected Trams Back Office/ClientBase field with a Source Column from the text file being imported. (Black fields apply to both Trams Back Office/ClientBase. Blue fields are for ClientBase use ONLY.)
Constant: By clicking Constant after choosing a field from Trams Back Office/ClientBase, pick a value from a drop-down menu (if available); or type in a value to use for the selected field.
Rule: By clicking Rule, setup a conditional “if...then” statement/s for the file being imported.
Field Name: This field is hard-coded and is displaying the selected Trams Back Office/ClientBase field on which the rule is being written.
Default Value: Choose a value from a drop-down menu if this option is available. Otherwise, type in a value to use by choosing Constant, or Map a value from the import file for the selected field. This value is used if the data does not meet the condition set up in the rule.
Add/Modify/Delete: To add a rule, click Add; to modify a rule, click Modify; to delete a rule, click Delete.
If Source Field: The drop-down menu lists each column in the import file for selection. Choose the Source Field.
Source Operation: Choose the Source Operation, = (equals), <>, (not equal), LEN= (Length equals), LEN< (Length is less than), LEN> (Length is greater than), LEN<> (Length does not equal) from the drop-down menu.
Source Test Value: Type a value from the file you are importing.
Then Set Database Field to: Type value you want to use if the source test value is met. If no drop-down menu is available, type out the value precisely as you want it in Trams Back Office/ClientBase.
Reset: To clear all settings, click Reset.
Step 6: Importing Data to Address Fields
Click Next to get to the next screen in the import wizard, address fields. Like the previous screens, this area has the capability of stamping all records in the file with an indicated value so that they all appear with that value in Trams Back Office/ClientBase. By clicking View preview the file to import. Review the address data for accuracy.
Map: By clicking Map, link a selected Trams Back Office/ClientBase field with a Source Column from the text file being imported. Field name represents the name of the field in Trams Back Office/ClientBase. Source Column is the name of the data (or header) of the data being imported.

Map an address to Primary, Bill To, and Ship To addresses all at once. When an address mapped to these fields is imported, one address record with the Primary, Bill To, and Ship To boxes checked is created.
Fields that can be mapped are:
Constant: By clicking Constant after choosing a field from Trams Back Office/ClientBase, pick a value from a drop-down menu (if available); or type in a value to use for the selected field.
Rule: By clicking Rule, setup a conditional “if...then” statement/s for the file being imported.
Field Name: This field is hard-coded and is displaying the selected Trams Back Office or ClientBase field on which the rule is being written.
Default Value: Choose a value from a drop-down menu if this option is available. Otherwise, type in a value you want to use by choosing Constant, or Map a value from your import file for the selected field. This value is used if the data does not meet the condition set up in the rule.
Add/Modify/Delete: To add a rule, click Add; to modify a rule, click Modify; to delete a rule, click Delete. To add a rule:
If Source Field: The drop-down menu lists each column in the import file for selection. Choose the Source Field.
Source Operation: Choose the Source Operation, = (equals), <>, (not equal), LEN= (Length equals), LEN< (Length is less than), LEN> (Length is greater than), LEN<> (Length does not equal) from the drop-down menu.
Source Test Value: Type a value from the file you are importing.
Then set Database Field to: Type value you want this field to be if the source test value is met. If no drop-down menu is available, type out the value precisely as you want it in Trams Back Office or ClientBase.
Reset: To clear all settings, click Reset.
Step 7: Importing Data to Marketing Fields
Click Next to get to the next screen in the import wizard, Marketing Fields. Like the previous screens, this area has the capability of stamping all records in the file with an indicated value so that they all appear with that value in Trams database. By clicking View, preview the file to import. Review the marketing data for accuracy.
Sub-delimiter: Insert a sub-delimiter separating the marketing codes. If no sub-delimiter has been used, leave empty.
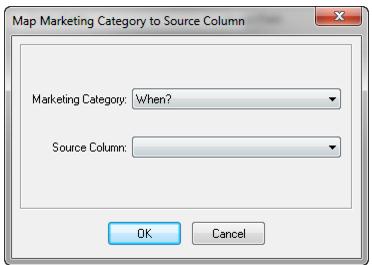
Add Map: By clicking Map, link a selected ClientBase field with a Source Column from the text file you are importing. Field name represents the name of the field in ClientBase. Source Column is the name of the data (or header) of the data being imported.
Add Constant: By clicking Constant after choosing a field from ClientBase, pick a value from a drop-down menu (if available); or type in a value to use for the selected field.
Rule: By clicking Rule, setup a conditional “if...then” statement/s for the file being imported.
Field Name: This field is hard-coded and is displaying the selected ClientBase field on which the rule is being written.
Default Value: Choose a value from a drop-down menu if this option is available. Otherwise, type in a value to use by choosing Constant, or Map a value from the import file for the selected field. This value is used if the data does not meet the condition you are set up in the rule.
Add/Modify/Delete: To add a rule, click Add; to modify a rule, click Modify; to delete a rule, click Delete. To add a rule:
If Source Field: The drop-down menu lists each column in the import file for selection. Choose the Source Field.
Source Operation: Choose the Source Operation, = (equals), <>, (not equal), LEN= (Length equals), LEN< (Length is less than), LEN> (Length is greater than), LEN<> (Length does not equal) from the drop-down menu.
Source Test Value: Type a value from the file you are importing.
Then set Database Field to: Type value you want this field to be if the source test value is met. If no drop-down menu is available, type out the value precisely as you want it in ClientBase.
Reset: To clear all settings, click Reset.
Step 8: Importing Data to Traveler Fields
NOTE: The Profile Import now works with the new Traveler/Contact records. It does not yet designate a Primary Traveler or Primary Communication entries, but it will do so in future release.
Click Next to get to the next screen in the import wizard, Traveler Fields. Like the previous screens, this area has the capability of stamping all records in the file with an indicated value so that they all appear with that value in Trams Back Office/ClientBase. By clicking View, preview the file to import and review the traveler data.
Map: By clicking Map, link a selected Trams Back Office/ClientBase field with a Source Column from the text file you are importing.
Field name represents the name of the field in Trams Back Office/ClientBase. Source Column is the name of the data (or header) of the data being imported. Fields to map include: Primary Traveler/Contact Name, and Second Traveler/Contact Name.
Constant: By clicking Constant after choosing a field from Trams Back Office/ClientBase, choose a value from a drop-down menu (if available); or type in a value to use for the selected field.
Rule: By clicking Rule, setup a conditional "if...then" statement/s for the file being imported.
Field Name: This field is hard-coded and is displaying the selected Trams Back Office/ClientBase field on which the rule is being written.
Default Value: Choose a value from a drop-down menu if this option is available. Otherwise, type in a value to use by choosing Constant, or Map a value from your import file for the selected field. This value is used if the data does not meet the condition you set up in the rule.
Add/Modify/Delete: To add a rule, click Add; to modify a rule, click Modify; to delete a rule, click Delete. To add a rule:
If Source Field: The drop-down menu lists each column in the import file for selection. Choose the Source Field.
Source Operation: Choose the Source Operation, = (equals), <>, (not equal), LEN= (Length equals), LEN< (Length is less than), LEN> (Length is greater than), LEN<> (Length does not equal) from the drop-down menu.
Source Test Value: Type a value from the file you are importing.
Then set Database Field to: Type value to fill this field to be if the source test value is met. If no drop-down menu is available, type out the value precisely as you want it in Trams Back Office/ClientBase.
Reset: To clear all settings, click Reset.
Step 9: Importing Data to Trams Back Office/ClientBase Program Group Fields
Click Next to get to the next screen in the Import Wizard, TFW/CB Program Group Fields. Like the previous screens, this area has the capability of stamping all records in the file with an indicated value so that they all appear with that value in Trams Back Office/ClientBase. By clicking View, preview the file being imported. Review the group data for accuracy.
Group delimiter: Insert a delimiter separating the groups. If delimiter has not been used, leave empty.
On Updates, Appends to Existing Groups: Check here to append to existing groups if you are updating.
Add Map: By clicking Map, link a selected Trams Back Office/ClientBase field with a Source Column from the text file being imported.
Field name represents the name of the field in Trams Back Office/ClientBase. Source Column is the name of the data (or header) of the data being imported.
Add Constant: By clicking Constant after choosing a field from Trams Back Office/ClientBase, pick a value from a drop-down menu (if available); or type in a value to use for the selected field.
Rule: By clicking Rule, setup a conditional “if...then” statement/s for the file being imported.
Field Name: This field is hard-coded and is displaying the selected Trams Back Office/ClientBase field on which the rule is being written.
Default Value: Choose a value from a drop-down menu if this option is available. Otherwise, type in a value you want to use by choosing Constant, or Map a value from your import file for the selected field. This value is used if the data does not meet the condition you are setting in your rule.
Add/Modify/Delete: To add a rule, click Add; to modify a rule, click Modify; to delete a rule, click Delete. To add a rule:
If Source Field: The drop-down menu lists each column in the import file for selection. Choose the Source Field.
Source Operation: Choose the Source Operation, = (equals), <>, (not equal), LEN= (Length equals), LEN< (Length is less than), LEN> (Length is greater than), LEN<> (Length does not equal) from the drop-down menu.
Source Test Value: Type a value from the file you are importing.
Then set Database Field to: Type value to land in this field if the source test value is met. If no drop-down menu is available, type out the value precisely as you want it in Trams Back Office/ClientBase.
Reset: To clear all settings, click Reset.
Step 10: Importing Data to Special Dates Fields
Click Next to get to the next screen in the Import Wizard, Special Dates Fields. Like the previous screens, this area has the capability of stamping all records in the file with an indicated value so that they all appear with that value in ClientBase. By clicking View, preview the file being imported. Review the data for accuracy.
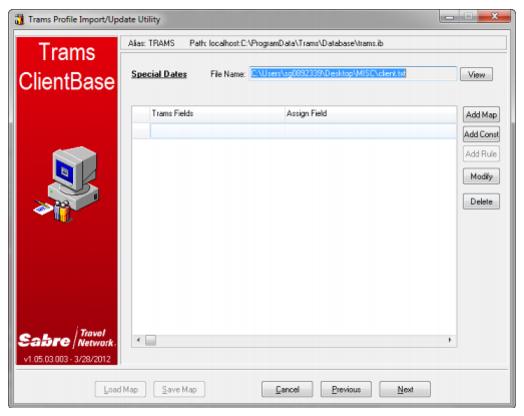
Add Map: By clicking Map, link a selected ClientBase field:
Special Date Type: Select from the drop down list of Special Date Types created in your ClientBase database (e.g. Wedding Anniversary). Please note if the desired Special Date Type is not included within the drop down, you must first go to ClientBase, and from Global Defaults|General Setup|User Defined Fields, select Special Date Types and add to the default drop-down list.
Source Column: Select the column within the file you are importing that represents the special date entries.
Source Date Separator: Select between /, -, or . to identify the format used within the date fields in your source file.
Source Date Format: Select from the following to identify the format used within the date fields in your source file.
mm/dd/yy
mm/dd/yyyy
dd/mm/yy
dd/mm/yyyy
yyyy/mm/dd
yy/mm/dd
yyyy/mm/dd
dd/mmm/yy
dd/mmm/yyyy
Based on these date settings the special date in your file is mapped to a separate Month, Day and Year field within the ClientBase Special Dates record.
Add Constant: By clicking Constant after choosing a field from ClientBase, pick a value from a drop-down menu (if available); or type in a value to use for the selected field.
Special Date Type: Select from the drop down list of Special Date Types created in your ClientBase database (e.g. Wedding Anniversary). Please note if the desired Special Date Type is not included within the drop down, you must first go to ClientBase, and from Global Defaults|General Setup|User Defined Fields, select Special Date Types and add to the default drop-down list.
Field Value: Type the value you want used for this type.
Source Date Separator: Select between /, -, or . to identify the format used within the date fields in your source file.
Source Date Format: Select from the following to identify the format used within the date fields in your source file.
mm/dd/yy
mm/dd/yyyy
dd/mm/yy
dd/mm/yyyy
yyyy/mm/dd
yy/mm/dd
yyyy/mm/dd
dd/mmm/yy
dd/mmm/yyyy
Based on these date settings the special date in your file is mapped to a separate Month, Day and Year field within the ClientBase Special Dates record.
Step 11: Importing Data to Profile Remarks
Click Next to get to the next screen in the import wizard, ClientBase Profile Remarks. Miscellaneous fields in your text file can be stored in the remarks folder in ClientBase. By clicking View, preview the file to import and review.
Add Map: By clicking Map, link a selected ClientBase field with a Source Column from the text file you are importing. Field name represents the name of the field in ClientBase. Source Column is the name of the data (or header) of the data being imported.
Add Constant: By clicking Constant after choosing a field from ClientBase, choose a value from a drop-down menu (if available); or type in a value to use for the selected field.
Add Rule: By clicking Rule, setup a conditional "if...then" statement/s for the file being imported.
Field Name: This field is hard-coded and is displaying the selected ClientBase field on which the rule is being written.
Default Value: Choose a value from a drop-down menu if this option is available. Otherwise, type in a value to use by choosing Constant, or Map a value from the import file for the selected field. This value is used if the data does not meet the condition you set up in the rule.
Add/Modify/Delete: To add a rule, click Add; to modify a rule, click Modify; to delete a rule, click Delete. To add a rule:
If Source Field: The drop-down menu lists each column in the import file for selection. Choose the Source Field.
Source Operation: Choose the Source Operation, = (equals), <>, (not equal), LEN= (Length equals), LEN< (Length is less than), LEN> (Length is greater than), LEN<> (Length does not equal) from the drop-down menu.
Source Test Value: Type a value from the file you are importing.
Then set Database Field to: Type value to fill this field if the source test value is met. If no drop-down menu is available, type out the value precisely as you want it in ClientBase.
Reset: To clear all settings, click Reset.
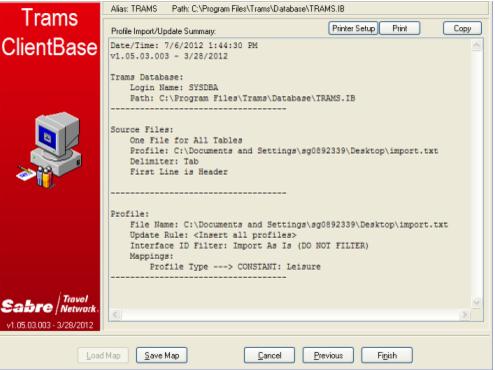
Step 12: View Profile Import/Update Summary Screen
Once the remarks table value(s) have been selected, click Next to get to the last screen in the import wizard. This screen provides a complete summary of all your import wizard selections.
Printer Setup: Click Printer Setup to select printer options for printing out the summary sheet.
Print: Click Print to print out the summary sheet.
Copy: Click here to copy the summary sheet to the Windows clipboard. Go to any other program to paste.
Save Map: Click Save Map to save the mappings. Browse to location to save the mapping. That way the next time you import a similar file, load the saved map and save lots of time.
Cancel: Click Cancel to abort the import process.
Previous: Click Previous to go back one screen.
Finish: Click Finish to complete the import process.
Once the import is completed view a screen of statistics stating how many profiles were inserted, updated, or skipped.
Check for Accuracy of Import
By using Level 2 Query in the Profile Manager, search for all profiles with a Create Date, From today and To today, or stamp some other constant in records with which to Query. Review newly imported profile data and verify that all information was imported properly.