Adjustments
This chapter contains:
Agent Adjustments
Agent Commission Adjustments are used to adjust an agent’s commission as it appears on an Agent Statement. These adjustments print on Agent Statements and increase or decrease the amount owed to the Agent.
1. Click Adjustment|Agent Comm Adjustment.
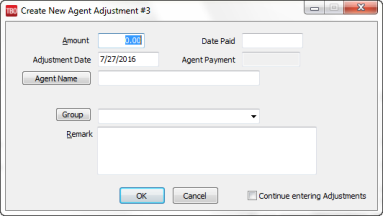
2. In the Amount field, type in the adjustment amount. If the adjustment amount is being added to the amount owed to the Agent, enter a positive (+) amount. If the adjustment amount is being subtracted from the amount owed to the Agent, enter a negative (-) amount.
3. The Date Paid is automatically filled in when you do an Agent Reconciliation. Leave blank.
4. The Adjustment Date is the statement date that the adjustment affects. Type the correct date in this field.
5. Click the Agent Name field and query for the Agent Name. Agent Adjustments can be created for multiple agents concurrently. After clicking Agent Name, in the agent profile query, selected multiple agents using Shift-Click or Control- Click). Once the desired Agents have been selected from the list, click the select button at the bottom of the profile query screen. In the Agent Name field of the Create Adjustment screen, Multiple Agents Selected is now be displayed in the Agent Name field. When the adjustment is saved, all Agents selected will receive the adjustment.
6. Do you have an agent group set up? If so, select it by clicking on the Group button.
7. Click the Remark field, and type a brief description about why the adjustment is being made. (e.g., Overnight Fee, Client Gift, etc.).
8. Click OK to save. (If creating more than one adjustment, click Continue Entering Adjustments before clicking OK.
Agent adjustments can also be entered at the time of entering both Payments|Received and Payments|Made.
Special Note to IC/Host Agencies: Capture IC and Host fees split among agents on this screen. If the agency is a Host Agency, enter one lump fee charge for the specific IC Agency using the IC’s code selected from the drop-down menu. Enter a Generic Agent name for the IC Agency, as an agent is needed to save an adjustment.
If the agency is an IC Agency, enter one or more fee charge adjustments, depending on how costs of the Host’s fees are going to be split among agents. Enter the agent’s name and the Host Code from the drop-down menu.
These Host Fees are displayed on the Agent’s individual statements, reducing the commission owed to them, and on the appropriate IC or Host Net Remit reports to increase or decrease the “net remit” owed.
Note: You can also create an agent adjustment from a payment screen, if the profile type is Vendor, Agent or Other.
Void Agent Adjustment
1. Click Adjustments|Query|Agent Adjustment.
2. Enter the adjustment number being voided. If the adjustment number is unknown, query by any one or more of the fields shown. (It is best not to fill in all of the fields. Usually two or three are sufficient.) Click Query to process.
3. When the adjustment(s) appear, click and highlight the correct entry and click Void.
4. Trams Back Office prompts, “Void adjustment number X”
5. Click Yes.
Agent Adjustments Query
Query can retrieve an existing (or a previously entered) payment. Enter the query screen by either selecting Adjustment|Query from the main menu or using the Agents Adjustments tab at the bottom of the screen. The query screen is broken into two sections. The top section is used to enter the data for the query and the bottom section displays the results of the query.
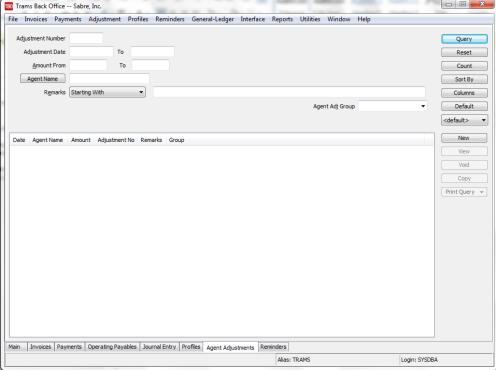
The fields displayed in the top section show how an adjustment can be found. Each of these fields are fields within an agent commission adjustment. As few as none and as many as all can be completed to retrieve an adjustment. The more criteria entered in query, the more selective the search for matching adjustments.
Enter the criteria available (or applicable) and the system brings up a complete listing of adjustments matching that criteria.
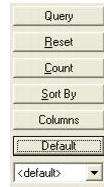
Buttons on the right side of the screen are also broken into two sections. Query, Reset, Count, Sort by, Columns and Default are buttons related to the query, while the bottom buttons are related to do with the query results. Use Reset to clear away any previous query criteria in both the General and Advanced tab. Count is used to give the number of items that match the query criteria. Sort by customizes how to display the results once the query is executed.
Columns is used to select which columns of data to display in the results screen. Click Columns and choose the columns to display by highlighting the column in the Available Fields and clicking on the left arrow to move it over to Displayed Fields. Using the red up and down arrows, put the column in the order to appear on the results screen. Click OK. Go out to the results screen and size the columns, and go back into Columns and click Save Settings and OK. Next, click Sort to get up to 3 sorts in ascending or descending order of selected columns and click Save Settings.
Drag and drop the columns to re-position them on the results screen if desired. Do this by clicking on the column to move, holding down the left mouse button, and sliding the column to any position on the query screen. To place a column to the right or left of any existing column, stop on the column to the right or left and release the mouse. The moved column is inserted in the correct place. Click Columns,Save Settings, and OK to save.
Default is an area to save the filters in the query by following these directions to create a new Saved Query:
1. Change the selection criteria on the results screen for the new query to save.
2. Click Default.
3. Type in the new query name in the Setting Name field.
4. If this saved query is the default, at the top of the drop-down window, check Set As Default.
5. Select Per User (on this one workstation only) or Global (on everyone’s sets).
6. Click OK to save.
To remove a saved query from the list, check the Remove the Current Named Setting box, click OK and the saved query is no longer available for use in the drop down field.
Once the listing of matching adjustment is displayed through query, any payment can be created(New), viewed (View), copied (Copy), or voided (Void).
Helpful Tips: On the Adjustments Query Screen, use <Shift> left-mouse click for selecting a range of items for closing, deleting, etc. Use <CTRL> left-mouse click to select multiple individual items in any order for closing, deleting, etc. By right-mouse clicking in the results screen, create a New or View Adjustment.
Sorting Query Data
Sort data in all query screens in two ways:
1. “Quick” sort by one field by clicking on a column in the results screen. The first time click sorts the column in ascending order (first to last or earlier date to more current date), and clicking on the same column a second time sorts in descending order (last to first or current date to earlier date).
2. Sort in Ascending or Descending order by up to 3 columns. When clicking Sort By, select the first, second or third column sort and what order (ascending or descending) the data displayed is to be displayed. Enter the selection criteria and click Save Settings and OK.