
Chapter 2 Installing Trams Back Office
Installing Trams Back Office
This chapter contains:
- Minimum Hardware Requirements
- Directions for Installation
- Agencies using ClientBase and Adding TBO
- Alias Utility
- Trams License Manager
- PCI Compliance
Minimum Hardware Requirements
Trams Back Office requires minimum hardware requirements. Click here for the current requirements.
Trams Back Office Installation for New Installs
If installing Trams Back Office on new computer that does not already have Trams Back Office or ClientBase installed, use the instructions below.
Reminder: A Trams Implementation representative will be calling to assist with the installation process. You can contact the Implementation team by emailing Trams.Implementation@sabre.com.*Note: If you are an existing customer installing on a new computer, please reach out to the Trams Tech Desk (trams.techdesk@sabre.com).
Step 1: Download the Program File.
After selecting the computer to install Trams Back Office on, download the Trams Products Installation setup.exe file into a folder on the computer. (If you will install Trams Back Office on more than one computer, we suggest that you save it to a shared folder that can be accessed from other computers on the network, so that you only need to download it once.) The file is linked below:
Step 2: Run the Installer - setup.exe .
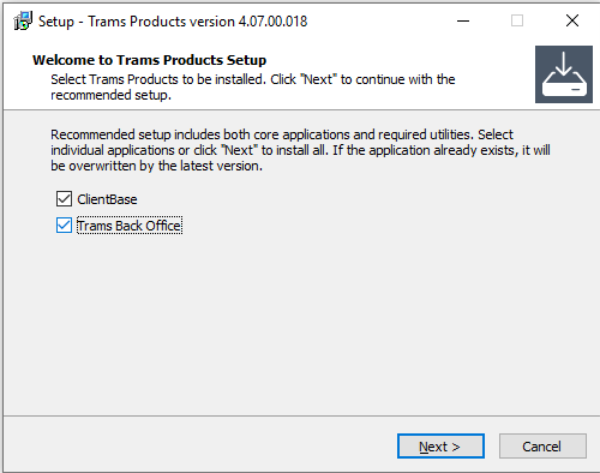
Browse to the folder that holds the setup.exe file. Double-click the file to launch the installation wizard.
If you want to install only Trams Back Office, uncheck ClientBase. If your agency will use both products, leave them both checked.
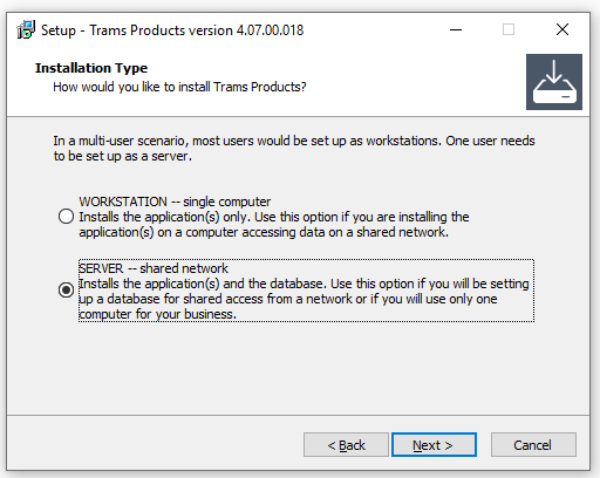
Step 3: The Wizard.
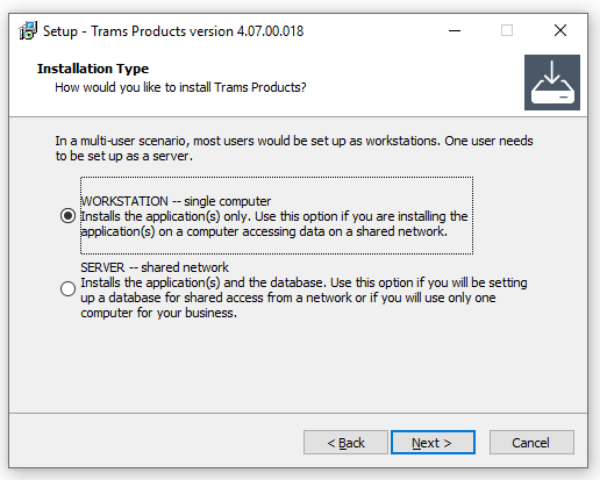
Click Next and decide whether you want to install as a Server or a Workstation.
- If Trams will only be used on one computer, choose Server.
- If you are installing for multiple users, one computer must be designated as the Server. The Server will house the database. All other computers will be set up as Workstations, which will connect to the Server over a network.Workstation is selected by default. We will cover a Server Installation first, then cover Workstations at the end.
To install a Server, choose the Server radio button, then click Next.
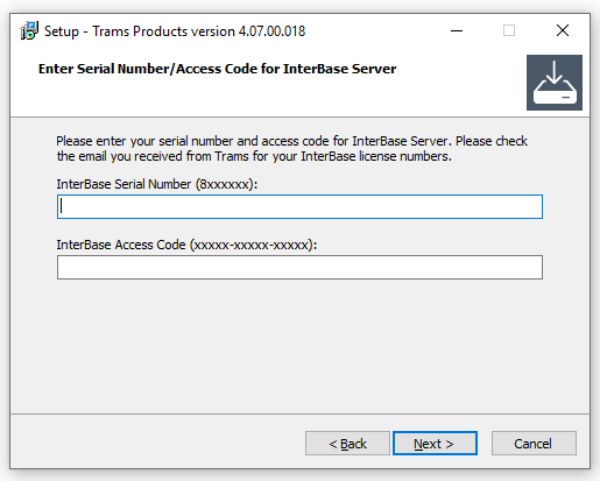
Step 4:
Enter your InterBase Server Serial Number and Access Code. (You will have this in an email from Trams).
Then click Next.
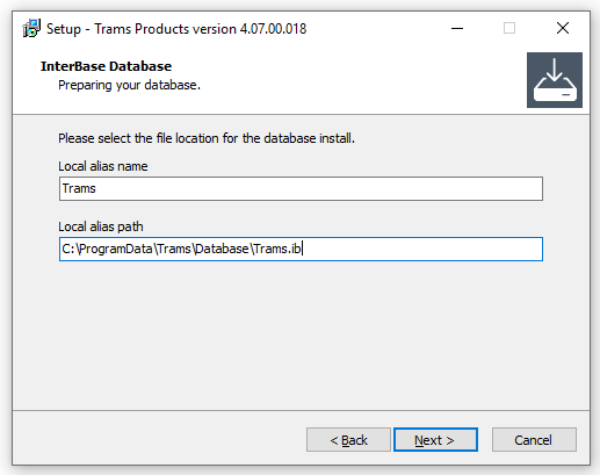
Step 5: Preparing your database
Select the file location for your database to be installed. Leave the database name and path as the default, or change them if you have another preference.
Click Next when satisfied with the name and location of the database.
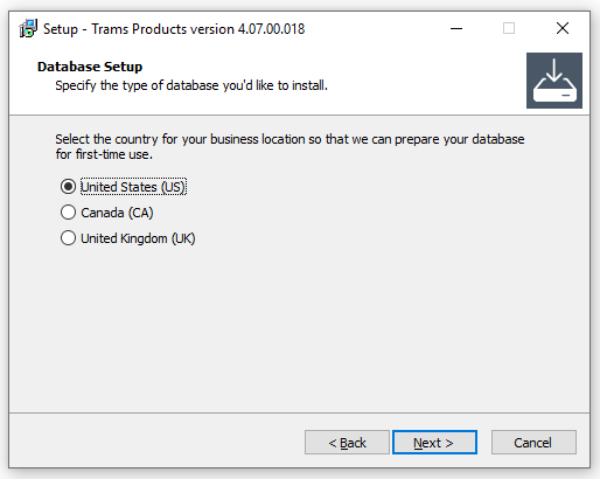
Step 6: Database Setup
Select your country. If not shown, choose the country whose currency and taxes best map to yours.
Click Next when finished.
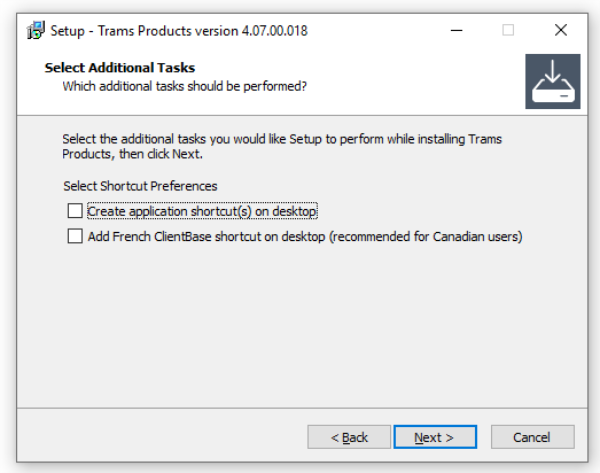
Step 7: Additional Tasks
Choose whether to add shortcuts to your desktop. If you’d like to add a shortcut on your desktop for Trams Back Office (and ClientBase, if you chose to install it), then leave the first box checked. If not, uncheck it. The second option, for a French version of ClientBase, is intended for ClientBase users with many French-speaking customers. Check that box if that describes your agency.
Click Next when ready.
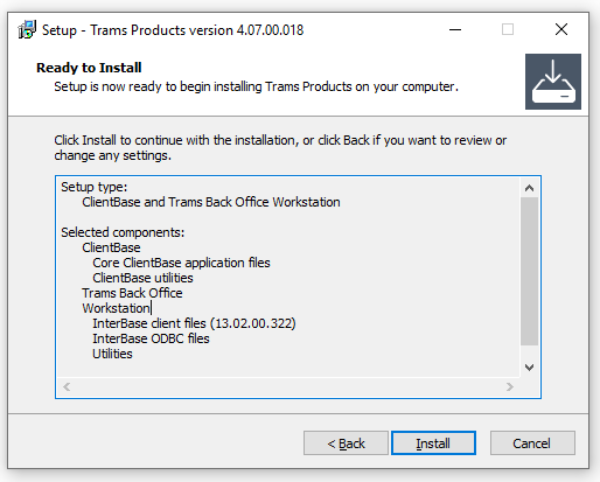
Step 8: Ready to Install!
Review the options that you have selected. Click Back if you want to make changes. Otherwise, click Install.
Trams Back Office (and ClientBase, if selected, will be installed in the default destination folder.

After installation is complete, a blank database with the filename of Trams.ib is created.
For Windows 8, Windows 10 or Server 2012 (R2) the default path to your database is:
C:\ProgramData\Trams\Database\Trams.ib .

If you changed the database location in step 5, make a note of it. You’ll need it when you install any Workstations.
Workstation Installation for multiple users
Step 1: Download the Program File.
After selecting the computer to install Trams Back Office on, download the Trams Products Installation setup.exe file into a folder on the computer. The file is linked below:
Step 2: Run the Installer - setup.exe .
For each workstation, browse to the folder where the Trams Back Office installation file was saved, and launch setup.exe.
Select Workstation, then click Next.
Step 3: Additional Tasks
Choose whether to add shortcuts to your desktop. If you’d like to add a shortcut on your desktop for Trams Back Office (and ClientBase, if you chose to install it), then leave the first box checked. If not, uncheck it. The second option, for a French version of ClientBase, is intended for ClientBase users with many French-speaking customers. Check that box if that describes your agency.
Click Next when ready.
Step 4: Ready to Install!
Review the options that you have selected. Click Back if you want to make changes. Otherwise, click Install.
Trams Back Office (and ClientBase, if selected) will be installed in the default destination folder.
Step 5: Finished.
Click the Finish button.

After each workstation has Trams Back Office installed, direct its Alias to the correct database file.
To change the path to the database, go to Start | Trams | Alias Utility. Select the Trams Alias, click Modify and update the path to point to the Trams.ib database located on the server using the format required for remote connection via TCP/IP.For Windows 8, Windows 10 or Server 2012 (R2) the default path to your database is:
ServerName:C:\ProgramData\Trams\Database\Trams.ib
*replace the default with your own server name and path, then click OK.
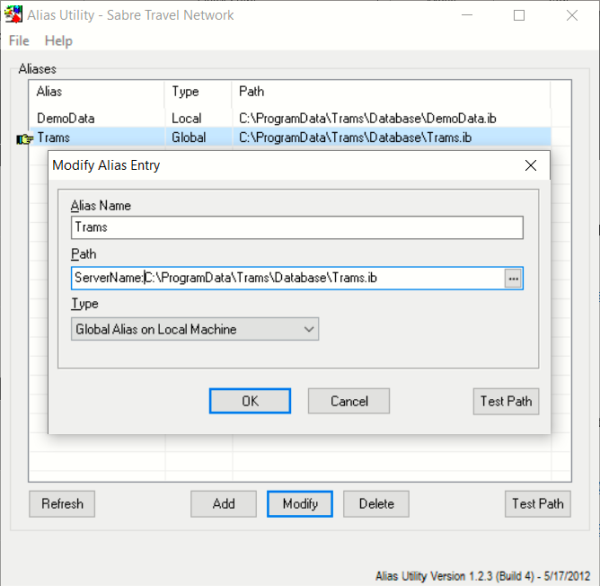
You can test to make sure the connection to the server is working by clicking the Test Path button and entering your username and password.
Auto-Update Feature
Trams Back Office will automatically install updates when they become available. Auto-update greatly streamlines installing updates on users' workstations and ensures fixes are being installed in a timely manner. Auto-update will only install updates that match the current major version (4.09.01 or 4.08.02, for example).
When Trams Back Office is launched, the auto-update feature checks to see if a newer version is available, then automatically downloads and installs the update on the users' workstation. The automatic update works for tramswin, download, ibbackup and the ibbackuplib files. The earlier versions of the executables will be renamed by appending .old to the file name during the process, so they are available to roll back to an earlier version, if necessary.
Users can postpone the auto-update for 24 hours or 1 week; after which they will be prompted again that an update is available.
*Note: If a user does not have administrative rights, the auto-update routine won't be able to install the new versions. You can get around this by giving users Read & Execute, List folder contents, Read, Write, Modify Security permissions to the Trams folder, subfolders and files in which Trams Back Office is installed (e.g., C:\Program Files (x86)\Trams\).
Agencies Using ClientBase and Adding Trams Back Office
If the agency has been using ClientBase and have decided to add Trams Back Office, follow these instructions:
1. Upgrade the ClientBase program to latest version. The database update should be run with the update to latest version.
2. On the Server, proceed with the Trams Back Office Installation as outlined above.
3. Proceed to install Trams Back Office as outlined above on all workstations.
For help please e-mail Trams.TechDesk@sabre.com .
Program Components
This program is made up of the following pieces:
- InterBase: The database operating system behind Trams Back Office.
- Trams.ib: The database backbone, holding all the data and tables where data resides.
- Tramswin.exe: The actual program file that coordinates the InterBase server and the Trams.ib - what is seen on the screens of Trams Back Office and data manipulation.
- Wintint32.exe: The program receiving interface data from a GDS.
- Download.exe: The program converting GDS interface data into the Trams format.
- IBBackup.exe: The program used for backing up Trams Back Office.
- index.html: The help files linked to screens.
Trams Alias Utility
The Alias Utility manages the location of the Trams database/s. An alias is simply a shortcut name to the long path which maps to the location of the database. By default there are probably two aliases set up, Trams (the Trams database), and DemoData (a database with sample data in it that can be used to experiment with the program). But there can be as many databases as desired.
Access the Trams Alias Utility in the program group by going to Start|Programs|Trams Back Office|Alias Utility.
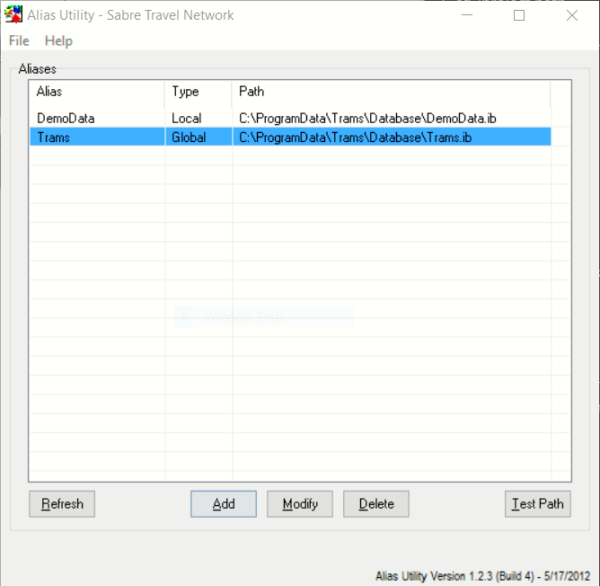
*Note: If shown at the bottom left corner click Enable Global Aliases Updates to add, modify or delete an Alias.
Alias Name - The short name to long path to the database.
Path - The path that leads to the Alias’s database.
Type - Global Alias On Local Machine: For multiple users on a machine (like in Terminal Server), then each user needs to have a copy of the alias set up. With Global Alias, an administrator sets up one global alias on the machine that is used by all users on that machine.
-Local Alias is used on the Server or on a single user computer.Test Path - Provides a test to verify the correct path.
Special Note:
To initiate changes to the Alias Utility, make sure to log out of the Trams program and log back in again.
Changing the Trams Alias
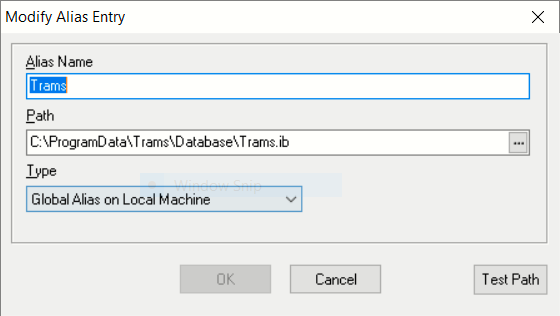
To make a change the database location, start the alias utility by going to Start|Program Files|Trams Back Office and select Alias Utility. Add, Modify, or Delete Aliases from this screen.
Click Add or Modify to bring up the screen where the alias path is entered.
The Alias Name is simply a name used to recall the path to the database.*Note: Formats for the path to the database if on a network are:
TCP/IP Servername:drive:\directories\databasename.ib
Netbeui \\Servername\drive:directories\databasename.ib
Trams License Manager
The License Manager monitors the number of users logged into the database and compares it to the agency Access Code which reflects the number of users the agency is licensed for with Trams and ClientBase Products and Services.
When accessing the Trams database using any of Trams applications, the Trams License Manager verifies that connection can be made to the Trams database and that a current version of the License Manager is enabled.The Trams License Manager utilizes Port 8090 for communication.
This port must be opened on any firewall that a company may be utilizing to filter traffic internally.
It also must be opened externally for remote users in their network configuration.*Note: If the licensed number of users is exceeded the system prompts:
Your Trams User License is currently set for X Users. You are the Xth User logging into your database.
Please contact Trams Marketing to modify your User Licenses and obtain a new Access Code.This means number of User Licenses have been exceeded and someone else needs to log out of the program or contact Trams Billing at 310-641-8726 or Trams.Billing@Sabre.com to obtain additional licenses.
PCI Compliance
Credit Card Encryption Background
The payment card industry (PCI) compliance and validation regulations spells out what security measures must be taken to protect the private information during any transaction occurring with the use of a paycard. The PCI Data Security Standard is used by all card brands to assure the security of the data gathered when transacting on behalf of a customer. There are numerous regulations including encrypting the credit card numbers in the database.
Encrypting this data makes it virtually impossible to decipher a credit card number without a decryption key which protects the credit card information in the database from fraudulent abuse. Future Trams Back Office development will implement additional enhancements to help agencies further comply with the PCI regulations.
Background
The payment card industry (PCI) compliance and validation regulations spell out what security measures must be taken to protect the private information during any transaction occurring with the use of a paycard. The PCI Data Security Standard is used by all card brands to assure the security of the data gathered when transacting on behalf of a customer. There are numerous regulations, including encrypting the credit card numbers in the database. Encrypting this data makes it virtually impossible to decipher a credit card number without a decryption key which protects the credit card information in your database from fraudulent abuse. Future Trams Back Office development will implement additional enhancements to help agencies further comply with the PCI regulations.
How it Works
In Trams Back Office, credit card numbers are encrypted in the database and masked throughout most of the Trams applications. A field exists in the database to accommodate the encrypted credit card number, and another fieldcontains a masked version of the number. During encryption, a cleaning and masking routine takes place to standardize all of the credit card numbers so they can be properly masked for all applications utilizing the masked Credit card field.
An indicator will show if the database has been encrypted and can be found under Help | Table Version Encrypted: (Yes/No).
Technical Notes
The field name Credit Card Number will be renamed “CCNUMBER”.
Two changes to database fields take place when encryption takes place:
- Masked CC Number Field (CCNUMBER): Credit card number in masked format. Credit card numbers are standardized and validated. Valid credit cards are saved in its masked format andinvalid credit cards are saved as is.
- Encrypted CC Number Field (NUMBERENCRYPT): Encrypted full credit card number entry (allnumbers, whether valid or not, are encrypted).
Use of Encryption Keys
A unique encryption key will be generated for each agency that can be used in product development for applications that will need to read the full credit card number. The key can be obtained by a SYSDBA log-in only by going to Utilities | Credit Card Encryption Key and entering a password provided by the Trams Support desk (Trams.TBOsupport@sabre.com). A CCEncrypt.dll file is installed that allows access tothe Trams database to view un-encrypted Credit card numbers.
For the purpose of rotating an encryption key, version 117 or higher of the DBUP.exe can be used (with the additional command line parameter –REENCRYPT, will allow for credit card numbers to be re-encrypted so that a new encryption key may be generated. This feature is only available for non-syncing databases.
The intended audience is for the designers and developers of applications that reads credit card numbers in the Trams database from outside of the Trams applications.
A PCI requirement mandates logging when a full credit card number has been viewed. Therefore, functionality was added to allow users to view a full credit card number provided the user is logged in as SYSDBA or the user profile has the permission to view full credit card numbers enabled. Once enabled in payments received and made, in the profile payment info tab and in the booking expanded fare tab CC Commtrack field, right clicking on the credit card number field displays a menu option to view the fullcredit card number.When the user selects it, the full credit card number is displayed in the payment field and a log event is created including:
- Date/Time
- Username
- Credit Card number
- Screen or report they were in when the full cc number was viewed
An Audit Report can be located in Trams Back Office under Reports/Payments/Audit.
A User Permission setting can be enabled to allow viewing the full version of the credit card number throughout the application. The permission "Enable ability to view full credit card numbers can be found under Utilities/Setup/User Profiles under the Permissions tab and is unchecked for all users by default.
Credit card numbers are masked upon saving to the database. Users who have this permission enabled can right-click to view the full credit card number and select Show Full Credit Card numbers in the following areas:
- Payment Screen
- Profiles
- Expanded Fare booking tab - Comm Track CC No field
Additionally, the permission setting "Run Reports/Exports with full credit card Numbers and view REC LOC content allows access to:
- Report Generator reports that contain Full Credit Card numbers
- Prism Handoff
- CC Merchant Report (Mailmerge format)
Regardless of user permission settings, Users will only be able to view the masked credit card number in:
- CC Merchant Reconciliation Screen
- Credit Card Reconciliation Report
- CC Merchant Report
- Note for CC Merchant Report: If the user has the proper permissions, full credit card numbers can be exported using the Mail Merge format.
Credit card data can be permanently masked (so that the ability to view a full credit card number no longer exists) by using the Purge Credit Card function under Utilities.
Password Security
By default, Password Security is not enabled. For assistance with enabling, contact Trams.TechDesk@Sabre.com
- User Permission Security Enhancements (only available with Interbase XE or higher):
- - Enable User Authentication for login security settings for password management. EUA enabling the database allows benefits from the new password management features of setting password strengths, setting password expiration dates, as well as users being able to change their own passwords.
- - All user login password security enhancements are strictly tied to EUA enabling the database. If a database is not EUA enabled, Trams Back Office user login password management remains unchanged and only SYSDBA can update User Login passwords.
Password Protection
User Permission Security Enhancements (only available with Interbase XE or higher):
- Enable User Authentication for login security settings for password management. EUA enabling the database allows benefits from the new password management features of setting password strengths, setting password expiration dates, as well as users being able to change their own passwords.
- All user login password security enhancements are strictly tied to EUA enabling the database. If a database is not EUA enabled, Trams Back Office user login password management remains unchanged and only SYSDBA can update User Login passwords.
EUA REQUIREMENTS
•
IB Server and IB Client must be on IB version XE.
•
The ClientBase/Trams Back Office database must be updated to IB XE or higher.
•
Trams Back Office table version must be DB version 37 or higher (3.3)
•
ClientBase Windows table version must be DB version 99 or higher (3.6)
EUA ENABLING A DATABASE
To EUA enable the database, a special command line prompt must be used: dbup.exe -eua When the command line prompt is used, if the above requirements are not met, the user is prompted, The following requirements must be met to EUA enable the database:
- Database Server version must be upgraded to version “10” or greater. The current version is “X”.
- Database File version must be upgraded to version “15” or greater. The current version is “X”
- Database Client version must be upgraded to version “10” or greater. The current version is “X”
Please verify these requirements are met and try EUA enabling again.
If the requirements for EUA enabling the database are met the user is prompted, You have the option of using Embedded User Authentication. Your user logins and passwords will now be directly tied to your database file. Enable EUA?
- Help|About includes a new entry: EUA Enabled Yes|No
Upon EUA enabling a database all User Login passwords are converted and stored within the database, rather than within InterBase. The SYSDBA password remains unchanged. Upon logging into Trams Back Office as SYSDBA after EUA enabling the database, continue using the original SYSDBA password. If that password was never changed from the generic "xxxxxxxxx" password, a prompt launches upon first login to change the password.
All other User Logins have their current password converted to their login name (which is always Upper Case). As each user first logs into Trams Back Office (or ClientBase) they will need to use their newly converted password based on their login name. For example, if the User Login name is MARY, upon first logging into Trams Back Office the user should enter MARY into the Login Name AND enter MARY into the password. Upon successfully entering the User Login and Password the user is then prompted to enter a new password, to ensure security going forward. This new password is then used each time the user logs into Trams Back Office. Because the database is EUA enabled, all users can now update their own User Login passwords by going to Utilities|Setup|User Profile and entering a new password.
A new tab was added to Utilities|Setup|Global Defaults called User Login Options that is accessible for SYSDBA and Admin users with fields to set password expiration and password strengths.
PASSWORD EXPIRATION
Enter the number of days until password is expired (Example: 30, 60, 90, etc.). If you are also a CBO user, the maximum time allowed for a password to be used before resetting is 90 days. Once password expires, when user tries to login user is directed to a new page and asked to enter the old password and a new password.
Password Strength
A setting was also added to assign password strength when creating a new password. If a chosen password does not meet the rules, user must change password before allowed to continue.
Options are low, medium or high and are described as follows:
Low Strength - Passwords must contain:
- A minimum of one character
- A maximum of 8 characters
- Cannot be a repeat of last 4 passwords
Medium Strength - Passwords must contain:
- A minimum of 7 characters
- A maximum of 8 characters
- At least one alpha character (a-z, A-Z)
- At least one numeric character (0-9)
- Cannot be a repeat of last 4 passwords
High Strength - Passwords must contain:
- A minimum of 7 characters
- A maximum of 8 characters
- At least one lower case alpha character (a-z)
- At least one upper case alpha character (A-Z)
- At least one numeric character (0-9)
- At least one special character (!,@,#,$,%,^,&,*,_,-,+,= etc.)
- No character may be used more than once, regardless of case
- Cannot be a repeat of last 4 passwords
Blacklisted Passwords
For security purposes certain passwords are no longer allowed to be used in the database. The default that came with the program is no longer allowed for use as a password for SYSDBA. After EUA enabling the database, if the SYSDBA password is the default, or if at any point you are changing the SYSDBA password and you try to use the default, you are prompted to select a different password.
For user logins, the user login name and the user password can no longer be the same. After EUA enabling the database, if you try to create a password that matches the user login name, you are prompted to select a different password.
Important Note about SYSDBA Password
It is extremely important that you archive the SYSDBA password to a removable storage drive as a source of password recovery. If the SYSDBA password is forgotten and was not archived, the password cannot be recovered.
To archive, when changing the SYSDBA password enter the new password and check the box Archive Password. Click OK to save and a popup screen is displayed to create a password recovery disk.
The prompt appears, Please insert your password recovery drive/disk and select the appropriate drive letter to archive the password. To refresh the drive list, click the drop down arrow. Then press OK to continue or Cancel to stop the process. Click the arrow and select the drive to save the password to and click OK.
Once the password is on the drive the prompt, Password successfully archived is displayed. Should the need arise to recover the password from the removable device, in the login screen, click the Forgot Password link (which is only visible with the SYSDBA Login), then insert the removable device and navigate the removable device drive. Once logged in, the SYSDBA password should be changed and re-archived.