
Chapter 6: Set Up Trams Back Office
Set Up Trams Back Office
This chapter contains directions for setting up Trams Back Office:
- Understanding the Agency’s Needs
- Getting Started: Set Up Travel Types, Chart of Accounts, G/L Accounts, Prompt Tab in Global Defaults
- Set Up Client Balance Core Report
- Set Up Vendor Balance Core Report
- Set Up ARC/BSP Core Report
- Set Up Check Register Core Report and Bank Reconciliation
- Enter Opening Balances
- General Ledger Setup
- Suggested GL Procedures (Daily, Weekly, Monthly)
- Balancing Core Reports to Trial Balance Report
- Use of GL Reconciliation Report
- Set Up and Special Usage for Canadian Agencies
- Remote Access Setup (using Direct Connect)
- Additional Security Settings
Understanding the Agency’s Needs
Two things to consider before setting up Trams Back Office:
1) Most users have a single Balance Sheet and choose to have a single Income Statement or an Income Statement per branch. Multiple Balance Sheets are available, but are generally only needed if there is a need to print full financials (Balance Sheet and Income Statement) per branch or entity for tax reporting. This is usually only needed if branches are in separate states, or if for some other reason, separate balance sheets for tax purposes are needed.
2) Trams Back Office has the ability to account for invoices as Sales/Costs of Sales or Commission Income. Some agencies have used Commission Income accounting with previous back office systems and may want to consider converting to Sales/Cost of Sales when converting to Trams Back Office as nothing is lost, but much can be gained.
Using Sales/Cost of Sales does allow for more flexibility especially with regards to yield management information, because we can track the sales/cost of sales for Commtrack invoices, based on the actual commission received. The cost of sales is determined by the difference between the total fare and the commission of the invoices that have a vendor payment. Converting from Commission Income to Sales/Cost of Sales accounting takes place at the time of loading beginning balances into Trams Back Office. When using Commission Income method accounts are "rolled up" into a Commission Income account based on the actual commission received and the sales amount is not tracked.
Getting Started Steps
Here are the steps for setting up Trams Back Office:
- Set Up Travel Types
- Set Up Chart of Accounts
- Set Up G/L Accounts
- Set Up Prompt Tab in Global Defaults
- Set Up Client/Vendor Balances Core Reports
- Set Up ARC/BSP Core Report
- Set Up Check Register Core Report and Bank Reconciliation
- Enter Opening Balances
- General Ledger Setup
Set Up Travel Types
Travel Types in Trams Back Office are categories to organize bookings by the type of travel that they represent. For example, it is often useful to see a breakdown of the business by travel type. The travel types are initially set up as shown below. Modify any of the 50 available travel types to correspond to a category that are needed.
Remember that travel types define what Sales/Cost of Sales that will be updated during an EOP journal entry. If adding a travel type, be sure to create a GL account for the Sales/Cost of Sales accounts under General Ledger|Accounts and update the table under Utilities|GL Accts.
Selecting Travel Categories
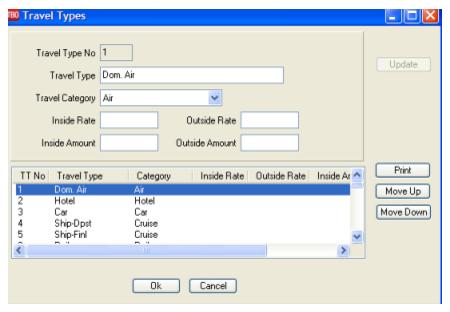
To setup Travel Types go to Utilities|Setup|Travel Types
Rearrange the Travel Types by using the Move Up and Move Down buttons. However, if the agency plans to interface, we recommend NOT changing, moving or renaming DomAir, Hotel, Car, Rail, Int'l. In general, we recommend leaving the first eight Travel Types alone. The first column contains the travel types used in the invoice booking screen. The second column contains pre-defined categories used to group travel types. These categories are edited by clicking on the travel type, making the changes at the top of the data entry screen and then clicking on Update to save those changes. (If adding a new travel type, be sure to choose the correct Travel Category from the drop-down menu.)
Travel Categories are used to facilitate the Interface from the GDS with uniform travel types. During the Interface, Trams Back Office searches the Travel Category column for a similar match. When it finds a match in the Category column, this record is interfaced to the proper Travel Type.
Set Up Chart of Accounts
Trams Back Office comes with default General Ledger Accounts which are easily revised. Although a tremendous amount of flexibility is available in tailoring the Chart of Accounts, the following classification rules must be followed:
|
Account Classifications |
||||
|
Acct # |
Description |
Natural Balance |
Increase |
Decrease |
|
1000 |
Assets |
Debit |
Debit |
Credit |
|
2000 |
Liabilities |
Credit |
Credit |
Debit |
|
3000 |
Capital |
Credit |
Credit |
Debit |
|
4000 |
Sales |
Credit |
Credit |
Debit |
|
5000 |
Cost of Sales |
Debit |
Debit |
Credit |
|
6000 |
Expenses |
Debit |
Debit |
Credit |
|
7000 |
Expenses |
Debit |
Debit |
Credit |
|
8000 |
Expenses |
Debit |
Debit |
Credit |
|
9000 |
Expenses |
Debit |
Debit |
Credit |
Within these classifications, assign account numbers and descriptions. For example, include up to 4,000 expense accounts, each of which must be numbered in the range 6000...9999. It is important to understand that every business is slightly different, with different assets, liabilities etc. Although Trams Back Office comes with a default Chart of Accounts, time must be spent tailoring these accounts for the business before implementing the General Ledger.
The accounts listed below are accounts automatically updated by Trams Back Office when creating End of Period, standard, and Year End journal entries. These accounts numbers and descriptions should be modified with caution, and if changed, update the table found in Utilities|Setup|Gl Accounts if the End of Period journal entry is to be used in Trams. Following is an explanation of each:
|
Account Definitions |
||
|
1000 & 1005 Default Cash In Bank accounts. |
Trams Back Office can integrate up to 100 Check Registers into the General Ledger through the End of Period journal entry. Each Check Register established in Utilities|Setup|Bank Accounts should have a corresponding General Ledger account set up within the General Ledger. To identify which Check Register corresponds to which General Ledger account, update the area called Bank Accounts in GL setup screen under the Utilities|Setup|G/L Accounts menu options. |
|
|
1100 Default Client Balances Account |
Trams Back Office maintains all client balances in one management report called Client Balances. Because of this, one corresponding GL account is maintained within the General Ledger. If this corresponding account is changed from the default account, update Client Balances in GL Setup screen under the Utilities|Setup|G/L Accounts menu options. |
|
|
2000 Default Vendor Balances Account |
Trams Back Office maintains all vendor balances in one management report called Vendor Balances. Because of this, one corresponding GL account is maintained within the General Ledger. If this corresponding account is changed from the default account, update Vendor Balances in GL Setup screen under the Utilities|Setup|G/L Accounts menu options. |
|
|
2010 Default ARC/BSP Balances Account |
Trams Back Office maintains all ARC/BSP balances in one management report called ARC/BSP Balances. Because of this, one corresponding GL account is maintained within the General Ledger. If this corresponding account is changed from the default account, update ARC/BSP Balances in GL Setup screen under the Utilities|Setup|G/L Accounts menu options. |
|
|
3200 Retained Earnings |
When doing a Year End, the total of all the 4000, 5000, 6000, 7000, 8000, and 9000 accounts are put into Retained Earnings and these accounts are set to 0. |
|
|
4000-4060 5000-5060 Default Sales and Cost of Sales Accounts |
A table located in Utilities|Setup|Travel Types allows users to classify sales activities into categories. Each category established in the Travel Type table should have a corresponding Sale and Cost of Sales account within the General Ledger. If these Travel Types are modified, update the General Ledger accounts so that each new Travel Type has a corresponding GL account, and then update the GL setup. Note: If the setting Commission Income is chosen under Utilities|Setup|Global Defaults, the table must also have a corresponding Commission Income account for each Travel Type. Accounts are 4000 series account numbers. |
|
|
Account Types |
||
|
Detail Accounts |
All Detail accounts are treated individually on the Detail General Ledger reports. If a Detail account's number is within the range specified for a Summary account, its balance can also be reflected as part of that Summary's account balance on all Summary General Ledger reports. |
|
|
Summary Accounts |
Summary accounts are used for summarizing a range of Detail accounts and cannot have balances posted to them. If a Summary General Ledger report is selected, it summarizes any account balances numbered within the Summary account's range. |
|
Add to the General Ledger Chart of Accounts
To add a to the existing Chart of Accounts:
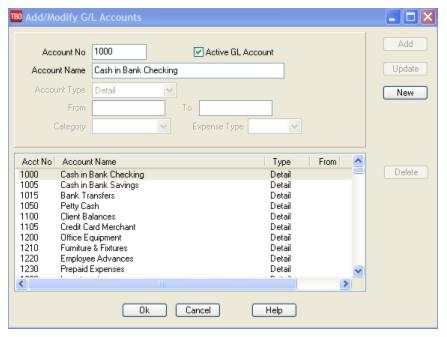
1. Click General Ledger|Accounts.
2. Click New then Account No field and type in the number of the General Ledger account being added. When using all the General Ledger features in Trams, the following series must be followed:
1000 = Assets
2000 = Liabilities
3000 = Capital
4000 = Sales
5000 = Cost of Sales
6000 - 9999 = Expenses
3. Leave the Active GL Account field checked.
4. In the Account Name field, type in the name of the account.
5. Click the arrow to the right of the Account Type field and choose Detail or Summary.
If adding a summary account, click the From and To fields and type in the account numbers to be summarized. Remember to include the summary General Ledger account in the range.
Note: There are two types of General Ledger accounts:
Detail: accounts to which Journal Entries are directed.
Summary: accounts used to total any detailed accounts falling under a designated range of account numbers.
For example:
6000 Telephone Summary Account
6005 Telephone - Local (Detail Account)
6010 Telephone - Long Distance (Detail Account)
6015 Telephone - Fax (Detail Account)
If there are multiple expenses for phone services, account numbers 6005, 6010, and 6015 are the detail accounts to which journal entries are directed. Account number 6000 would be the Summary account which totals the balances from the range of account numbers 6000 through 6015.
6. Click Add to add the account to the list.
7. Once all accounts are added, click OK to save.
|
Fly Away Travel wants to add an expense account for “Employee Fam Trips.” They create an account 6261 by Clicking New then entering the Account No. and the Account Name, then clicking on Add. |
Note: The fields Category and Expense Type are used for Financial Modeling. Please refer to the Financial Modeling chapter for more detail.
Account Status
Indicate a status of active or inactive on the general ledger accounts by selecting the main General Ledger menu, then Accounts. Highlight the account and click the Active GL Account. When the checkmark is showing, the account is active and can be updated with a journal entry. When the checkmark is not showing, the account is dimmed and cannot be accessed or updated with a journal entry from a payment screen or general ledger Journal Entry. This provides continuity in the General Ledger and avoids entries to old accounts.
|
Aloha Travel Center set up a general ledger expense account for their tenth anniversary office party. After the bills were reconciled, the account was marked inactive preventing any further journal entries to this account. |
Modifying General Ledger Chart of Accounts
General Ledger accounts can be renamed or they can be deleted if the account does not have activity attached to it. If an account can not be deleted, deactivate by removing the check mark from the box, Active GL Account.
To Delete a General Ledger Account
1. Click General Ledger|Accounts.
2. Click the account being deleted to highlight it and click Delete.
3. Trams Back Office prompts, “Delete Record? Click YES.
4. Once all accounts are deleted, click OK to save.
To Rename a General Ledger Account
1. Click General Ledger|Accounts.
2. Click the account being modified to highlight it. Click the Account Name field and type in the new account name. Click the Update button to store the change.
3. Once all accounts are updated, click OK to save.
To Deactivate a General Ledger Account
Deactivate an account when it is longer wanted, but there is journal entry history attached to the account that is needed.
1. Click General Ledger|Accounts.
2. Click the account being deactivated to highlight it and the Active GL Account box to remove the check mark. Click the Update button to store the change.
3. Once all accounts are updated, click OK to save.
Note: Inactive accounts maintain their balances and print on Financial Statements. It is suggested to zero out the account balance before making the account inactive.
To Activate a General Ledger Account
1. Click General Ledger|Accounts.
2. Click on the account being activated to highlight it and click the Active GL Account box. This places a check mark in the box. Click the Update button to store the change.
3. Once all modifications have been made, click OK.
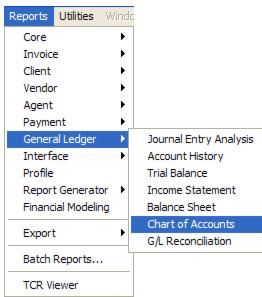
Chart of Accounts Report
Click Reports|General Ledger|Chart of Accounts. Trams Back Office prompts, “Only Active GL Accounts? Yes or No.” Choose YES to see only live accounts. Choose NO to see all accounts.
Once the report appears on the screen, click the printer icon.
Chart of Accounts Report
Set Up General Ledger Accounts
Before setting up the GL Accounts, first set up the Travel Types table and Chart of Accounts (see sections Travel Types and Setting Up Chart of Accounts this Chapter).
1. Click Utilities|Setup|GL Accounts.
2. Match the Sales and Cost of Sales accounts from the Chart of Accounts to each Sales and Cost of Sales account for each Travel Type on the General Ledger Accounts Setup table. Each Travel Type needs a separate Sales and Cost of Sales account number.
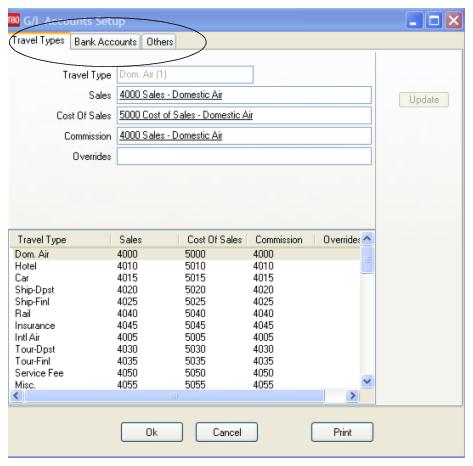
(Exception: If the Comm Track Payments in EOP field in the Global Defaults is set to Commission Income, there will also have to be a Commission Income account for each travel type.)
3. Next, while still under Utilities|Setup|GL Accts, click the Bank Accounts tab.
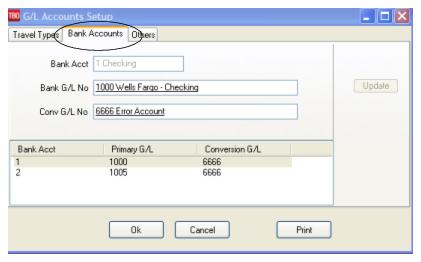
4. Match the Bank Account numbers (1, 2, 3, etc.) to their corresponding General Ledger accounts (1000 series). If the bank account is not a foreign account, the conversion field is not needed. Therefore, type in "6666" as the account number for this field.
5. While still under Utilities|Setup|GL Accts, click the Others tab.
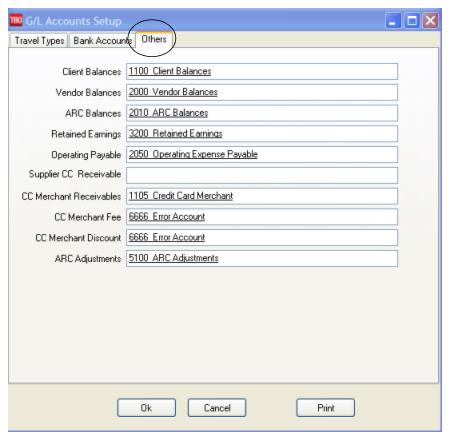
6. Match the Client Balance, Vendor Balance, ARC/BSP Balance, etc. to their corresponding General Ledger accounts. If NOT using the CC Merchant Receivables account, type in “6666” as the account number for this field.
Set Up Prompt Tab in Global Defaults
Choose a start date to enter beginning balances, usually the beginning of a month or quarter. On that start date, go to Utilities|Setup|Global Defaults and click on the Prompt tab. Under the Journal Entry Prompting tab, indicate to Trams Back Office how interact with the program by selecting one of these settings.
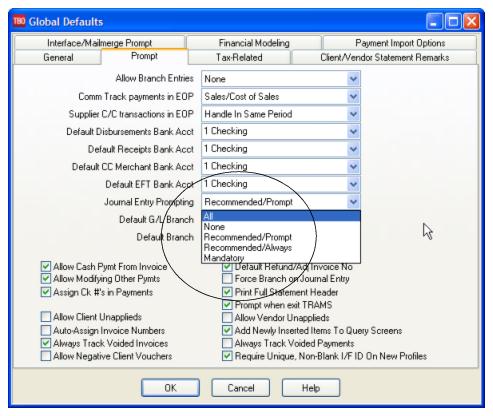
1. All - Trams Back Office will prompt to create a journal entry for any payment received or made.
2. None - There are no prompts for the journal entry at the time of payment. While using this option, the only way to journalize a payment is by selecting General Ledger, then journal entry from the main menu.
3. Recommended/Prompt - Trams Back Office prompts to create a journal entry when payments are received or made with a pay method of Other or a profile type of Other.
4. Recommended/Always - Trams Back Office automatically displays a journal entry screen when payments are received or made with a pay method of Other or a profile type of Other. This option enters the first general ledger account necessary to fill in the journal entry. Supply the offset account to finish the journal entry. This is Trams Back Office recommended setting.
5. Mandatory - Trams Back Office requires a journal entry before the payment can be saved.
NOTE: Do NOT use setting #1or #2 if using the General Ledger in the recommended manner.
Set Up Client/Vendor Balances Core Reports
Client Balances prior to the start of Trams Back Office need to be entered into the Trams Back Office program. When client payments are received, an invoice will be present in Trams Back Office in order to apply payments. Client Balances are entered in Trams Back Office by creating invoices. Agencies have two choices when entering prior Client Balances. By using Method One, enter each invoice individually with complete Client, Vendor and Agent details which ensure accurate Client and Agent Statements, and Vendor detailed reports. Or create a separate invoice for each Client Balance using the “short cut” Method Two below. Be aware that by using this method; however, may stop the program’s flexibility resulting in inaccurate Client and Agent Statements, and Vendor detailed reports.
From Previous Back Office System, run:
- Client Balance Report (Accounts Receivable)
- Vendor Balance Report (Accounts Payable)
- Income Statement (Profit/Loss Statement)
- Balance Sheet
- Trial Balance
Set Up Client Balance Report
- In Trams run Report/Core/Client Balancesin detail using date one day prior to the start-up date
- Compare to previous system Client Report and note differences.
- Make any entries in Trams Back Office to correct report (see directions below). Remember to include unapplied balances!
- Rerun Client Balance Report in detail using date one day prior to the start-up date. Verify that all balances match the report from the previous system.
Set Up Vendor Balance Report
Vendor balances prior to the start of Trams Back Office need to be entered into the Trams Back Office program. When payments are made to Vendors, an invoice will be present in Trams Back Office in order to apply payments. First steps for setting up the Vendor Balances:
- *In Trams run Report/Core/Vendor Balances in detail using date one day prior to the start-up date.
- *Compare to previous system Vendor Balance Report and Note differences.
- *Make any entries in Trams Back Office to correct report (see directions below). Remember to include unapplied balances.!
- *Rerun Vendor Balance Report in detail using date one day prior to the start-up date. Verify that all balances are correct.
Creating Separate Invoices for Each Client/Vendor Balance - Method One
1. Click on Invoices|Sale.
2. To create Client Balances - Enter all invoice details pointing to the correct client, agent and vendor profiles for all client outstanding balances. Use the correct issue date of the invoice. Make sure the Submit To is properly set to ensure Client Balances for invoices is correct.
3. To create Vendor Balances - Enter all invoice details, pointing to the correct client, agent and vendor references for all vendor outstanding balances. Use the correct issue date of the invoice. Make sure the Submit To is properly set to ensure Vendor Balances for invoices is correct.
4. Go to Reports|Core and run a Client Balance Report and a Vendor Balance Report with dates set one day prior to the startup date.
5. Compare the Core Reports to the previous accounting system’s Account Receivable and Accounts Payable.
6. Since creating an Invoice creates a Client balance and Vendor Payable which may have been paid prior to starting Trams, write off any outstanding balances by using directions below.
7. Add any unapplied balances by following directions below.
8. WHEN COMPLETING ENTERING ALL INVOICES AND UNAPPLIED BALANCES (and have done write-offs, if necessary), DON’T FORGET TO RERUN THE CLIENT BALANCE CORE REPORT WITH DATES SET ONE DAY PRIOR TO THE START-UP DATE TO MAKE SURE THE BALANCES ARE ACCURATE.
Remove/Write Off a Previous Client Balance
When setting up the Core Report, remove/write off a previous Client Balance by:
1. Go to Payments|Received.
2. Enter the Amount of invoice to be removed/written off.
3. Use the Payment Date of one day prior to the start-up date.
4. Choose Payment Method of OTHER.
5. Under Remarks, type “Prior Receivable Write-off”.
6. In the Name field, enter the Client Name.
7. Toggle the invoice closed by clicking Toggle Close.
8. Do NOT create a Journal Entry when prompted. (When the GL is set up, create a JE and write it off to a bad debt account which is usually a 6xxx account.)
Remove/Write Off an Old Vendor Balance
When setting up the Core Report, remove/write off a previous Vendor Balance by:
1. Go to Payments|Made.
2. Enter the Amount of Invoice to be removed/written off.
3. Use the Payment Date of one day prior to the start-up date.
4. Choose Payment Method of OTHER.
5. Under Remarks, type “Prior Payable Write-off”.
6. In the Name field, enter the Vendor Name.
7. Toggle the invoice closed by clicking Toggle Close.
8. Do NOT create a Journal Entry when prompted. (When the GL is set up, create a JE and write it off to a bad debt account which is usually a 6xxx account.)
Set Up an Unapplied Client Balance
1. Go to Payments|Received.
2. Enter the Amount Client paid on account.
3. Use the Payment Date of one day prior to the start-up date.
4. Under Remarks, type “Prior Receivable”.
5. In the Name field, enter the Client Name. Trams prompts to build a new profile if it does not find a match. Note: If creating a new Client Profile, make sure to add an Interface ID #.
6. TBO prompts to create a Voucher. Click Yes and Click OK.
Set Up an Unapplied Vendor Balance
1. Go to Payments|Made.
2. Enter the Amount of the Vendor Balance on account.
3. Use the Payment Date of one day prior to the start-up date.
4. Under Remarks, type “Prior Payable”.
5. In the Name field, enter the Vendor Name. Trams prompts to build a new profile if it does not find a match. Note: If creating a new Vendor Profile, make sure to add an Interface ID #.
6. Trams prompts to create a Voucher. Click Yes and Click OK.
Create Invoices in Detail w/Shortcut Method Two
Client Balances are entered in Trams by creating invoices. Create a separate invoice for each Client Balance. Click on Invoices|Sale.
1. In the Invoice # field, type in the invoice number of the unpaid invoice.
2. The Issue Date is the date prior to the start-up date, e.g.12/31/xx if the start-up date is 01/01/xx.
3. In the Remarks field, type in Prior Receivable or any other free flow information.
4. In the Name field, enter the Client Name. Trams prompts to build a new profile if it does not find a match. Note: If creating a new Client Profile, make sure to add an Interface ID #.
5. Click OK to process.
6. Change the Submit To field to Supplier.
7. In the Vendor Name field, type in Prior Client Balances. Trams prompts to create a new profile if it does not find a match.
8. In the Total Fare field, type in the amount owed.
9. The Taxes/Rate and Commission/Rate fields are 0.00.
10. Click No on the prompt “Enter a payment for this invoice?”
Since creating a Receivable also creates a Payable, enter a Payment Made to close off all the Vendor Balances now contained in the Profile, “Prior Client Balances.”
1. Click Reports|Core|Vendor Balances.
2. In the As Of field, enter the date. The date should be one day prior to the start date.
3. Change the Format field to Summary, then click OK to process.
4. Find the Balance Due total for the profile Prior Client Balances and make a Note of the balance.
5. Next, click Payments|Made.
6. In the Amount field, type in the total amount of the Prior Client Balances Noted from the Vendor Balance report.
7. Change the Payment Method to Other.
8. The Pay Date is one day prior to the start date.
9. Leave the Check/CC No field blank.
10. Leave the Payment Code field blank.
11. Leave the Payment Group field blank.
12. In the Remark field, type “To Close Prior Payable.”
13. Change Profile Type to Vendor-Supplier.
14. In the Name field, type “Prior Client Balances.”
15. Click OK to display open invoices. Click Close All. Click OK to save.
16. Trams prompts, “Create a Journal Entry? Click NO.
Set Up an Unapplied Client Balance
1) Go to Payments|Received.
2) Enter the Amount Client paid on account.
3) Use the Payment Date of one day prior to the start-up date.
4) Under Remarks, type “Prior Receivable”.
5) In the Name field, enter the Client Name. Trams prompts to build a new profile if it does not find a match. Note: If creating a new Client Profile, make sure to add an Interface ID #.
6) TBO prompts to create a Voucher. Click Yes and OK.
Remove/Write Off a Prior Client Balance
1) Go to Payments|Received.
2) Enter the Amount of Invoice to be removed/written off.
3) Use the Payment Date of one day prior to the start-up date.
4) Choose Payment Method of OTHER.
5) Under Remarks, type “Prior Receivable Write-off”.
6) In the Name field, enter the Client Name.
7) Toggle the invoice closed by clicking Toggle Close.
8) Do NOT create a Journal Entry when prompted. (Note: After the GL has been set up, write off a client balance using these directions with this current date, but you need to create a Journal Entry to credit Client Balances and debit a bad debt, agent error, or misc. adjustment account setup in the 6000’s or expense accounts.)
WHEN COMPLETING ENTERING ALL INVOICES AND UNAPPLIED BALANCES (and have done write-offs, if necessary), DON’T FORGET TO RERUN THE CLIENT BALANCE CORE REPORT WITH DATES SET ONE DAY PRIOR TO THE START-UP DATE TO MAKE SURE THE BALANCES ARE ACCURATE.
Set Up Vendor Balances - w/Shortcut Method Two
Vendor balances are entered in Trams by creating invoices. Create a separate invoice for each vendor balance.
Note: If creating a new vendor profile, make sure to add an Interface ID #.
1. Click Invoices|Sale.
2. In the Invoice # field, type in the invoice number of the unpaid invoice.
3. The Issue Date is the date prior to the start-up date, e.g. 12/31/11 if the start-up date is 01/01/12.
4. In the Remarks field, type in Prior Payable or any other free flow information.
5. In the Name field, type Prior Vendor Balances. Trams prompts to create a new profile. (Don’t forget Interface ID!)
6. Click OK to process.
7. Change the Submit To field to Supplier.
8. In the Vendor Name field, enter the name of the vendor to be paid.
9. In the Total Fare field, type in the amount owed.
10. Click No on the prompt “Enter a payment for this invoice?”
Since creating a Payable also creates a Receivable, enter a Payment Received to close off all the Client Balances now contained in the Profile, “Prior Vendor Balances.”
1. Click Reports|Core|Client Balances.
2. In the As Of field, type in the date. The date should be one day prior to the start date.
3. Change the Format field to Summary, then click OK to process.
4. Find the Balance Due total for the profile Prior Vendor Balances and make a Note of the balance.
5. Next, click Payments|Received.
6. In the Amount field, type in the total amount for Prior Vendor Balances, Noted from the Client Balance report.
7. Change the Payment Method to Other.
8. The Pay Date is one day prior to the start date.
9. Leave the Check/CC No field blank.
10. Leave the Payment Code field blank.
11. Leave the Payment Group field blank.
12. In the Remarks field, type “To Close Prior Receivable.”
13. Change Profile Type to Client.
14. In the Name field, type in Prior Vendor Balances.
15. Click OK to display open invoices. Click Close All. Click OK to save.
16. Trams prompts, “Create a Journal Entry?” Click NO.
Set Up an Unapplied Vendor Balance
1. Go to Payments|Made.
2. Enter the Amount of the Vendor Balance on account.
3. Use the Payment Date of one day prior to the start-up date.
4. Under Remarks, type “Prior Payable”.
5. In the Name field, enter the vendor Name. Trams prompts to build a new profile if it does not find a match. Note: If creating a new Vendor Profile, make sure to add an Interface ID #.
6. Trams prompts to create a voucher. Click Yes and OK.
Remove/Write Off a Prior Payable Vendor Balance
1. Go to Payments|Made.
2. Enter the Amount of Invoice to be removed/written off.
3. Use the Payment Date of one day prior to the start-up date.
4. Choose Payment Method of OTHER.
5. Under Remarks, type “Prior Payable Write-off”.
6. In the Name field, enter the Vendor Name.
7. Toggle the invoice closed by clicking Toggle Close.
8. Do NOT create a Journal Entry when prompted. (Note: After the GL has been setup, write off a vendor balance using these directions with the current date, but you need to create a Journal Entry to debit Vendor Balance account and credit a bad debt, agent error, or misc. adjustment account setup in the 6000’s or expense accounts.)
Adding a Negative Payable or Vendor Receivable
To enter Cruises, Tours, etc. paid by credit card (where commission is due), a Sale Invoice is created:
1. Go to Invoice|Sale and enter invoices (using Method One as outlined in Setting Up Client Balances Core Report).
2. Click Yes on the prompt “Enter a payment for this invoice?”
3. Enter credit card number.
4. Repeat for each Negative Payable.
WHEN COMPLETING ENTERING ALL INVOICES AND UNAPPLIED BALANCES (and have done write-offs, if necessary), DON’T FORGET TO RERUN THE VENDOR BALANCE CORE REPORT WITH DATES SET ONE DAY PRIOR TO THE START-UP DATE TO MAKE SURE THE BALANCES ARE ACCURATE.
Set Up the ARC/BSP Core Report
ARC/BSP balances prior to the start of Trams, need to be calculated and entered into Trams Back Office. Then when ARC/BSP withdrawals take place, the unsettled ARC/BSP Net Remits are present in the ARC/BSP General Ledger Account.
ARC/BSP Settlement if there is Old Data or Converted Data in TBO
1. Select Payment|ARC(BSP) Settlement.
2. Leave the Amount field and Payment Type set at the default, but change the Payment Method to OTHER.
3. For the ARC/BSP Settlement Date, use date of Sunday prior to the cutover date.
4. Type in “To Start Trams” in Remarks field.
5. For the ARC/BSP Period, input the earliest possible date of invoices included in the settlement in first field and use the date of the Sunday prior to the cutover date in the To field. Click OK.
6. Once inside the settlement feature, note the amount of the invoices at bottom of settlement screen and input this into the Amount field on the top and indicate the Payment Type (Received From or Paid To) at this time.
7. Click on Close All and click OK to process. DO NOT CREATE A JOURNAL ENTRY WHEN ASKED.
8. Now go to Reports|Core|ARC or BSP and run report with dates set one day prior to the startup date. Make sure this total agrees with previous system’s total. Retain this amount to enter into General Ledger (see next section, General Ledger Setup).
Only the interfacing of new records starts building the ARC/BSP Core Report for use after the StartUp Date. Do the ARC/BSP Settlement when received to reconcile the bank account and close off items on ARC Core Report.
For Clients Who Do Not Have Old/Converted ARC/BSP Data
1. A different way to determine the ARC/BSP balance as of the end of that month is to determine the last draft or deposit in that month from ARC/BSP and what ARC/BSP week that pertained to. The week following that week is still open.
2. Total up ARC/BSP invoices that belong to the ARC/BSP week prior to the startup date. Retain this amount to enter into the General Ledger (see next section, “General Ledger Setup”).
First ARC/BSP Settlement: If Payments were Made to ARC/BSP
1. Select Payments|Made, choose Cash as the Payment Type, Type “First ARC/BSP Settlement” in the Remarks field.
2. Choose profile type of “Other,” and the Name, “ARC/BSP Balances.”
3. If ARC/BSP was paid, when the journal entry comes up, Credit the correct Bank Account, and Debit the ARC/BSP Balances account. Click OK.
First ARC/BSP Settlement: If Payments were Received from ARC/BSP:
1. Select Payments|Received, choose Cash as the Payment Type, Type “First ARC/BSP Settlement” in the Remarks field.
2. Choose profile type of “Other,” and the Name, “ARC/BSP Balances.”
3. If the agency received money from ARC/BSP, Debit the correct Bank Account and Credit the ARC/BSP Balances Account. Click OK to save.
Only the interfacing of new records starts building the ARC/BSP Core Report for use after the startup date. From this point onward, do the ARC/BSP Settlement when received to reconcile the bank account and close off items on ARC/BSP Core Report.
Set Up the Check Register Core Report and Bank Reconciliation
To begin using the Check Register and to set up the Bank Reconciliation, prepare the following information:
- The check register balance from the checkbook as of one day prior to the start date. Example: If starting the check register 1/1/12, the ending balance from 12/31/11.
- The ending balance from the prior month's Bank Statement. i.e.: The Bank Statement from 12/31/xx.
- A list of all outstanding items that have not cleared the bank as of the bank statement’s date. Include all deposits, checks and withdrawals. Note: Deposits can include EFT (Electronic Fund Transfer) Deposits not yet cleared the bank, including agency processed credit card transactions (CC Merchant). Withdrawals can include EFT Withdrawals not yet cleared the bank, including scheduled EFT expense withdrawals.
|
|
A list of all outstanding items that have not cleared the bank as of the bank statement’s date. Include all deposits, checks and withdrawals. Note: Deposits can include EFT (Electronic Fund Transfer) Deposits not yet cleared the bank, including agency processed credit card transactions (CC Merchant). Withdrawals can include EFT Withdrawals not yet cleared the bank, including scheduled EFT expense withdrawals.
|
To help gather the information needed, complete the information below:
Bank Statement Ending Balance _____________________________
Total of Outstanding Checks - _____________________________
Total of Outstanding Withdrawals - _____________________________
Total of Outstanding Deposits + _____________________________
Ending Balance = _____________________________
1. Click Reports|Core|Check Register.
2. In the From and To fields, enter the date one day prior to the start date. (e.g., From: 12/31/11, To: 12/31/11)
3. The Bank Acct field should be the corresponding bank account number (1, 2, 3, etc.). To change the default, type in the new number, or click the arrow next to the field to see the list.
4. Leave Bank Reconciliation field to the default set to All. Click Preview to process. Note the Ending Balance at the end of the report.
5. To zero out the Ending Balance enter a Withdrawal (Payments|Withdrawal) if the amount is positive or enter a Deposit (Payments|Deposit) if the amount is negative.
Note: The date of the Deposit or Withdrawal is one day prior to the start date (or one day prior to the statement end date). In the Remark field type, “To zero out acct.”
6. Enter the Ending Balance from the bank statement by creating a Deposit if the amount is positive or a Withdrawal if the amount is negative. The date of the entry should be one day prior to the start date. In the Remark field, type “Bank Statement Balance.”
7. Next, click Payment|Reconciliation|Bank Reconciliation.
8. Click Clearing Date and enter the date one day prior to the start date.
9. Leave Stmt Ending Balance blank.
10. Click OK to process.
11. Trams shows a list of payment items (Deposits, Withdrawals and Checks). Click Clear All to mark all items as cleared. Click OK to save.
12. Trams prompts, “(Number) Payment(s) Will be Marked Cleared and (Number) Payment(s) Will be Marked Uncleared. Continue? Yes or No.” Click YES.
13. Next, enter the list of all outstanding deposits, withdrawals and checks under Payments with actual dates as long as they are at least one day prior to the start-up date. DO NOT CREATE A JOURNAL ENTRY WHEN PROMPTED.
14. Once all outstanding items are entered, click Reports|Core|Check Register and print as of one day prior to the start date, with Bank Reconciliation set to All. Verify that the checkbook balance is correct.
Entering Opening Balances
We recommend that Core Reports be set up in Trams Back Office prior to entering General Ledger opening balances. Opening Balances reflect the current state of the agency’s financial position the day prior to the General Ledger start date in Trams. Obtain opening balances from the agency’s accountant, or from the Trial Balances from the prior bookkeeping system.
IMPORTANT! Opening Balances don’t have to be entered in Trams Back Office to use the General Ledger. However, an end a period in Trams Back Office CANNOT BE CLOSED without the opening balances.
Set Up General Ledger
The General Ledger does not need to be “turned on” because it is always active. Print monthly financial reports at any time without putting in the beginning balances. However, if accurate financial reports are wanted year-to-date, it is required that the General Ledger be set up with accurate beginning balances and then balance the General Ledger on a monthly basis.
1. Before beginning, establish the Four Core reports as described in previous section. After establishing the Core Reports, there is a solid foundation on which to build the General Ledger.
2. Determine the General Ledger implementation date, e.g.01/01/xx.
3. Get the General Ledger ending balances from the previous accounting program, manual bookkeeping records, or the agency accountant. The balances need to be from the day prior to the implementation date. (e.g. if the implementation date is 01/01/12, balances are from 12/31/11.)
Note: It is not necessary to have the General Ledger ending balances to implement the General Ledger as long as the Four Core reports are accurate.
4. The Travel Types table, General Ledger Accounts table, and the Chart of Accounts should all correspond. The Chart of Accounts should have a Sales and Cost of Sales account for each travel type listed in the Travel Type table. The General Ledger Accounts table should coincide with both the Chart of Accounts and Travel Type table. (For additional information on setup procedures for these tables, see General Ledger Accounts Setup below.)
5. Click Reports|General Ledger|Trial Balance and print the Trial Balance report. Enter the As Of date as one day prior to the General Ledger start date, e.g. 12/31/xx. Verify that the Pseudo Post box is selected. Click Preview to view to the screen (or click Print to send directly to the printer without viewing first). Once the report is displayed on the screen, click the Printer icon to print. Check the report for any accounts with balances. If there are accounts with balances, proceed to step 6 to zero out balances, in order to start with a clean General Ledger. If the account balances on the Trial Balance are zero, skip to step 7.
6. To zero out account balances on the Trial Balance report, click General Ledger|Journal Entry and create a journal entry to reverse them. Enter the Activity Date as the day prior to the implementation date. In Remarks field, type in “To Zero Out General Ledger.” In the Account Name & Number field, enter the Account Name or Number or click the arrow to choose from the list. Enter the amount as the opposite of how it appears on the Trial Balance report. (e.g. Account 2000 shows a credit of $400.00 on the Trial Balance. The journal entry will be a debit of $400.00 to account 2000.) Once all accounts are entered and debits and credit equal, click OK to save. After reversing all balances, print a new Trial Balance, with Pseudo Post selected. The report should now be zero. If it is not, repeat steps 4 and 5.
7. Print the Four Core Reports as of the day prior to the implementation date. Verify that the Core report balances match the ending balances from the accountant or prior bookkeeping system.
8. Enter new beginning balances in the General Ledger by clicking General Ledger|Journal Entry. Enter the Activity Date as the day prior to the implementation date. In the Remarks field, type in “Beginning Balances.” In the Account Name & Number field, enter the Account Name or Number, or click the arrow to select from the list. Enter the Amount in the Debit or Credit column. If entering balances from a previous accounting system or from the accountant, copy the information line by line. If entering Core Report balances only, see below.
9. From the Check Register report, enter the Ending Balance into the Cash in Bank account. (1000 series number) If the ending balance on the Check Register report is positive, enter the amount in the debit column. If the ending balance is negative, enter the amount in the credit column.
10. From the Client Balances report, enter the Balance Due total into the Client Balances account. (1000 series number) If the report total is a positive amount, enter in the amount in the debit column. If the report total is negative, enter in the credit column.
11. From the Vendor Balances report, enter the Balance Due total into the Vendor Balances account. (2000 series number) If the total is a positive amount, enter in the amount in the debit column. If the total is negative, enter in the amount in the credit column.
12. For the ARC/BSP Balances, enter the Net Remit balance into the ARC/BSP Balances account. (2000 series number) If the ARC/BSP Balance is positive, (ARC/BSP owes the agency) enter in the debit column. If the ARC/BSP Balance is negative, (ARC/BSP is owed) enter in the credit column.
13. To balance the journal entry, put the difference between the debits and credits in the 3999 - Suspense Account. Set this account up if it does not already exist. (See Add To the General Ledger Chart Of Accounts in this chapter.)
14. Once all accounts are entered and debits and credits equal, click OK to save. If debits and credits do not balance, go back and check all the amounts in the journal entry against all the amounts from the previous Balance sheet.
15. Now print the Trial Balance Report and compare against the Four Core reports and verify that they are all in balance.
16. Finally, once having verified the General Ledger amounts are in balance, Post the journal entry to the General Ledger. This makes it permanent. To post, click General Ledger|Posting. In the Latest Posting Date field, enter date as the day prior to the implementation date. (i.e.12/31/04)
NOTE: Once the journal entry has been posted, print a final copy of the Four Core Reports and the Trial Balance report to keep in the agency files.
From this point forward maintain the General Ledger on a monthly basis by balancing the General Ledger to the Four Core reports. (See Maintaining the General Ledger below.)
Suggested General Ledger Procedures
1. ARC/BSP Balance Report
- Enter sales and payment information on a daily basis.
- Submit the report weekly to ARC/BSP.
- Reconcile the ARC/BSP Settlement each week.
2. Client Balances Report
- Enter sales and payment information on a daily basis.
- View on a regular basis and review for accuracy.
3. Vendor Balances Report
- Enter sales and payment information on a daily basis.
- View on a regular basis and review for accuracy.
4. Check Register Report
- Enter Deposits, Withdrawals and Checks on a daily basis.
- Balance and reconcile against the Bank Statement each month.
Daily Routine
1. Capture Sale and Refund Invoices (manual or interface). Enter all adjustment invoices such as debit/credit memos.
2. Enter Receipts and balance the Bank Deposit:
a) Enter each separate receipt under Payments|Received. (If there is information available, consider entering any EFT (Electronic Fund Transfer) or Direct Deposit receipts for the day. As these type transactions hit the Check Register directly, these items are not included in the daily deposit to the bank.)
b) Under Payments|Deposits, verify the date for which the deposit is being done and Query for the receipts to be included in the Deposit.
c) Verify the receipts that are included are receipts actually going to be deposited in the bank.
d) Print 2 deposit slips - one for the agency records and one for the bank.
3. Print a copy of a Receipts Report (Reports|Payments|Receipts) for all Cash/Check receipts for each bank account for the day. Balance the total on the report to the bank deposit slip. Attach the report to the agency copy of the deposit slip and file.
4. Enter all agency disbursements in Payments|Made.
5. Run the Four Core Reports and review for errors: Client Balances, Vendor Balances, ARC/BSP Reconciliation and Check Register.
6. Run the G/L Reconciliation Report to catch any G/L errors daily.
7. Backup files (Utilities|Backup)!
Weekly (ARC/IAR Sales Report/Reconciliation) Routine
Step 1. Check that the data in the IAR Sales Report matches data in Trams Back Office by one of three methods:
a) Method One: Run a list of all invoices captured in Trams by going into Reports|Invoice|Analysis and verifying that all invoices for the week are accounted for in Trams. Then, run a list of all tickets captured in Trams by going into Reports|Invoice|ARC/BSP Reconciliation and verifying that all tickets issued for the week are accounted for in Trams, and be sure to set ticket status to ALL.
b) Method Two: Download the IAR file from the IAR website. Go to Reports|Invoice|IAR Reconciliation and click the IAR File button to point to the path of the downloaded .txt file obtained from the IAR website. Print out an Exception Report which points out differences between what was submitted to IAR and Trams Back Office.
c) Method Three: Download the IAR file from the IAR website.
-- Go to Payments|ARC Settlement.
-- Query for the week’s ARC tickets so they are displayed on the settlement screen.
-- Click IAR Reconciliation on the ARC Settlement screen.
-- Click IAR Filename and map to the weekly IAR file.
-- Click Query to see the standard IAR Reconciliation Report.
-- For tickets where Net Remit Do Not Match, Ticket Is Voided in IAR but Not in Trams, or Missing IAR Ticket, click Find Ticket and the cursor lands on the appropriate ticket on the ARC Settlement screen so Edit Invoice appears as normal.
-- For tickets that are Voided In Trams but Not In IAR, click Find Ticket to go to the booking containing that voided ticket in TBO, so it can be unvoided, allowing the ticket to now show correctly on the ARC Settlement Screen.
-- For any exceptions that are Missing Trams Ticket, click off the IAR Reconciliation screen, and manually add the missing tickets. If doing this method, no need to do Steps 2 and 4 below.
Note: This is the same IAR Reconciliation exception report that was only available before under Reports|Invoice|IAR Reconciliation. The IAR Reconciliation from the ARC Settlement screen works the same way and provides that same exception report, but now has linking ability to the tickets displayed on the ARC Settlement Screen.
Step 2. Enter any missing Refunds, Debit Memos, Voids, etc. so Trams Back Office agrees with IAR Sales Report.
Step 3. Enter and balance the ARC/BSP Settlement for the week under Payments|ARC Settlement. Do this by comparing the amount withdrawn to the amount Trams calculated as the Net Remittance amount for that ARC/BSP week. If the two numbers do not balance exactly, review the ARC/BSP Settlement section of this manual.
Step 4. Submit the IAR Sales Report.
If processing through ARC/IAR, complete the ARC Settlement right after submitting the IAR Sales Report.
Weekly (BSP Sales Report/Reconciliation)

Complete the BSP Settlement after Weekly Sales Summary has been received from BSP as amounts could be changed from what was submitted.
1. Print an Invoice Analysis Report (Reports|Invoice|Analysis) to verify all invoices issued during the week are entered in Trams.
2. Print a BSP Reconciliation Report (Reports|Core|BSP Reconciliation). Set the ticket status to ALL to verify all tickets issued for the week are entered in Trams.
3. Submit BSP Link report through the Internet. If necessary, print the BSP Report (Report|Invoice|BSP), set the Included Items to Manual, and mail it to the area bank.
4. If not using the BSP Link, print the BSP Report (Reports/Invoice/BSP) and mail it to the area bank with the auditors’ coupons from the tickets issued, or verify cash and credit card totals and period net remit if submitting the report through BSP Link.
5. Reconcile BSP’s Weekly Sales Summary Report by entering the amount of the BSP Withdrawal in Payments|BSP Settlement. Adjust each Trams entry to match BSP’s report and close all bookings paid for in that BSP period.
Weekly BSP HOT Reconciliation Routine
A BSP HOT Reconciliation can be found under Reports|Invoice|BSP Reconciliation. To receive a copy of the BSP Report in the HOT file format, contact:
www.IATA.org/customer
Trams Back Office compares the data in the HOT file to the information in Trams Back Office and generates an exception report which lists all the differences between the Trams Back Office data and the HOT file. Once the transactions on the exceptions reports have been addressed, the BSP Settlement routine can be completed. The Submit to field in the TBO booking must be set to BSP (for both BSP and Web bookings reported via BSP). For web booking exchange transactions, see additional information below.
Reconciliation Steps:
1. Download the HOT file from the IATA Web Site
2. In TBO, go to Reports/Invoice/HOT Reconciliation
3. Click the HOT File Button and browse to where the file was saved
4. Click the Preview Button
5. Reconcile the Exceptions that appear on the Exception Report
Sample Exceptions:
|
Ticket # |
Inv # |
Exception Reason |
|
7771113333 |
5589 |
Missing HOT Ticket – Ticket is not listed in the HOT file |
|
7771113358 |
5598 |
Missing TBO Ticket – Ticket is listed in the HOT file but cannot be found in TBO |
|
7771113362 |
5600 |
Remittance Amounts do not match – Commission amounts do not match |
|
7771113375 |
5612 |
Total Fares do not match – Ticket amount does not match total fare amount in TBO |
Non-automated air web booking exchanges (Air Canada, Westjet, etc.), must contain Trams Descriptor codes to properly flag the transaction as an exchange. The original ticket number must also be added to populate the original ticket field in the booking.
Examples (to be added in addition to other accounting line information):
*EXE – Even exchange
*EXA – Exchange with an add collect
*EXR – Exchange Refund
*OT – Original Ticket number
Sabre
ACOTH1/SUPPLY/DOC/P11/950.00/0/ALL/CK/*SBA*TT1*VCAC*EXE*OT7771113375
Worldspan
AC1-A*TT1*VCAC*EXE*OT7771113375
Apollo
T-MS9A*VCAC*TT1*CM10*CF123456*SG*EXE*OT7771113375
Amadeus
RM*9A*VCAC*TT1*CM10*CF123456*SG*EXE*OT7771113375
Monthly Checklist
1. Using Trams Back Office Bank Reconciliation routine under (Payments|Bank Reconciliation), balance the bank statement to the Trams Back Office check register. Print a copy of the Check Register for the month for ALL along with a second Check Register Report for Not Cleared, and staple it to the statement from the bank and file.
2. Create an End of Period journal entry (General Ledger|End of Period) for the month.
3. Print a trial balance. Compare the Management Summary Report balances to their corresponding General Ledger accounts and make sure they are the same. If not, print a GL Reconciliation (Reports|General Ledger|GL Reconciliation) to locate any possible errors. Note: There is a Total Base column on this report, The yield percentage is the commission divided by total base.
Optional: Run a Journal Entry Query with the Status set as Unposted. Run for an appropriate posted period, year-to-date of last posted period, last-year-to date of last posted period, etc., to view any unposted items that someone might have added or changed in a posted period. Verify or delete those items, post them, and run new monthly financials to reflect the changes made.
4. When (and only when) everything is in balance, post the journal entries made and print Financial Statements. Audit Trail reports could include Trial Balance, Income Statement, Balance Sheet, End of Period Reports, Account History, or Journal Entry Analysis.
TBO End of Period Reports
End of Period reports can be found under Reports|Batch Reports|Load.
1. Sales Activity Report: Select Reports|Invoice|Activity. Set Format to “Summary”, set Submit To as “ARC or BSP/Supplier” and set Invoice Status to “All.”
Trams uses this report to show what has been updated in the GL by the End of Period in Sales, Cost of Sales, Client Balances, Vendor Balances and ARC/BSP Balances. The ARC/BSP Adjustments account is also updated for Debit/Credit Invoices.
2. Sales Activity Report: Select Reports|Invoice|Activity. Set Format to “Summary”, set Submit To as “Comm Track” and set Invoice Status to “Closed.”
If Commission Track Payments in EOP under Utilities|Setup|Global Defaults is set to the Sales/Cost of Sales option, Trams uses this report to show what has been updated in the GL by EOP in Sales, Cost of Sales and Cash in Bank. If it is set to the Commission Income option, Trams updates Cash in Bank and Commission Income.
3. Receipts Report: Select Reports|Payments|Receipts. Set the Pay Method as “Credit Card” and set Received From as “Client.”
Trams uses this report to show what has been update by the EOP in Client Balances, Vendor Balances & ARC/BSP Balances.
4. Disbursements Report: Select Reports|Payments|Disbursements. Set the Pay Method to “Credit Card” and set Paid To as “Client.”
Trams uses this report to show what has been updated by EOP in Client Balances, Vendor Balances & ARC/BSP Balances.
5. Receipts Report: Select Reports|Payments|Receipts. Set the Pay Method to “Cash/Check/EFT” and set Received From as “Client.” Trams creates this report for each bank account. The system creates the report a second time with Received From set to “Vendor.”
Trams uses this report to show what has been updated by EOP in Cash, Client Balances & Vendor Balances. The Receipts Report also shows EOP updates in ARC/BSP Balances for EFT's from ARC/BSP.
6. Disbursements Report: Select Reports|Payments|Disbursements. Set the Pay Method to “Cash/Check/EFT” and set Profile Type as “Client.” Trams creates this report for each bank account. The system creates the report a second time with Paid To set to “Vendor.”
Trams uses this report to show EOP updates in Cash, Client Balances and Vendor Balances. The Disbursements Report also updates ARC/BSP Balances for EFT's to ARC/BSP.
7. Receipts Report: Select Reports|Payments|Receipts. Set the Pay Method to “CC Merchant” and set Received From as “Client.”
Trams uses this report to show EOP updates in Cash and the CC Merchant account.
8. Disbursements Report: Select Reports|Payments|Disbursements. Set the Pay Method to “CC Merchant” and set Paid To as “Client.”
Trams uses this report to show EOP updates to Cash and the CC Merchant account.
Additional End of Period Reports for BSP Users
At the end of each month, run the following reports to verify the amount of TAX to be paid.
1) Run an Invoice Activity Report by going to Reports|Invoice|Activity.
2) Compare the tax amounts on this report with the amounts in the Balance Sheet accounts created for these taxes (Reports|General Ledger|Account History).
3) When sending the quarterly check to pay the tax due, go to Payments|Made. Enter the amount of the tax due. Use the profile type "Other" that was created for these taxes and create the following journal entry:
Debit Credit
Cash in Bank 500.00
GST Payable 500.00
Summary
If the Core Reports are being successfully maintained, financial statements are easily obtained through Trams, provided opening balances have been correctly entered. It is important to provide these basic financial statements, as well as a detailed audit trail, to the agency accountant for review. In addition to the Income Statement and Balance Sheet reports, several audit trail reports, including the Account History report, are also available.
Note: The recommendations contained in this application Note are designed to allow the TramsBack Office system to produce information in a manner which Trams believes to be useful to a travel agency; however, Trams makes no representation or warranty that the recommendations, if applied, will conform to generally accepted accounting or auditing practices or principals or to any type of financial reporting requirements. To the extent that any reports generated by Trams Back Office are used for reporting purposes, including tax reporting, we strongly suggest to review these recommendations either with a certified public accountant or tax advisor, as applicable.
Maintain the GL & Balancing Core Reports to Trial Balance Report
Once the bank statement and all ARC/BSP reports for the month are reconciled:
1. Click General Ledger|End of Period and create the End of Period journal entry.
2. Print the Trial Balance Report. (Reports|General Ledger|Trial Balance)
3. Print the Management Summary Report and Note the balances for the following Core Report totals:
Client Balances
Vendor Balances
ARC Balances
Check Register
Note: There is a Total Base column on this report, The yield percentage is the commission divided by total base.
5. Each month, compare the Ending Balances of all Core Reports against the Trial Balance Report. The Core Reports and the Trial Balance Report should balance to the pennybefore posting occurs. If one or more of the Core Reports does not balance to the Trial Balance, print the GL ReconciliationReport.
a. Click Reports|General Ledger|GL Reconciliation.
b. Although not every entry on this report needs to be cleared off, the report gives the best idea of why the Trial Balance is out of balance. Check each item’s warning message. (For warning definitions see the manual under Reports|General Ledger|GL Reconciliation Report.) To make corrections, Void the End of Period first.
c. After making corrections, create the End of Period journal entry again.
d. Print the Core Reports again, along with the Trial Balance Report.
e. Verify that the Core Reports and the Trial Balance are now in sync.
6. When the Four Core Reports match the Trial Balance, go ahead and post. Posting to the General Ledger is permanent. Changes can no longer be made to the journal entries; however, adjusting journal entries can always be added to the period if needed. Click General Ledger|Posting and Post to the General Ledger.
GL Reconciliation Report
The GL Reconciliation report is used to aid in reconciling financial reports at the end of the month. It flags items that could possibly cause financials to be out of balance when compared against the Core reports.
- Select Reports|General Ledger|GL Reconciliation.
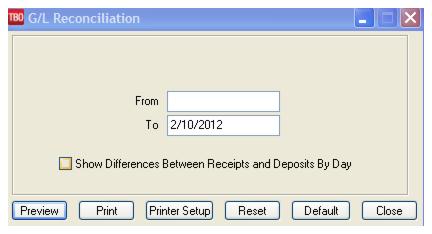
2. Type in the From and To dates for the period being reconciled.
3. Click Preview to view on screen. (Or click Print to send report directly to the printer without viewing.)
4. The report displays a list of items that may need correcting. Query each item and correct it if needed.
Possible GL Reconciliation messages are listed below.
|
Message |
Description |
|
Payable is not Journalized and Should Be |
|
|
Payment Is Journalized and Shouldn’t Be |
Only Payments Received and Made where the Profile Type is Other or where the Payment Method is Other, or Bank Withdrawals should be journalized. |
|
Payment Is Not Journalized and Should Be |
Payments Received and Made where the Profile Type is Other, or where the Payment Method is Other, or Bank Withdrawals must have a journal entry. |
|
Payment Amount Doesn’t Match Journal Entry Amount |
The amount of the payment does not match the amount posted to the Cash in Bank account in the journal entry. This message also appears if the amount is being posted to the incorrect Cash in Bank account or the debits and credits have been reversed. |
|
Payment Date Doesn’t Match Journal Entry Date |
The date on the payment screen should always match the date in the journal entry screen. |
|
Pymt Invalid For JE That Affects Client Balances*** |
1) A journal entry should only affect Client Balances when a Payment Received or Made is entered that has a payment method of Other and a profile type of Client. 2) A Pseudo EOP entry exists. |
|
Pymt Invalid For JE That Affects ARC/BSP*** |
1) A journal entry should only affect ARC/BSP when a Payment Received or Made is entered that has a payment method of EFT and a profile type of Vendor-ARC/BSP. 2) A Pseudo EOP entry exists. |
|
Pymt Invalid For JE That Affects Vendor Balances*** |
1) A journal entry should only affect Vendor Balances when a Payment Received or Made is entered that has a payment method of Other and a profile type of Vendor-Supplier. 2) A Pseudo EOP entry exists. |
|
Pymt Invalid For JE That Affects Cash In Bank*** |
1) A journal entry should only affect Cash in Bank when a Payment Received or Made is entered that has a payment method of cash, check or EFT and a profile type of Client, Vendor or Other. Also for Bank Withdrawals. 2) A Pseudo EOP entry exists. |
|
Credit Card Pymt Date Doesn’t Match Invoice Date |
A client payment with a payment method of Credit Card should have the same date of the invoice. |
|
Bank Account #1 Difference Between Receipts And Deposits: 500.00 |
There should always be a receipts report to match every deposit. The message means there is a discrepancy and the deposit entered needs to be re-reconciled. |
|
Zero Dollar Client or Vendor Balance Journal Entries Exist |
User creates a payment received from a client with a payment method of other, invoice appears and user marks it closed. When the journal entry comes up TBO shows credit to Client Balances (which is correct), but the user then makes the Debit to Client Balances also which throws off the GL. |
*** When a Posted End of Period is voided, the entry is converted back into a normal journal entry and a reversing journal entry is also created. This results in these messages seen here. If receiving these messages as the result of a voided End of Period, ignore the message.
Canadian TBO Set Up and Special Usage
This section of the TBO manual is for Canadian setup and usage. Please read through this section and mark it as a favorite in the help files for reference. Canadian agencies should follow the setup as outlined for all users in this section with the following exceptions.
BSP Taxes Initial Setup
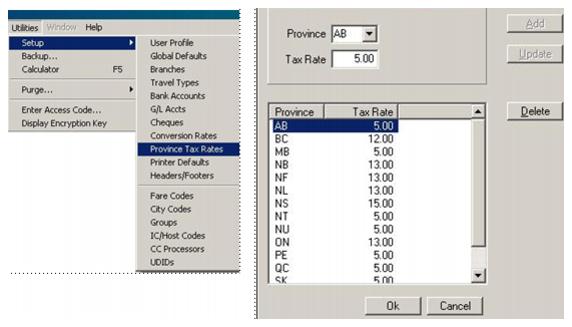
Canadian taxes can get complicated. Here are the suggested steps to setting up the tax table in TBO. This needs to be setup prior to interfacing. If working with GDS Integration, get help with this after filling out an Interface Appointment sheet or set up an appointment by e-mailing Trams.GDSDesk@sabre.com.
1) Go to Utilities|Setup|Global Defaults|Tax Related Tab to designate which taxes go to which tax fields when interfacing from the reservation system.
All Provinces Setup
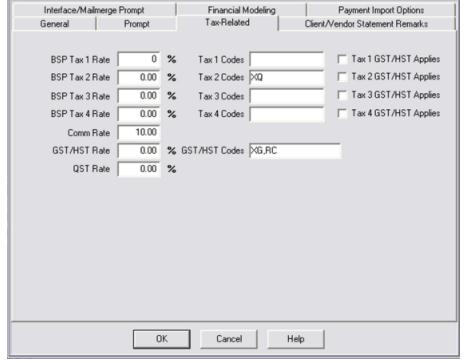
BSP TAX 1: Leave Blank.
BSP TAX 2: Leave Blank, except Quebec, enter XQ.
BSP TAX 3: Leave Blank (if any other taxes need to be tracked, do so in this or TAX 4 box).
BSP TAX 4: Leave Blank.
Comm Rate: 5% or 10% (What is preference to use for interfacing?) The commission rate for vendors used in reservations defaults to the vendor commission field in the TBO vendor profile. If the vendor default commission in TBO is blank, then the commission defaults to the amount entered in the field called Comm Rate.
HST/GST Rate: Enter the rate based on the province.
QST Rate: 7.5% subject to change by government regulation.
Tax 1 Codes: Leave Blank.
Tax 1 GST Applies: Leave Blank.
Tax 2 Codes - Taxes wanted to report for clients; i.e. a Quebec agency wants to report to their client how much XQ Tax clients have paid, so they would put XQ in this field.)
Tax 2 GST Applies: Leave Blank.
Tax 3 Codes: Put code on any other tax to report.
Tax 3 GST Applies: Leave Blank.
Tax 4 Codes: Put code on any other tax to report.
Tax 4 GST Applies: Leave Blank.
GST Codes - For Canada use XG,RC code only.
IMPORTANT CONSIDERATIONS
Since the Client GST/HST is passed to Trams Back Office either via the GDS or the invoice generated from a ClientBase Res Card, our focus in this update has been on implementing place of supply logic to better default the percentage used to calculate the Commission GST/HST.
A hard coded table of Provinces and their applicable GST/HST rates has been added that will be referenced during interface processing based on the rules of supply enhancement.
AB 5%
BC 12%
MB 5%
NB 13%
NL/NF 13%
NS 15%
NT 5%
NU 5%
ON 13%
PE 5%
QC 5%
SK 5%
YT 5%
To comply with the rules, a two prong approach was implemented.
1. Create logic to determine the place of supply based on the Travel Category.
2. Once the place of supply is determined, do a lookup of the Province GST/HST Rate associated with each Province.
The new Commission GST/HST logic is only applied during interface processing. Invoices generated from ClientBase contain the Commission GST/HST based on Agent input.
Using the Travel Category to Determine Place of Supply Logic
During interface processing, based on the travel category linked to the travel type, logic will be applied to determine the Province of supply. Once the Province is identified, the Province rate will be determined based on a hard coded rate table.
Travel Categories that use the Province in the Vendor Profile:
Air
Hotel
Cruise
Tour
Rail
Transportation
Travel Category that Use the City in the Itinerary Field of the Booking Record:
Car
Travel Category that use the Province in the Client Profile:
Service Fees
Travel Categories that are HST Exempt:
Insurance
International
Zero Rated
Transborder 5% is applied to all Travel Categories
Better Calculate QST Commission
During interface processing, before calculating QST on commission, a look up on the Vendor profile is done to determine the Vendor’s Province to apply the rules below:
· If the vendor address province is outside of Canada (Province ≠ AB, BC, MB, NB, NL, NS, NT, NU, ON, PE, QC, SK, or YT), the vendor will not pay Commission QST.
· Since commission QST only applies to agencies located in Quebec, the QST Rate will determine if commission QST is to be applied. Commission QST is calculated using the QST rate indicated in the Utilities/Setup/Global Defaults/Tax Related tab or Utilites/Setup/Branches Record (used if QST only applies to some branches but all). In addition, if the vendor address province is Quebec (Province = QC), the Vendor will pay commission QST.
· Commission QST will be calculated for all domestic air travel.
· Commission QST will default to 0 and for all International and Transborder tickets.
· Commission QST for Car bookings will default to 0.
· Hotels located in Quebec – Commission QST is calculated.
· Hotels located outside of Quebec – No commission QST will be calculated.
· Insurance - Commission QST will default to zero regardless of where the Insurance Company is located.
· Service Fees - Commission QST applies if the customer address province is in Quebec. If the customer resides outside on Quebec no commission QST will be calculated.
The above rules apply only to interfaced bookings. Commission QST amounts are not changed or updated by:
· Manual entries/updates
· Global Modify
· Quick Edit
Setting Up Profiles and City Code Provinces
Since a large portion of the Commission GST/HST calculations will be based on the profile Province where the client and vendor resides, it is ESSENTIAL to ensure the TBO client and vendor profiles contain a Province and non-Canadian Vendor profiles contain a Country code. The province should use 2 letter codes as follows: BC, AB, etc. (Please use drop-down menu to select province code.)
The lookup logic on the profile will first look for Canadian profiles by checking the country field. If the country field contains CANADA or is blank, it will look in the Province field to determine if there's a match to one of the Provinces in the rate table and if so, use the applicable rate to calculate the Commission GST/HST for the booking.
For cars, we will look for the pickup city in the itinerary field of the TBO booking, and then use the city code table to locate the province and lookup the province rate. Therefore, it is also important that the city code table (Utilities|Setup|City Codes) has province codes for each applicable city and they match the province codes listed above.
Processing Error Log Entries
It is important to review the log carefully for entries that pertain to HST.
Entries that are now logged to Reports|nterface|Processing Error Log include the following examples:
HST Set to 12% for Car Booking Based on City=YVR, Province=BC
HST Province Lookup for Vendor Sheraton Failed; Province=
HST Set to 5% for Service Fee Booking Based On Client ABC Manufacturing/, Province=AB
Markups and Discounts and Commission GST/HST
Since the place of supply rules also apply to markups and discounts, when creating an additional booking record in an invoice for the markup/discount, agencies will need to create a Markup/Discount Vendor for each Province and link to the proper profile (containing the province code) accordingly so that the correct percentage is used to make the calculation.
For transactions with discounts/markups, where users are creating a separate booking in the invoice, a discount/markup vendor should be created for each Province with the Province field in the vendor profile populated for each province and also Canada in the Country field. The correct HST on Commission can then be calculated for these transactions.
Miscellaneous
**BSP ticket data seems to be pretty straight forward as the HST is broken out in the Interface record via an RC Code. This RC Code should be mapped in Trams Back Office to the GST Tax field (which again will shortly be relabeled GST/HST). This is done by going to Utilities|Global Defaults|Tax Related and ensuring both XG (GST) and RC (HST) codes are captured in the GST Codes field. Separate them with a comma (XG,RC). Be sure the RC code is not also captured in any of the Tax 1 - 4 Codes.
**We now accept multiple TX entries for Client GST (i.e. XG and RC) on the same MS line as long as the client GST was not already set from a previous line or some other non-MS entry.
**For Sabre, we read any accumulated Client GST,QST taxes from the AC line which means we won't have a breakdown by tax code. GST/HST will go into Client GST, QST if present will go into the designated tax field and everything else goes into the tax field designated for XT or Tax 1.
2) Next, Go to Utilities|Global Defaults|Interface/Mailmerge Prompt Tab.
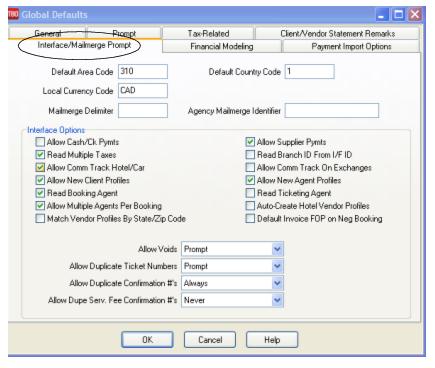
3) Fill in the local currency with CAD - this interfaces the Total Fare in each booking made in Canadian dollars.
4) Check the box Read Multiple Taxes.
5) When all other setup has been completed, click OK to save.
Notes:
**Transborder Indicator is interfaced at the Invoice level and is defined by the CRS. An International override can be triggered by placing a *IX in the remarks field of the PNR.
** RBC Insurance Scripts: If the agency books with RBC Insurance, inform them of the cutover date to Trams Back Office. This prompts them to change the profile so that the correct scripts are being utilized.
BSP Bank Accounts Initial Setup
These are steps to setup bank accounts including use of Conversion Codes for different countries' currencies.
- Go to Utilities|Setup|Bank Accounts (make sure to enter the CAD currency code under Utilities|Setup|Global Defaults|Interface|Mailmerge Prompt as outlined above).
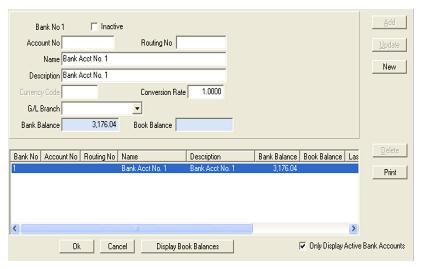
2) Highlight "Bank Acct No 1" and change the Name and Description in the entry boxes above to the Name of the primary bank account. Do not enter CAD in the Currency code because it was set up in the Global Defaults (see above). The Conversion Rate is 1.0000. Assign a G/L Branch if using more than one Branch. Click Update.
3) Click New on the right hand side of the screen and enter the second Bank Account Name and Description. Leave the Currency code blank, Conversion rate 1.0000. Enter any other pertinent information and click Add.
4) Proceed to enter all of bank accounts in the same manner. Make sure all is seen correctly in the data entry screen below, and click OK to save.
Note: Entering the Account No. and Routing No. enables the printing of deposit slips to bring to the bank. (See section Deposits in Payments Chapter.)
5) If there is a USD Bank account, enter the information about the account and also enter the USD Currency code.
|
Currency Code |
The 3-letter code of the country the bank account is in. The code is entered only if the bank account is different than the local currency. |
|
Conversion Rate |
The current default rate from the bank is defaulted to 1.0000. If using local currency, do not change this area. If there is set up a Currency Code that is different from the local currency above, leave the default, and change the rate when the payment is received, or put the current conversion rate here. |
6) When entering a Payment (Received, Made, Deposit, Withdrawal) using the USD Bank Account, a Conversion Rate and Equivalent Amount Box appears on the Payment screen. Enter the day's rate on this screen as each payment is entered, rather than going to Utilities|Setup to change it.
Canada General Ledger Accounts Initial Setup
If using Conversion Rates, set up special GL accounts in the Chart of Accounts.
- Go to General-Ledger|Accounts to add and modify G/L accounts.
2) Add bank accounts by highlighting each bank account and changing the name to the name of the bank account. If more than two bank accounts are needed, choose the next number in the series (1010) for the third account and 1020 for a fourth account.
3) Add a conversion account to be used when converting CAD to USD and USD to CAD. This account is usually set up as: 1001 Currency Conversion.
4) Add a Liability Account in the 2000 series for GST Payable and an Offset Account in the 2000 or 1000 series for GST Expense.
5) If paying the QST tax, create the Liability - QST Payable and QST Offset account also.
6) Add an Asset Account named "GST Receivable". (See G/L Accounts Setup below for more information.)
7) The Payroll Tax Liability accounts in the 2100 series and the Payroll Expense accounts in the 6000 series should be renamed using the correct terminology for Canada. The FICA Payable tax, for example, is the same as the Canada Pension, or Quebec Pension. State Withholding Payable should be changed to Provincial Income Tax.
8) Make a note of the Account Numbers added or changed.
9) When these accounts are set up in the General Ledger, click OK to save.
Canada G/L Accounts Initial Setup
Now we need to tell TBO where some of the GL accounts reside.
1) Go to the Utilities|Setup|G/L Accts. (This is also called the End of Period Table because it tells the Trams Back Office program where to journalize the information in the Invoices and Payment entries when the End of Period is created.)
2) Under the Bank Accounts Tab, highlight each Bank Account and enter the correct G/L account number in the fields above.
3) Any Bank Accounts that are not CAD - set the Conversion G/L No to 1001.
4) Under the Others Tab make sure the GST Payable and QST Payable (if required) are set to the accounts that were created in General-Ledger|Accounts.
5) In the GST Receivable account, enter the account that was created in General-Ledger|Accounts.
Note: When the "GST Receivable" Account is entered into the GL Acct #2 field of an "Other" Profile, the same GST Calculation is performed as when the GST Payable account is entered.
Additional End of Period Reports for BSP Users
At the end of each month, run the following reports to verify the amount of TAX to be paid.
1) Run an Invoice Activity Report by going to Reports|Invoice|Activity.
2) Compare the tax amounts on this report with the amounts in the Balance Sheet accounts created for these taxes (Reports|General Ledger|Account History).
3) When sending the quarterly check to pay the tax due, go to Payments|Made. Enter the amount of the tax due. Use the profile type "Other" that created for these taxes and create the following journal entry:
Debit Credit
Cash in Bank 500.00
GST Payable 500.00
Quebec TAX - OPC - Consumer Protection Fund
The Quebec government has introduced a new Consumer Protection Fund, and the agency has to collect the fees. The Consumer must pay 35% or $3.50 on every thousand dollars in Travel. This charge must be represented as a separate line item on the client's invoice. For the first year the agency is allowed to keep 10% of the monies collected during the quarter and 3% after the first year. Setup and use for OPC:
1) Set up a new vendor. The name of the vendor optional, but one recommendation is OPC or OPC Fees. Enter an Interface ID, which could be OPCFEES.
2) Go to General-Ledger|Accounts and create a new 4xxx Sales account and a new 5xxx Cost of Sales account.
3) Go to Utilities|Setup|Travel Types and setup a new Travel Type, OPC Fees.
4) Go to Utilities|Setup|GL Accts and point this new travel type to the new Sales and Cost of Sales accounts.
5) In order to create the new booking on the invoice, drive a manual accounting line for this fee at 0% commission so that the vendor collects the entire amount payable and there is no income earned.
6) At the end of the quarter send a check, along with the form, to the government. Deduct 10% which can then be taken as income.
(Please note that at this time BSP does not process these credit card charges for the agency. Since it has to appear as a separate item on the client's invoice, it cannot be included in the existing service fees. One option is to have each agent enter the charges to the point of sale machine for every invoice generated which might work in a very small agency but not be effective in an agency with any kind of volume.)
Note: Both IATS (TicketMaster), CSI (Card Services International, and Pinnacle Payment Solutions (formerly PRI) are willing to handle the OPC Fund charges provided the agency gives them their service fee business as well. This charge must appear on the client original invoice, and it cannot be backdated.
Air Canada Credit Memos
As of April 2004, Air Canada began paying commissions via credit memos, which are processed through BSP. These are the recommended steps agencies should follow to properly account for these transactions.
1) Create the invoice in Trams Back Office either via interface or manual entry. The issue date will reflect the actual date of the sale:
* Submit to = Supplier (Comm Track invoices would not account for sales/cost of sales in the general ledger)
* Total Fare = Amount of ticket
* Commission = Amount of commission earned on the ticket
* Form of Payment = Credit card
* Sales Agent(s) = Sales Agent(s) in PNR
2) On the Monday after the BSP Canada Web sale, BSP will e-mail the Web Cash Reward report and Web Account file.
3) When receiving the BSP Report, it will list the credit memo, and at that time create an adjustment Invoice in Trams Back Office (Invoices|Adjustments, or Debit/Credit Memo) - one booking record for each confirmation number.
* Client name on the invoice = Air Canada
* Vendor name on the invoice = Air Canada
* Memo number in the invoice = Credit memo number
* Original Ticket number in the invoice = Credit memo number
* Do not enter any Sales Agents to the credit memo as they were already tagged when the supplier invoice was created in Step 1
4) Perform the BSP Settlement as usual.
5) Run a Vendor Statement Summary report (Reports|Vendor|Statement) and compare this to the Credit Memo from Air Canada. This serves as a reconciliation process to ensure that the proper commissions were received from Air Canada on the Credit Memo.
* Report type = Summary
* Vendor Name = Air Canada
* From and To dates = BSP reporting period
6) Write off the Vendor Balance on the Vendor Balance Report created from Step 1. Go to Payments|Received after determining the amount of write-off based on the reconciliation process in Step 5. Enter the amount in the amount field of the payment received screen with a Pay Method = Other; Payment Date = BSP Settlement Date; Profile Type = Vendor Supplier; and Name = Air Canada. Toggle closed invoices that were paid by the Credit Memo from Air Canada and journalize to BSP Adjustments.
Note: Agent Statements will be affected by the write-off of the Vendor Balance, as this is a Supplier CC transaction and should be set to Vendor Payment Date.
Remote Access Setup (using Direct Connect)
This section describes Trams Back Office setup using Direct Connect in lieu of Terminal Services. The method uses a remote instance of TramsAppServer. Click here for setup instructions.
Additional Security Settings
Additional security settings were created with the 4.05 release. New features and setup follows.
Security Features
- When a Profile, Res Card, or Reservation is viewed, created, updated, or deleted, the system logs this information to the changelog in order to record who has viewed or modified personal customer data and when.
- When a User Login record is viewed, modified, added, or deleted, these changes are logged, along with the user who made the change and at what date and time.
- Users are now temporarily locked out after three unsuccessful attempts to log in (e.g., incorrect password). A manager can unlock the user's account by changing their password for them; otherwise, the account will unlock after 30 minutes.
- Unsuccessful login attempts are now logged, as are the lockouts of user logins with too many unsuccessful login attempts.
Security Setup
To take advantage of the above security features, you must take two steps:
- Run the latest database update. Download the database update (DBUp.exe) here: Be sure to back up your database before running the database update. No one can be logged in while the database update is running.
- Set up and use the new Remote Database Connection feature (described below) to connect to the database:
Remote Database Connection
- ClientBase Windows has the option of configuring a centralized app server that all users connect to. Connecting this way allows ClientBase to track and log user login attempts and lock out users after three failed attempts. It also logs views of and changes to customers’ personal data.
Setting up to use the Remote Connection:
- Download the latest TramsAppServer version here:
- Save it to C:\Program Files (x86)\Trams\Common Files and replace the old version, if present.
- Install TramsAppServer on the server:
- Open Windows ‘Command Prompt’ program by clicking on Windows Start Icon > All Programs > Accessories > Command Prompt and right-click to ‘Run as administrator’.
- In Command Prompt, change directory to C:\Program Files (x86)\Trams\Common Files.
- Write command ‘tramsappserver -install’ and press Enter.
- ‘Service installed successfully’ displays.
- Run TramsAppServer:
- Make sure Port 211 is open on the server:
- Go to Control Panel and launch "Windows Firewall."
- Go to "Advanced Settings."
- Select "Inbound Rules" in the left pane.
- Select "New Rule…" in the right pane.
- In the New Inbound Rule Wizard, select "Port" as Rule Type, then click "Next".
- Select "TCP and enter "211" in "Specific local ports", then click "Next".
- Select "Allow the connection", then click "Next".
- Select all the checkboxes for “When does this rule apply,” then click "Next".
- Enter “Trams App Server Rule” as the name, then click “Finish”.
- Open Windows ‘Service’ program by clicking on Windows Start Icon > typing in ‘Services’ in Search and clicking Services from the results.
- Once Services is opened, scroll and select TramsAppServer, then click on “Start the service”.
- Launch tramsappserversettings.exe from the Common Files folder. This application allows Trams App Server settings to be changed. (These settings are stored in the registry.)
- All global aliases found in the Alias Utility will appear in a drop down. Select the database alias to connect to; or add a new alias name and browse to the database location in the Database Path field. More than one database alias can be set up, if your agency uses more than one database.
- Enter the username and password to connect to the database with. Usernames and Passwords are stored in encrypted form.
- The "Use Default Alias Checkbox," if checked, means that the database path will not be stored in the registry; it will always be looked up from the corresponding alias. If it is not checked, the path is stored in the registry and the path from the corresponding alias is ignored.
- Optional: If your agency also uses ClientBase Online, to enable Trams App Server to send email when a user clicks the Forgot My Password link, click the Email Settings button and enter the SMTP settings for your agency.
- Finally, on the ClientBase Windows login screen, click the Advanced Settings link. Change the connection type from Local to Remote. Specify the remote server name, which is then stored in the registry.
TramsAppServer Automatic Update
- Launch TramsAppServerSettings.exe and click Check for Updates.
If updates are available, you will be asked to install them.
- When updates are complete, you will be prompted to restart the service.
- Restarting the TramsAppServer service via Services [found under Control Panel | Administrative tools] completes the installation.