
Chapter 7: Profiles
Profiles
This chapter contains:
- Overview of Leisure or Corporate Client, Vendor, Other and Agent Profiles
- Steps for creating Leisure or Corporate Client, Vendor, Other and Agent Profiles
- Profile Query Overview
Creating New Profiles in Trams Back Office
Profiles are source records for statements and mailing lists for customer and vendors. Profiles store information about individuals and companies with whom the agency does business and are generally defined as “billing entities.” Think of the profile as ledger cards in a manual system. When entering invoices or payments, Profiles eliminate the need to re-key data.
Create Profiles manually, or capture them via interface from the GDS. (See the Interface Section for GDS entries required to capture profile information.) Trams Back Office recommends that if creating a new profile manually, create it from the Query screen. This minimizes the possibility of having duplicate profiles in the database. By using the first few letters of the last name in the query screen, any profiles beginning with those letters are displayed. At a glance, determine if the profile already exists in the system. If the system finds no match, click on the New tab and complete the fields for the new profile. The only mandatory field for a profile is the last name field.
If certain the profile does not already exist in the system, create a new profile by going to the Profile main menu. Select the type of profile to enter, Leisure, Corporate, Vendor, Agent or Other and complete the information fields. The more fields completed, the greater the opportunities become for future target marketing.
Tip: Although profiles can be created during Interface, they are NOT updated automatically. View any changes received during Interface in the Processing Error Log.
Leisure Client Profiles
When creating a leisure profile, consider who is responsible for payment. (We recommend one profile per paying party.) Build a profile for each billing party who purchases (or may purchase) travel from the agency. Each invoice entered must link to an existing client profile. Review the listing of fields below to get familiar with the data that exists in the profiles.
GENERAL TAB
Last Name/First/Middle
Client's name. Last Name is the only field required to create a profile.
Contact Title
Owner, Manager, President, etc.
Courtesy Title
Suggested use is Mr. and Mrs./Mr./Mrs./Dr. etc., Field shows on mail labels and statements.
Salutation
Name to use when greeting client, e.g. First Name (Robert), Nickname (Bob), etc.
Street Address 1/2
Mailing Street Address used on reports, including statements, and mail labels. Two lines can be entered.
City, State, Zip and Country
Client's city, state ZIP code (and country, if applicable). The ZIP code can contain letters and numbers.
Payee Name
Person/Entity usually financially responsible for account.
Interface ID
This field is used to identify client profiles in Trams Back Office during interface. This is entered in the PNR as Client ID. Trams Back Office recommends using the client’s phone number as the ID (see Interface Guide for additional information.) Enter up to ten alpha/numeric characters.
Credit Limit
Type in credit limit amount for profile if desired. “Available Balance” line appears on Client Statements and is calculated from Credit Limit in Profile less amount outstanding on statement.
Inactive
Click this box to mark this profile Inactive. It will not longer appear in the Query Screen.
Primary Agent
To designate a primary agent for this client, type a few letters of the agent’s name and choose agent from the drop-down menu. This field is filled in with the agent sine during interface.
Branch
Specify a particular branch this profile is associated with.
Continue Entering Profiles
Click this box to continue entering profiles without getting “booted” out of this screen.
COMMUNICATIONS TAB
Entering Type, Value, Description, Traveler Name.
Using Add, Update, and
Primary.Select type (phone, e-mail, fax, or web) by clicking the down arrow on the scroll bar. The recommended format for entering the phone number is nnn/nnn-nnnn. The area code and the country code entered into Global Defaults automatically default. After entering Type, Value, and Description (cell phone, business email, etc.), Click Add. Enter as many profile communication entries this way or click on the Travelers tab to enter more specific traveler communication items which will appear here with the Traveler’s name. To edit an entry, double-click on item, make changes and click Update.
The first entry of each type defaults as primary. Any selected entry can be designated as primary by clicking on the Primary button.
Using Delete/Edit Traveler Communication
All Travelers must be associated to a profile, but can be linked to multiple profiles. The delete button removes the Traveler from the current profile. Once the contact is deleted from the last remaining associated profile, the profile will be deleted from the database.
Email addresses (and other communication entries) now reside in the Traveler/Contact record, but viewing and/or changing those Traveler/Contact communication entries can be done by clicking on Edit Traveler Communications after first selecting the entry.
Columns
The Columns can be sorted in ascending order when the column header is clicked once and in descending order when clicked a second time (with the exception of Primary Phone and Primary E-mail at this time).
TRAVELERS TAB
Starting in TBO version 3.05, the passenger table that associates a passenger with a profile was redesigned. All references to passenger have been relabeled to traveler: Passenger name on booking screen (drop down), Invoice Query Columns, Profiles, Profile Query, Passengers on existing invoices, and Family and Employee tabs
Important Note: Functionality with the passenger (traveler) in the invoice booking record has not changed in terms of functionality. The field label was simply changed from Passenger to Traveler.
All travelers must be a part of a profile, but can be linked to multiple profiles.
Export Traveler Profile
Users with Manager authorization can export profiles from the Travelers tab.
Note: Remarks are also exported. Use caution if your agency uses the remarks fields for information that you do not want to provide to a customer.
To Export a Profile:
- Right-click on a Traveler.
- Click Export Traveler/Contact.
ADD A NEW TRAVELER
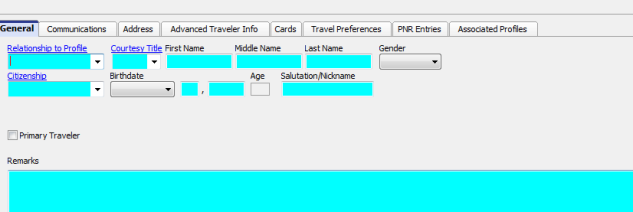
1) You may want to hit Search in Traveler Tab before you add a new traveler. If the traveler already exists, just link it.
To add a new traveler, click Add and enter the Relationship toTraveler, Courtesy Title, First Name, Middle Name, Last Name, Gender, and any additional information in any of the other traveler tabs (Communications, Address, Advanced Traveler Info, Cards, Travel Preferences, PNR Entries, and click Add. Want to make this entry the primary entry for the profile? Select the entry and click Primary.
2) When the Add button is clicked, a query runs to search for any travelers that match the data entered in First/Middle/Last name. At least two of the three Name fields must be entered in order for the search to run. If a match is found, link or cancel the found associated profile.
3) If this traveler is associated with other profiles, the Associated Profiles tab lists associated profiles for that traveler.
Unlink removes the Traveler from the current profile. Update is clicked when changes are made to the Traveler information.
PAYMENT INFO TAB
New cards can be added from within the payment info tab, however, they will not be linked to any specific traveler. Cards that are linked to a traveler cannot be modified from this tab, but can be modified within the Traveler tab by clicking on the Payment Info button.
Bank Account/Routing No.
This Payment Method can be used for handing off data from TBO to a Payment Distribution Service or the local bank. For complete directions on using this feature, please refer to the Payments section of this manual.
Credit Card Number
Enter credit card number/expiration date. Number is automatically retrieved for credit card payments. The first credit card entered is the default credit card used, but any entered credit card can be selected when a credit card payment is entered. Enter also in this area under ACH (Automated Clearing House) Settings, Bank Account/Routing No. for use if authorized.
Exp. Date
Click Exp.Date button and select date from calendar. Click OK. Click Add.
Name on Account
Enter name of cardholder.
GROUPS TAB
Group/Batch
Any group(s) to which the client belongs. This field can be used as a selection criteria for reports, or to print group statements and summary reports. Set up new groups from here by clicking the Group/Batch button, or from Utilities|Setup|Groups. Click on Add.
MARKETING TAB
Business Affiliation
Client's employer. Field is used as selection criteria for lists and labels.
Other
Any other marketing data important to particular client. Field is used as selection criteria for lists and labels.
Notes
Any free-flow information about the client. Field is used as selection criteria for lists and labels.
Additional Notes
Additional field for comments or Notes about the customer. Field is used as selection criteria for lists and labels.
Statement Remark
IMPORTANT! Any remarks entered in this area of the client profile appear on ALL statements generated for this profile.
Travel Preference
Any particular travel preference the client may have. Field is used as selection criteria for lists and labels.
Check Remarks
Enter a specific profile remark that prints on the check for payments made using the profile.
Alt Interface ID
The interface process now checks both Interface ID and Alternate Interface ID for a match on clients and vendors. This feature is used by those agencies that are using multiple GDS interfaces where the interface ID's for Hotel Codes are different for each GDS. Now use a single vendor profile for both systems. Put one Interface ID in the Interface ID field on the profile General Tab, and for a different GDS, the other Interface ID in the Alt Interface ID field on the Marketing Tab. Enter up to ten alpha/numeric characters.
AGENTS TAB
Agents
Enter the name(s) of the agent(s) that will be attached to this profile. Enter the commission percentage that each agent will receive on every invoice issued to this particular client. Note: This adds the agent to every invoice interfaced to Trams Back Office.
ATTACHMENTS TAB
Starting with Trams Back Office version 3.05, an attachment tab was added to all profile (Client, Vendor, Agent, Other), all invoice types (sale, refund, adjustment) and the payment screens. The tab is located adjacent to the tab now named General at the top of each screen. Within the workspace area of the new attachment tab, users can manage (add, view, delete, update) electronic documents of any type.
Filename
Click the browse button to locate to the desired file.
Compressed
Defaults to enabled. Compressing the file helps to reduce the file size (maximum file size is 8MB).
Description
Enter a user-defined description.
Path
This field is automatically populated based on the location of the file.
Add, adds a new file; Update, updates the existing file with a new or updated file; View, opens the file; and
Delete deletes the attached file. Extract copies the file to another location on your computer.
Entering Leisure Client Profiles
Leisure and Corporate profiles contain most of the same information and are entered the same way.
1. Click Profiles|Client|Leisure
2. Start with the General tab. The last name of the client (and the Interface ID field if the agency plans to interface invoices for this profile in the future) is the only field required for building a Profile. Query a profile and modify existing information at any time. Trams Back Office recommends entering as much information as possible in all profiles. If a field is left blank, it is not used in future applications. For example, if the address fields are left blank, statements and all other output using the address will have blanks where the address would print. Trams Back Office also recommends use both upper and lower case (e.g. Palley/Dan instead of PALLEY/DAN) when entering the name and address information to enhance the appearance of the mailing labels and other types of correspondence.
2. Click the Communications, Travelers, Payment Info, Groups, Marketing, Agent, or Attachments tabs to add as much information to the profile as possible. For more information on these area, read section, Leisure Client Profiles.
3. When the Profile is complete, click OK. To continue entering, select New from the query screen.
Tip: Look at the bottom of the New Profile screen. There is a checkbox next to Continue entering profiles. To enter multiple profiles at one time, make sure the box is checked. When finished entering profiles, click on the box and remove the check to return to the main menu instead of the profile entry screen.
Corporate Client Profiles
Corporate clients are business accounts. Their information is kept separately from Leisure clients. The business name is the only required field for a corporate client profile. Review the list of fields below to get familiar with the data available in profiles.
GENERAL TAB
Last Name/First/Middle
Client's name. Last Name is the only field required to create a profile.
Contact Title
Owner, Manager, President, etc.
Courtesy Title
Suggested use is Mr. and Mrs./Mr./Mrs./Dr. etc., Field shows on mail labels and statements.
Salutation
Name to use when greeting client, e.g. First Name (Robert), Nickname (Bob), etc.
Street Address 1/2
Mailing Street Address used on reports, including statements, and mail labels. Two lines can be entered.
City, State, Zip and Country
Client's city, state ZIP code (and country, if applicable). The ZIP code can contain letters and numbers.
Payee Name
Person/Entity usually financially responsible for account.
Interface ID
This field is used to identify client profiles in Trams Back Office during interface. This is entered in the PNR as Client ID. Trams Back Office recommends using the client’s phone number as the ID (see Interface Guide for additional information.) Enter up to ten alpha/numeric characters.
Credit Limit
Type in credit limit amount for profile if desired. “Available Balance” line appears on Client Statements and is calculated from Credit Limit in Profile less amount outstanding on statement.
Inactive
Click this box to mark this profile Inactive. It will not longer appear in the Query Screen.
Primary Agent
To designate a primary agent for this client, type a few letters of the agent’s name and choose agent from the drop-down menu. This field is filled in with the agent sine during interface.
Branch
Specify a particular branch this profile is associated with.
Continue Entering Profiles
Click this box to continue entering profiles without getting “booted” out of this screen.
COMMUNICATIONS TAB
Entering Type, Value, Description, Traveler Name.
Using Add, Update, and Primary.
Select type (phone, e-mail, fax, or web) by clicking the down arrow on the scroll bar. The recommended format for entering the phone number is nnn/nnn-nnnn. The area code and the country code entered into Global Defaults automatically default. After entering Type, Value, and Description (cell phone, business email, etc.), Click Add.
Enter as many profile communication entries this way, or click on the Travelers tab to enter more specific traveler communication items which will appear here with the Traveler’s name. To edit an entry, double-click on item, make changes and click Update.
The first entry of each type defaults as primary. Any selected entry can be designated as primary by clicking on the Primary button.
Using Delete/Edit Traveler Communication
All Travelers must be associated to a profile, but can be linked to multiple profiles. The delete button removes the Traveler from the current profile. Once the contact is deleted from the last remaining associated profile, the profile will be deleted from the database.
Email addresses (and other communication entries) now reside in the Traveler/Contact record, but viewing and/or changing those Traveler/Contact communication entries can be done by clicking on Edit Traveler Communications after first selecting the entry.
Columns
The Columns can be sorted in ascending order when the column header is clicked once and in descending order when clicked a second time (with the exception of Primary Phone and Primary E-mail at this time).
TRAVELERS TAB
Starting in TBO version 3.05, the passenger table that associates a passenger with a profile was redesigned. All references to passenger have been relabeled to traveler: Passenger name on booking screen (drop down), Invoice Query Columns, Profiles, Profile Query, Passengers on existing invoices, and Family and Employee tabs
Important Note: Functionality with the passenger (traveler) in the invoice booking record has not changed in terms of functionality. The field label was simply changed from Passenger to Traveler.
All travelers must be a part of a profile, but can be linked to multiple profiles.
ADD A NEW TRAVELER
1) Type the Traveler First Name, Middle Name, Last Name, Position, Department, and click Add. Need to add a phone number, fax, email or web address? Select the entry and click Comm Info to enter. Want to make this entry the primary entry for the profile? Select the entry and click Primary.
2) When the Add button is clicked, a query runs to search for any travelers that match the data entered in First/Middle/Last name. At least two of the three Name fields must be entered in order for the search to run. If no match is found, a new Traveler record can be created. If match(es) are found, a window entitled Traveler Search is displayed, from which the user can either link the existing traveler or cancel.
3) Click Payment Info to add a credit card or bank information linked to this Traveler. Updates for any payments linked to a specific traveler must be done from within the Travelers tab.
4) If this traveler is associated with other profiles, the Associated Profiles button is available. When clicked, a new window entitled Associated Profiles opens and a list of the associated profiles for that traveler is displayed which includes the number of profiles the traveler is associated with.
Delete removes the Traveler from the current profile. Once a traveler is deleted from the last remaining Associated Profile, the traveler is then deleted from the database. If a traveler is linked to a booking and deleted from a profile, they will no longer be linked. The name will still appear on the booking as if a free flow name had been entered. Update is clicked when changes are made to the Traveler information.
PAYMENT INFO TAB
New cards can be added from within the payment info tab, however, they will not be linked to any specific traveler. Cards that are linked to a traveler cannot be modified from this tab, but can be modified within the Traveler tab by clicking on the Payment Info button.
Bank Account/Routing No.
This Payment Method can be used for handing off data from TBO to a Payment Distribution Service or the local bank. For complete directions on using this feature, please refer to the Payments section of this manual.
Credit Card Number
Enter credit card number/expiration date. Number is automatically retrieved for credit card payments. The first credit card entered is the default credit card used, but any entered credit card can be selected when a credit card payment is entered. Enter also in this area under ACH (Automated Clearing House) Settings, Bank Account/Routing No. for use if authorized.
Exp. Date
Click Exp.Date button and select date from calendar. Click OK. Click Add.
Name on Account
Enter name of cardholder.
GROUPS TAB
Group/Batch
Any group(s) to which the client belongs. This field can be used as a selection criteria for reports, or to print group statements and summary reports. Set up new groups from here by clicking the Group/Batch button, or from Utilities|Setup|Groups. Click on Add.
MARKETING TAB
Business Affiliation
Client's employer. Field is used as selection criteria for lists and labels.
Other
Any other marketing data important to particular client. Field is used as selection criteria for lists and labels.
Notes
Any free-flow information about the client. Field is used as selection criteria for lists and labels.
Additional Notes
Additional field for comments or Notes about the customer. Field is used as selection criteria for lists and labels.
Statement Remark
IMPORTANT! Any remarks entered in this area of the client profile appear on ALL statements generated for this profile.
Travel Preference
Any particular travel preference the client may have. Field is used as selection criteria for lists and labels.
Check Remarks
Enter a specific profile remark that prints on the check for payments made using the profile.
Alt Interface ID
The interface process now checks both Interface ID and Alternate Interface ID for a match on clients and vendors. This feature is used by those agencies that are using multiple GDS interfaces where the interface ID's for Hotel Codes are different for each GDS. Now use a single vendor profile for both systems. Put one Interface ID in the Interface ID field on the profile General Tab, and for a different GDS, the other Interface ID in the Alt Interface ID field on the Marketing Tab. Enter up to ten alpha/numeric characters.
AGENTS TAB
Agents
Enter the name(s) of the agent(s) that will be attached to this profile. Enter the commission percentage that each agent will receive on every invoice issued to this particular client. Note: This adds the agent to every invoice interfaced to Trams Back Office.
ATTACHMENTS TAB
In TBO version 3.05, an attachment tab has been added to all profile (Client, Vendor, Agent, Other), all invoice types (sale, refund, adjustment) and the payment screens. The tab is located adjacent to the tab now named General at the top of each screen. Within the workspace area of the new attachment tab, users can manage (add, view, delete, update or extract) electronic documents of any type.
Filename
Click the browse button to locate to the desired file.
Compressed
Defaults to enabled. Compressing the file helps to reduce the file size (maximum file size is 8MB).
Description
Enter a user-defined description.
Path
This field is automatically populated based on the location of the file.
Add, adds a new file; Update, updates the existing file with a new or updated file; View, opens the file; and Delete deletes the attached file.
Entering Corporate Client Profiles
Leisure and Corporate profiles contain most of the same information and are entered the same way.
1. Click Profiles|Client|Corporate to create a new Corporate Profile.
Start with the General tab. The Name is the only field required for building a corporate profile. Query a profile and modify existing information. Trams Back Office recommends entering as much information as possible in all profiles. If a field is left blank, it is not used in future applications. For example, if the address fields are left blank, statements and all other output using the address will have blanks where the address would print. Trams Back Office also recommends using both upper and lower case (e.g. ABC Company instead of ABC COMPANY) when entering the name and address information to enhance the appearance of the mailing labels and other types of correspondence. Note: Don’t forget the Interface ID field if the agency plans to interface invoices for this profile in the future.
4. Click the Communications, Travelers, Payment Info, Groups, Marketing, Agent, and Attachment tabs to add as much information to the profile as possible. For more details on these tabs, read section entitled, Corporate Client Profiles.
5. When the Profile is complete, click on OK and continue entering profiles by selecting New.
Tip: Look at the bottom of the New Profile screen. There is a checkbox next to Continue entering profiles. To enter multiple profiles at one time, make sure the box is checked. When finishing entering profiles, click on the box and remove the check to return to the main menu instead of the profile entry screen.
Vendor Profiles
All vendors need a Vendor Profile, including Airlines, Tour Operators, Hotels, Car Rental Agencies, Cruise Lines, etc. By creating a Vendor Profile, Trams Back Office maintains vendor balances, tracks commissions due, as well as providing a complete history and analysis for each vendor. For example, each Holiday Inn location/property can have its own profile to run statements and be grouped together for reports. (See the Interface Guide to see how profiles are entered during the interface process.) Review the listing of fields below to get familiar with the data available in vendor profiles.
GENERAL TAB
Profile Name
The name of the Vendor.
Contact Last Name, First, Middle
The name of the Vendor contact person.
Contact Title
Contact person's title, e.g., Accounts Payable.
Courtesy Title
Mr. and Mrs., Mr., Mrs., Dr., etc.
Salutation
Name to use when greeting vendor, e.g. First Name (Robert), Nickname (Bob), etc.
Street Address 1: and 2:
Mailing Street address of the company. There are two lines available for street address.
City, State, Zip and Country
Company's city, state, ZIP code and country (if applicable). The ZIP code can contain letters and numbers.
Payee Name
Person/Entity usually financially responsible for account.
Interface ID
Allowing Trams Back Office to create vendor profiles during interface is recommended. Each CRS has a unique code for the vendor. Avoid using only character codes, such as HI or HH. This prevents the tracking of individual properties. We recommend using the chain code with the property code from your GDS.
Airline No.
For use with the res system interface: Enter corresponding airline number.
% Commission
This rate is used when manually adding a booking to an invoice. This rate defaults, but can be changed at the booking level. A blank field indicates there’s no default for the profile, so TBO uses the global vendor default percentages entered under Utilities. A vendor profile entered with a 0.00% commission indicates that the default commission rate should be zero. Vendor commissions are applied as follows: If a vendor commission is specified at the booking level of the PNR, that rate is entered in the Comm/Rate field of the booking screen during the processing of the interface records. If NO commission amount or rate was specified in the PNR, then the rate entered in the Vendor Profile,% Commission field is used. A vendor profile entered with a 0.00% commission indicates that the default commission rate should be zero. A blank field indicates there's no default for the profile. If NO rate was specified in the Vendor Profile, then the rate entered under Utilities|Setup|Global Defaults|Tax-Related Tab in the Comm Rate field is used. This rate is also used when manually adding a booking to an invoice. This rate defaults, but can be changed at the booking level.
Preferred
Identify vendors as preferred by checking the Preferred box.
Preferred versus non-preferred performance is compared in the Vendor Activity Report. Also print customized reports for preferred vendors in the Report Generator.
This helps identify the preferred vendors and to produce valuable reports.
Inactive
Click this box to mark this profile Inactive. It will not longer appear in the Query Screen.
Continue Entering Profiles
Click this box to continue entering profiles without getting “booted” out of this screen.
Example:
Budget Car Rental is a preferred vendor for your agency. You want to change their profile to show their new status. Go to the main Profiles menu, then to Query. Select Vendor as the Profile Type. Click on the Name field and type in “Bud.” Click on Query. Highlight the correct profile. Click on View to see the screen for this vendor, then click the Preferred box. Click OK to save your changes.
COMMUNICATIONS TAB
Entering Type, Value, Description, Contact Name.
Using Add, Update, and Primary.
Select type (phone, e-mail, fax, or web) by clicking the down arrow on the scroll bar. The recommended format for entering the phone number is nnn/nnn-nnnn. The area code and the country code entered into Global Defaults automatically default. After entering Type, Value, and Description (cell phone, business email, etc.), Click Add.
Enter as many profile communication entries this way, or click on the Contacts tab to enter more specific Contact communication items which appears here with the Contact’s name. To edit an entry, double-click on item, make changes and click Update.
The first entry of each type defaults as primary. Any selected entry can be designated as primary by clicking on the Primary button.
Using Delete/Edit Contact Communication
All Contacts must be associated to a profile, but can be linked to multiple profiles. The delete button removes the Contact from the current profile. Once the contact is deleted from the last remaining associated profile, the profile will be deleted from the database.
Email addresses (and other communication entries) now reside in the Contact record, but viewing and/or changing those Contact communication entries can be done by clicking on Edit Contact Communications after first selecting the entry.
Columns
The Columns can be sorted in ascending order when the column header is clicked once and in descending order when clicked a second time (with the exception of Primary Phone and Primary E-mail at this time).
CONTACT TAB
All Contacts must be a part of a profile, but can be linked to multiple profiles.
ADD A NEW CONTACT
1) Type the Contact First Name, Middle Name, Last Name, Position, Department, and click Add. Need to add a phone number, fax, email or web address? Select the entry and click Comm Info to enter. Want to make this entry the primary entry for the profile? Select the entry and click Primary.
2) When the Add button is clicked, a query runs to search for any contacts that match the data entered in First/Middle/Last name. At least two of the three Name fields must be entered in order for the search to run. If no match is found, a new Contact record can be created. If match(es) are found, a window entitled Traveler/Contact Search is displayed, from which the user can either link the existing traveler/contact or cancel.
3) Click Payment Info to add a credit card or bank information linked to this contact. Updates for any payments linked to a specific contact must be done from within the Travelers tab.
4) If this contact/traveler is associated with other profiles, the Associated Profiles button is available. When clicked, a new window entitled Associated Profiles opens and a list of the associated profiles for that traveler/contact is displayed which includes the number of profiles the traveler/contact is associated with.
Delete removes the Contact from the current profile. Once a Contact/Traveler is deleted from the last remaining Associated Profile, the Contact is then deleted from the database. If a traveler/contact is linked to a booking and deleted from a profile, they will no longer be linked. The name will still appear on the booking as if a free flow name had been entered. Update is clicked when changes are made to the contact information.
PAYMENT TAB
Account Type
Select Credit Card or Bank Account from drop-down menu.
Account Number
Enter the Account Number for the credit card selection.
C/C Exp Date/Name on Account
Enter the last day of the month the cc expires and Name of the Account.
Bank Routing No.
This Payment Method can be used for handing off data from TBO to a Payment Distribution Service or the local bank. For complete directions on using this feature, please refer to the Payments section of this manual.
GROUP TAB
|
Group/Batch |
Any group(s) to which the vendor belongs. This field can be used as a selection criteria for reports, or to run group statements and summary reports. Click on Add. Type the first few letters of the group name, then click on the arrow to see the choices, and click on the group to close the menu. Set up new groups from here, or from Utilities|Setup|Groups. |
MARKETING TAB
|
Business Type |
Type of vendor, e.g. Hotel, Cruise, Tour, etc. |
|
Other |
Marketing data important to particular vendor. Field is used as selection criteria for lists and labels. |
|
Notes |
Any free flow information about the vendor. Field is used as selection criteria for lists and labels. |
|
Additional Notes |
Miscellaneous information relating to this vendor. Field is used as selection criteria for lists and labels. |
|
Statement Remarks |
IMPORTANT! Any remark entered in this area of the vendor profile appears on all statements generated for this profile, if Include Profile Remarks has been checked. |
|
Travel Preference |
Additional field to keep information. |
|
Travel Categories |
Eliminate mismatches between Car and Hotel profiles with the same 2 letter Interface ID code. Interface Record now looks at Interface ID and Travel Category contained in profile for a correct match. |
|
Check Remarks |
Enter a specific profile “Account Number” or remark that will print on the check for payments made using the profile. |
|
Alt Interface ID |
The interface process now checks both Interface ID and Alternate Interface ID for a match on clients and vendors. This feature is used by those agencies that are using multiple GDS interfaces where the interface ID's for Hotel Codes are different for each GDS. Now use a single vendor profile for both systems. Put one Interface ID in the Interface ID field on the profile General Tab, and for a different GDS, the other Interface ID in the Alt Interface ID field on the Marketing Tab. Enter up to ten alpha/numeric characters. |
ATTACHMENTS TAB
In TBO version 3.05, an attachment tab has been added to all profile (Client, Vendor, Agent, Other), all invoice types (sale, refund, adjustment) and the payment screens. The tab is located adjacent to the tab now named General at the top of each screen. Within the workspace area of the new attachment tab, users can manage (add, view, delete, update) electronic documents of any type.
|
Filename |
Click the browse button to locate to the desired file. |
|
Compressed |
Defaults to enabled. Compressing the file helps to reduce the file size (maximum file size is 8MB). |
|
Description |
Enter a user-defined description. |
|
Path |
This field is automatically populated based on the location of the file. |
Add, adds a new file; Update, updates the existing file with a new or updated file; View, opens the file; and Delete deletes the attached file.
Entering Vendor Profiles
1. To enter a new Vendor Profile click Profiles|Vendor.
Start with the General Information tab. The Name is the only field required for building a vendor profile. Query a profile and modify existing information. Trams Back Office recommends entering as much information as possible in all profiles. If a field is left blank, it is not used in future applications. For example, if the address fields are left blank, statements and all other output using the address will have blanks where the address would print. Trams Back Office also recommends that use of both upper and lower case (e.g. Holiday Inn instead of HOLIDAY INN) when entering the name and address information to enhance the appearance of the mailing labels and other types of correspondence. Note: Don’t forget the Interface ID field if the agency plans to interface invoices for this profile in the future.
2. Click the Communications, Contacts, Payment Info, Groups, Marketing, or Attachment tabs to add as much information to the profile as possible. For more details are these areas, read Vendor Profiles in this chapter.
3. When the profile is complete, click OK and continue entering a profile by selecting New.
Tip: Look at the bottom of the New Profile screen. There is a checkbox next to Continue entering profiles. To enter multiple profiles at one time, make sure the box is checked. When finished entering profiles, click on the box and remove the check to return to the main menu instead of the profile entry screen.
A Vendor Profile should be built for each vendor the agency wants to track. (See the Interface Download chapter about creating the Interface ID through the Interface process.) For commission tracking purposes, “Hotel” profiles should be built for each hotel location.
Other Profiles
Other profiles are used in the Payments section and allow for maintaining “other” histories on other individuals and companies with whom the agency does business. For example, a company to which expenses are paid is entered as an Other profile. Utility companies (gas, electric, phone), landlord, etc. are entered as Other profiles. Name and address information for Other profiles is included on computer-generated checks.
Review the listing of fields below to get familiar with the data stored in Other Profiles.
GENERAL TAB
|
Profile Name |
Name of the company or individual. |
|
Contact Last Name, First, Middle |
Name of the contact person. |
|
Contact Title |
Contact person's title, e.g., Accounts Payable. |
|
Courtesy Title |
Such as: Mr. and Mrs., Mr., Mrs., Dr., etc. |
|
Street Address 1: and 2: |
Mailing street address. There are two lines available. |
|
City, State, Zip Code and Country |
Other Profile's city, state, ZIP code and country if applicable. The ZIP code can contain numbers and letters. |
|
Payee Name |
Name of person/entity financially responsible for account. |
|
Interface ID |
Only used for transmitting data from certain programs, such as a payroll program. Enter up to ten alpha/numeric characters. |
|
G/L 1 & 2 Account |
Default GL accounts for journal entries when making payments for this profile. |
|
G/L Branch |
Associate a particular branch to this profile whenever it is used. This overwrites the settings set up at the Branch level and in the Global Defaults. |
|
G/L Account Rate |
Specifically designed to calculate Canadian GST taxes during G/L entry. |
|
Inactive |
Click this box mark this profile Inactive. It will not longer appear in the Query Screen. |
|
Continue Entering Profiles |
Click this box to continue entering profiles without getting “booted” out of this screen. |

Entering Other Profiles
To build an Other profile, the only field required is Name.
1. Click Profiles|Other to create a new Other Profile.
2. Start with the General Information tab. The Name is the only field required for building an Other profile. Query a profile and modify existing information. Trams Back Office recommends entering as much information as possible in all profiles. If a field is left blank, it is not used in future applications. For example, if the address fields are left blank, statements and all other output using the address will have blanks where the address would print. Trams Back Office also recommends to use both upper and lower case (e.g. Gas Company instead of GAS COMPANY) when entering the name and address information to enhance the appearance of the mailing labels and other types of correspondence.
3. Click the Communications, Contacts, Payment Info, Groups, Marketing, or Attachments to add as much information to the profile as possible.
4. When the profile is complete, click OK and continue entering profiles by selecting New.
Tip: Look at the bottom of the New Profile screen. There is a checkbox next to Continue entering profiles. To enter multiple profiles at one time, make sure the box is checked. When profiles have been entered, click on the box and remove the check to return to the main menu instead of the profile entry screen.
COMMUNICATIONS TAB
|
Entering Type, Value, Description, Contact Name. Using Add, Update, and Primary. |
Select type (phone, e-mail, fax, or web) by clicking the down arrow on the scroll bar. The recommended format for entering the phone number is nnn/nnn-nnnn. The area code and the country code entered into Global Defaults automatically default. After entering Type, Value, and Description (cell phone, business email, etc.), Click Add. Enter as many profile communication entries this way, or click on the Contacts tab to enter more specific Contact communication items which appears here with the Contact’s name. To edit an entry, double-click on item, make changes and click Update. The first entry of each type defaults as primary. Any selected entry can be designated as primary by clicking on the Primary button. |
|
Using Delete/Edit Contact Communication |
All Contacts must be associated to a profile, but can be linked to multiple profiles. The delete button removes the Contact from the current profile. Once the contact is deleted from the last remaining associated profile, the profile will be deleted from the database. Email addresses (and other communication entries) now reside in the Contact record, but viewing and/or changing those Contact communication entries can be done by clicking on Edit Contact Communications after first selecting the entry. |
|
Columns |
The Columns can be sorted in ascending order when the column header is clicked once and in descending order when clicked a second time (with the exception of Primary Phone and Primary E-mail at this time). |
CONTACTS TAB
All Contacts must be a part of a profile, but can be linked to multiple profiles.
ADD A NEW CONTACT
1) Type the Contact First Name, Middle Name, Last Name, Position, Department, and click Add. Need to add a phone number, fax, email or web address? Select the entry and click Comm Info to enter. Want to make this entry the primary entry for the profile? Select the entry and click Primary.
2) When the Add button is clicked, a query runs to search for any contacts that match the data entered in First/Middle/Last name. At least two of the three Name fields must be entered in order for the search to run. If no match is found, a new Contact record can be created. If match(es) are found, a window entitled Traveler/Contact Search is displayed, from which the user can either link the existing traveler/contact or cancel.
3) Click Payment Info to add a credit card or bank information linked to this contact. Updates for any payments linked to a specific contact must be done from within the Travelers tab.
4) If this contact is associated with other profiles, the Associated Profiles button is available. When clicked, a new window entitled Associated Profiles opens and a list of the associated profiles for that traveler/contact is displayed which includes the number of profiles the traveler/contact is associated with.
Delete removes the Contact from the current profile. Once a Contact/Traveler is deleted from the last remaining Associated Profile, the Contact is then deleted from the database. If a traveler/contact is linked to a booking and deleted from a profile, they will no longer be linked. The name will still appear on the booking as if a free flow name had been entered. Update is clicked when changes are made to the contact information.
Export Contact Profile
Users with Manager authorization can export profiles from the Contacts tab.
Note: Remarks are also exported. Use caution if your agency uses the remarks fields for information that you do not want to provide to a customer.
To Export a Profile:
- Right-click on a Contact.
- Click Export Traveler/Contact.
PAYMENT TAB
|
Account Type |
Select Credit Card or Bank Account from drop-down menu. |
|
Account Number |
Enter the Account Number for the credit card selection. |
|
C/C Exp Date/Name on Account |
Enter the last day of the month the cc expires and Name of the Account. |
|
Bank Routing No. |
This Payment Method can be used for handing off data from TBO to a Payment Distribution Service or the local bank. For complete directions on using this feature, please refer to the Payments section of this manual. |
GROUP TAB
|
Group/Batch |
Any group(s) to which the other profile belongs. This field can be used as a selection criteria for reports, or to run group statements and summary reports. Click on Add. Type the first few letters of the group name, then click on the arrow to see the choices, and click on the group to close the menu. Set up new groups from here, or from Utilities|Setup|Groups. |
MARKETING TAB
|
Business Type |
Type of other profile, e.g. Utilities, Publications, etc. |
|
Other |
Marketing data important to particular profile. Field is used as selection criteria for lists and labels. |
|
Notes |
Any free flow information about the profile. Field is used as selection criteria for lists and labels. |
|
Additional Notes |
Miscellaneous information relating to this profile. Field is used as selection criteria for lists and labels. |
|
Statement Remarks |
IMPORTANT! Any remark entered in this area of the profile appears on all statements generated for this profile, if Include Profile Remarks has been checked. |
|
Travel Preference |
Additional field to keep information. |
|
Travel Categories |
Eliminate mismatches between profiles with the same 2 letter Interface ID code. Interface Record now looks at Interface ID and Travel Category contained in profile for a correct match. |
|
Check Remarks |
Enter a specific profile “Account Number” or remark that will print on the check for payments made using the profile. |
|
Alt Interface ID |
The interface process now checks both Interface ID and Alternate Interface ID for a match on clients and vendors. This feature is used by those agencies that are using multiple GDS interfaces where the interface ID's for Hotel Codes are different for each GDS. Now use a single vendor profile for both systems. Put one Interface ID in the Interface ID field on the profile General Tab, and for a different GDS, the other Interface ID in the Alt Interface ID field on the Marketing Tab. Enter up to ten alpha/numeric characters. |
ATTACHMENTS TAB
In TBO version 3.05, an attachment tab has been added to all profile (Client, Vendor, Agent, Other), all invoice types (sale, refund, adjustment) and the payment screens. The tab is located adjacent to the tab now named General at the top of each screen. Within the workspace area of the new attachment tab, users can manage (add, view, delete, update) electronic documents of any type.
|
Filename |
Click the browse button to locate to the desired file. |
|
Compressed |
Defaults to enabled. Compressing the file helps to reduce the file size (maximum file size is 8MB). |
|
Description |
Enter a user-defined description. |
|
Path |
This field is automatically populated based on the location of the file. |
Add, adds a new file; Update, updates the existing file with a new or updated file; View, opens the file; and Delete deletes the attached file.
Agent Profiles
Agents are employees or outside agents. Profiles for agents are similar to other profiles. The Interface ID must match the agent sine entered in the PNR. By default, Trams Back Office picks up the booking agent of record, usually a two-character alphanumeric sine of the agent that created the PNR. Enter up to ten characters in the Interface ID to accommodate additional agents or agent overrides. Agent Interface ID’s can be up to ten alphanumeric characters (letters or numbers). If the agency already uses codes or initials for identification, continue using them in Trams Back Office. By creating an agent profile, inside and outside agents are identified in each invoice and that information is available in the Reports section.
Review the listing of fields below to get familiar with the data available in an Agent Profile.
GENERAL TAB
|
Profile Name |
The name or code used to identify this agent. Use any combination of letters and numbers. If created by Interface, Trams Back Office uses the same code as the Interface ID. |
|
Last Name, First, Middle |
The name of the agent. |
|
Contact Title |
Employee’s job title. |
|
Courtesy Title |
Suggested use is Mr./Mrs./Ms. etc. |
|
Salutation |
Name to use when greeting agent, e.g. First Name (Robert), Nickname (Bob), etc. |
|
Street Address 1: and 2: |
Agent's mailing street address, up to two lines. Information is used for agent's statements. |
|
City, State, Zip, Country |
Agent's city, state, ZIP code, and country. |
|
Payee Name |
Name of person/entity paying on the account. |
|
Interface ID |
For use with reservation system interface; enter corresponding agent code/ID. See Interface Section for additional agents. Enter up to ten alpha/numeric characters. |
|
Inside/Outside Rates |
Default commission rates that the agent earn for both Inside and Outside sales. These defaults carry over to the Invoice screen when this Agent is selected. Important: See Agent’s Rates and Default Rates Below.* |
|
G/L Account 1 and 2 |
Two default GL accounts for this agent are available when a journal entry is needed for a payment to/from this agent. |
|
G/L Account Rate |
Specifically designed to calculate Canadian GST taxes during G/L entry.
|
|
Inactive |
Click this box to mark this profile Inactive. It will not longer appear in the Query Screen. |
|
Continue Entering Profiles |
Click this box to continue entering profiles without getting “booted” out of this screen. |
|
|
Mary, whose agent sine is 33, is a salaried employee. You want to track her productivity as an inside agent. Sometimes Mary works on special promotions for a 50% commission, plus a referral commission of 10% for her special corporate clients. Her profile shows NO commission defaults on inside or outside agents. By using the additional commission feature in the invoice, you can track her occasional 50% commission. For her referral clients, you can list the 10% on this profile. |
Entering Agent Profiles
1. To enter a new Agent Profile, Profiles|Agent.
2. The Profile Name is the only field required for building an Agent profile. Query a profile and modify existing information. Trams Back Office recommends entering as much information as possible in all profiles. If a field is left blank, it is not used in future applications. For example, if the address fields are left blank, statements and all other output using the address will have blanks where the address would print. Trams Back Office also recommends use of both upper and lower case (e.g. John Smith instead of JOHN SMITH) when entering the name and address information to enhance the appearance of the mailing labels and other types of correspondence.
Note: Don’t forget the Interface ID field if the agency plans to interface invoices for this profile in the future.
3. Click the Communications, Contacts, Payment Info, Groups, Marketing tab to add as much information to the profile as possible.
4. When the Profile is complete, click OK to return to the Profile Query Screen. To continue entering, select New.
Tip: Look at the bottom of the New Profile screen. There is a checkbox next to Continue entering profiles. To enter multiple profiles at one time, make sure the box is checked. When finished entering profiles, remove the check to return to the main menu instead of the profile entry screen.
COMMUNICATIONS TAB
|
Entering Type, Value, Description, Contact Name. Using Add, Update, and Primary. |
Select type (phone, e-mail, fax, or web) by clicking the down arrow on the scroll bar. The recommended format for entering the phone number is nnn/nnn-nnnn. The area code and the country code entered into Global Defaults automatically default. After entering Type, Value, and Description (cell phone, business email, etc.), Click Add. Enter as many profile communication entries this way, or click on the Contacts tab to enter more specific Contact communication items which appears here with the Contact’s name. To edit an entry, double-click on item, make changes and click Update. The first entry of each type defaults as primary. Any selected entry can be designated as primary by clicking on the Primary button. |
|
Using Delete/Edit Contact Communication |
All Contacts must be associated to a profile, but can be linked to multiple profiles. The delete button removes the Contact from the current profile. Once the contact is deleted from the last remaining associated profile, the profile will be deleted from the database. Email addresses (and other communication entries) now reside in the Contact record, but viewing and/or changing those Contact communication entries can be done by clicking on Edit Contact Communications after first selecting the entry. |
|
Columns |
The Columns can be sorted in ascending order when the column header is clicked once and in descending order when clicked a second time (with the exception of Primary Phone and Primary E-mail at this time). |
CONTACT TAB
All Contacts must be a part of a profile, but can be linked to multiple profiles.
ADD A NEW CONTACT
1) Type the Contact First Name, Middle Name, Last Name, Position, Department, and click Add. Need to add a phone number, fax, email or web address? Select the entry and click Comm Info to enter. Want to make this entry the primary entry for the profile? Select the entry and click Primary.
2) When the Add button is clicked, a query runs to search for any contacts that match the data entered in First/Middle/Last name. At least two of the three Name fields must be entered in order for the search to run. If no match is found, a new Contact record can be created. If match(es) are found, a window entitled Traveler/Contact Search is displayed, from which the user can either link the existing traveler/contact or cancel.
3) Click Payment Info to add a credit card or bank information linked to this contact. Updates for any payments linked to a specific contact must be done from within the Travelers tab.
4) If this contact/traveler is associated with other profiles, the Associated Profiles button is available. When clicked, a new window entitled Associated Profiles opens and a list of the associated profiles for that traveler/contact is displayed which includes the number of profiles the traveler/contact is associated with.
Delete removes the Contact from the current profile. Once a Contact/Traveler is deleted from the last remaining Associated Profile, the Contact is then deleted from the database. If a traveler/contact is linked to a booking and deleted from a profile, they will no longer be linked. The name will still appear on the booking as if a free flow name had been entered. Update is clicked when changes are made to the contact information.
PAYMENT TAB
|
Account Type |
Select Credit Card or Bank Account from drop-down menu. |
|
Account Number |
Enter the Account Number for the credit card selection. |
|
C/C Exp Date/Name on Account |
Enter the last day of the month the cc expires and Name of the Account. |
|
Bank Routing No. |
This Payment Method can be used for handing off data from TBO to a Payment Distribution Service or the local bank. For complete directions on using this feature, please refer to the Payments section of this manual.
|
GROUP TAB
|
Group/Batch |
Any group(s) to which the agent belongs. This field can be used as a selection criteria for reports, or to run group statements and summary reports. Click on Add. Type the first few letters of the group name, then click on the arrow to see the choices, and click on the group to close the menu. Set up new groups from here, or from Utilities|Setup|Groups. |
MARKETING TAB
|
Business Type |
Type of agent, e.g. Inside, Outside, etc. |
|
Other |
Marketing data important to particular profile. Field is used as selection criteria for lists and labels. |
|
Notes |
Any free flow information about the profile. Field is used as selection criteria for lists and labels. |
|
Additional Notes |
Miscellaneous information relating to this profile. Field is used as selection criteria for lists and labels. |
|
Statement Remarks |
IMPORTANT! Any remark entered in this area of the profile appears on all statements generated for this profile, if Include Profile Remarks has been checked. |
|
Travel Preference |
Additional field to keep information. |
|
Travel Categories |
Eliminate mismatches with the same 2 letter Interface ID code. Interface Record now looks at Interface ID and Travel Category contained in profile for a correct match. In the case of an agent profile, probably the Travel Category is None. |
|
Check Remarks |
Enter a specific profile “Account Number” or remark that will print on the check for payments made using the profile. |
|
Alt Interface ID |
The interface process now checks both Interface ID and Alternate Interface ID for a match on clients and vendors. This feature is used by those agencies that are using multiple GDS interfaces where the interface ID's for Hotel Codes are different for each GDS. Now use a single vendor profile for both systems. Put one Interface ID in the Interface ID field on the profile General Tab, and for a different GDS, the other Interface ID in the Alt Interface ID field on the Marketing Tab. Enter up to ten alpha/numeric characters. |
ATTACHMENTS TAB
In TBO version 3.05, an attachment tab has been added to all profile (Client, Vendor, Agent, Other), all invoice types (sale, refund, adjustment) and the payment screens. The tab is located adjacent to the tab now named General at the top of each screen. Within the workspace area of the new attachment tab, users can manage (add, view, delete, update) electronic documents of any type.
|
Filename |
Click the browse button to locate to the desired file. |
|
Compressed |
Defaults to enabled. Compressing the file helps to reduce the file size (maximum file size is 8MB). |
|
Description |
Enter a user-defined description. |
|
Path |
This field is automatically populated based on the location of the file. |
Add, adds a new file; Update, updates the existing file with a new or updated file; View, opens the file; and Delete deletes the attached file.
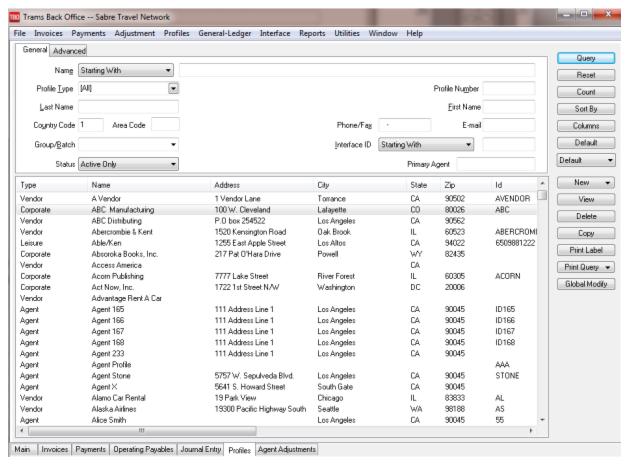
Profile Query
Query retrieves an existing (or a previously entered) profile. Enter the query screen by either selecting Profile|Query from the main menu or using the Profile tab at the bottom of the screen. The query screen is broken into two sections. The top section is used to enter the data for the query and the bottom section displays the results of the query. The fields displayed in the top section show how a profile/s can be found. Each of these fields are fields within a profile and can be used to locate that profile again. As few as none and as many as all can be completed to retrieve a profile.
The more criteria entered in a query, the more selective the search for matching invoices. The most frequently used query fields show on the General tab and additional fields are found in the Advanced tab. Enter the criteria available (or applicable) and the system brings up a complete listing of profiles matching that criteria.
To the right of some of the fields are drop-downs with selection options or operators.
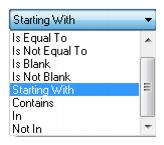
These operators help to more narrowly define the search. (When doing searches on fields containing “wildcard” search criteria using the selections of “IN” and “NOT IN," the field must contain the complete string entered between the delimiters or the exact match). In other words, In and Not In works like Is Equal to or Is Not Equal to except that the list of values when using In and Not in when separated by a comma will search for each value in the list. The entire text would need to match exactly for Is Equal to or Is Not Equal to.
Buttons on the right side of the screen are also broken into two sections. Query, Reset, Count, Sort by, Columns, and Default are buttons related to the query:
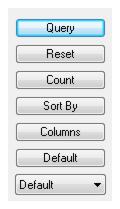
Query: After using the selection criteria in the General or Advanced tabs, click Query to process the search.
Reset: Clears out any previous query criteria in both the General and Advanced tab.
Count: Get a number of items that match the query criteria.
Sort by: Selects how to display the results once the query is executed. By clicking Save Settings, save sort settings for next time.
Columns: Used to select which columns of data to display in the results screen. Click Columns and choose the columns to display by highlighting the column in the Available Fields and clicking on the left arrow to move it over to Displayed Fields. Using the red up and down arrows, put the column in the order to appear on the results screen. Click OK. Now go to the results screen and resize the columns. Go back into Columns, click Save Settings and OK to save.
Drag and drop the columns to re-position them on the results screen if desired. Do this by clicking on the column to move, holding down the left mouse button, and sliding the column to any position on the query screen. To place a column to the right or left of any existing column, stop on the column to the right or left and release the mouse. The moved column is inserted in the correct place.
Default: Saves the filters in a query.
Follow these directions to create a new Saved Query:
1. Change the selection criteria on the results screen for the new query to save.
2. Click Default.
3. Type in the new query name in the Setting Name field.
4. If this saved query is the default, at the top of the drop-down window, check Set As Default.
5. Select Per User (on this workstation only) or Global (on everyone’s sets).
6. Click OK to save.
To remove a saved query from the list, check the Remove the Current Named Setting box, click OK and the saved query is no longer available for use in the drop down field.
Once the listing of matching profiles is displayed through Query, any profile can be added(New), viewed (View), copied (Copy), or deleted(Delete - only delete profiles that do not have invoices or payments attached.) Highlight an entry (or multiple entries by using SHIFT or CTR keys), and print a label or labels (Print Label) from this menu. By clicking Print Query, print out the results screen for all items or selected items.
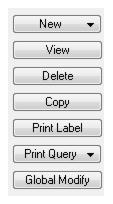
Global Modify adds a profile Group value to any profiles to more quickly and easily modify queried profiles with a Group Code. This is especially helpful for adding the hotel chain code to the Group Tab of a vendor profile. If the query screen has some profiles with a Group Code and others without one, selecting Add For All Query Results adds the Group Code to all profiles without one and NOT add the code again to all profiles that have it. This adds the Group Code to all profiles in a query without having to specifically select individual profiles using the Ctrl or Shift keys.
Profile Help screens are easily accessed within the Profile’s Menu by simply clicking on the Help button or F1.
Right-Mouse Click Menu in Profile Query
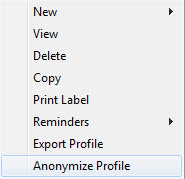
New - Creates a new profile - Leisure, Corporate, Vendor, Agent, or Other.
View - View the profile.
Delete - Delete the profile.
Copy - Copy the profile to create new profile.
Print Label - Prints a single label or an envelope for the profile.
Reminders - View existing reminders or create new reminders.
Export Profile - Export the profile for users with Manager authorization. Note: Remarks are also exported. Use caution if your agency uses the remarks fields for information that you do not want to provide to a customer.
Anonymize Profile - Used when a client requests that an agency delete their personal data, but their profile cannot be deleted due to the presence of res cards, invoices/booking, and/or payments.
Note: Only users with with Manager authorization and Read/Write profile rights can anonymize a profile.
The Anonymize Profile feature removes or overwrites Remarks, Record Locators, IUR records, Traveler Names, Check/Credit Card numbers, Attachments, free flow Traveler Names, and Activities from Invoices and/or Bookings belonging to a profile that is being anonymized.
Profiles with open invoices and/or payments cannot be anonymized. Groups will not be cleared as they may be required for reporting purposes.
The profile is set to inactive status after anonymizing.
Sorting Profile Data
Sort data in all query screens in two ways:
1. Quick sort by one field by clicking on a column in the results screen. The first click sorts the column in ascending order (first to last or earlier date to more current date), and clicking on the same column a second time sorts in descending order (last to first or current date to earlier date).
2. Sort in Ascending or Descending order by up to 3 columns. When clicking Sort By, select the first, second or third column sort and what order (ascending or descending) to display the data. Enter the selection criteria and click Save Settings and OK.
New Profile
To create a new profile from the query screen, click on the New button and complete the information fields. (See detailed information on entering each type of profile in sections in this chapter.)
Selecting Profiles/Viewing Existing Profiles
To select a profile to view or modify (once the listing of matching profiles is displayed on the screen) highlight the appropriate profile and select View. The creation date is located at the bottom together with a “Modified At” date and time and a “By” if the profile was modified.
Deleting Profiles
Profiles may only be deleted if there is not activity pointing to them. If any activity is pointing to a profile, Trams Back Office prompts “Cannot Delete Profile with Payments/Invoices Attached,” and will not delete the profile.
1. Click Profiles|Query.
2. In the Name field, type in the name (or a portion of the name) of the profile to delete.
3. Click the arrow to the right of the Profile Type field and select the appropriate profile type. Click Query to process.
4. Trams Back Office displays a profile list. Click the desired profile, then click Delete.
5. Trams Back Office prompts, “Delete Profile (Name)?” Click YES.
6. To delete another profile, click Reset and repeat steps 2 – 5.
Transfer Invoice/Payment to Different Profile
If an invoice and/or payment has been applied to the wrong client (in a closed or open period), transfer the invoice/payment all at once by querying invoice up and changing the name of the client.
1. Query the invoice that needs to be moved to a different client.
2. Highlight the invoice and click View; or double-click the invoice.
3. Click the Client Name field and type in a couple letters of the profile to change the name on the invoice.
4. Use the down arrow to find the exact match.
5. Get the following message if there is a payment attached:
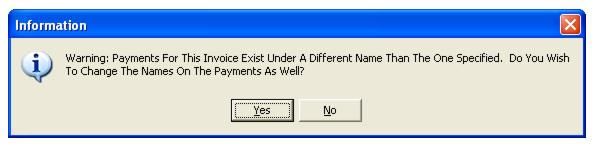
6. Click Yes to transfer the payment as well OR select No for payment to remain under the original Client Name.
7. Query up and delete out the duplicate profile if applicable.
Copying Profiles
To copy information from an existing profile as defaults into a new profile, highlight the appropriate profile to be copied and click Copy. The system displays a new profile record with all defaults completed from the copied profile, except for the Date Created, which defaults to the system date. Any of these defaults can be changed or deleted and more information entered before saving the new profile. When the profile is complete, select OK.