
Payments
This chapter contains:
- Overview of Payment Query feature
- Overview Receipts and Payments
- How to make Bank Deposits, Withdrawals, Transfers
- How to do a Bank Reconciliation, CC Merchant Reconciliation and Agent Reconciliation
- Overview of Payable Functions, ARC/BSP Settlement, Payroll Import, and Import
Payments Received or Made
These are the payments received from or made to Clients (Leisure or Corporate), Vendors (Supplier, or Commission Tracking), ARC (ARC/BSP Settlement), Agent, or Other. Payments Received or Made with a Profile Type of Client, Vendor or ARC/BSP are connected to an invoice. Payments Received or Made with a Profile Type of Other and Agent are not linked to an invoice and prompts for a journal entry.
There are five profile types for payments received and payments made - Client, Vendor, Agent, Other, and ARC/BSP.
Payments Received|Made|Deposit|Withdrawal
General Tab
|
Client |
Entering client payments update specific client account balances and are either applied to specific ARC/BSP and Supplier type invoices entered into the system, left unapplied or turned into a voucher, crediting the client’s account. Any pending client balances appear on the report called Client Balances found in Reports|Core. To maintain accurate client balances (one of the Core Reports of the system) all invoices and client payments received and made must be entered into Trams Back Office. |
|
|
Vendor |
Entering Vendor (Submit to of) Supplier payments received and made update specific vendor account balances and are usually applied to specific Supplier type invoices entered into the system. Any pending vendor balances appear on the report called Vendor Balances found in Reports|Core. To maintain accurate vendor balances (one of the Core Reports of the system) all Supplier type invoices, as well as all Vendor-Supplier payments received and made, must be entered into Trams Back Office. Entering Vendor (Submit to of) Comm Track payments clears any tickler files created by Commission Tracking type transactions entered into the system. Comm Track-type bookings do not update the General Ledger until they have been closed with a Vendor payment. |
|
|
Agent |
Payments can be received from agents for reimbursing the agency for expenses such as a special gift sent to a customer which was purchased with agency money. Payments can be made to agents for expense reimbursement. These transactions do not apply to an invoice and would require a journal entry to update the general ledger. |
|
|
Other |
Other payments are entered when money is received or made which does not pertain to a client balance, a vendor balance, or any Comm Track type bookings. Examples are agency expenses and miscellaneous receipts. |
|
|
ARC/BSP |
Approximately five days after submitting the ARC/BSP report, ARC/BSP either deposits or withdraws payment to/from the agency’s bank account. By performing an ARC/BSP Settlement in TBO (see section below), Core Reports of ARC/BSP Balances and Check Register are updated. |
|
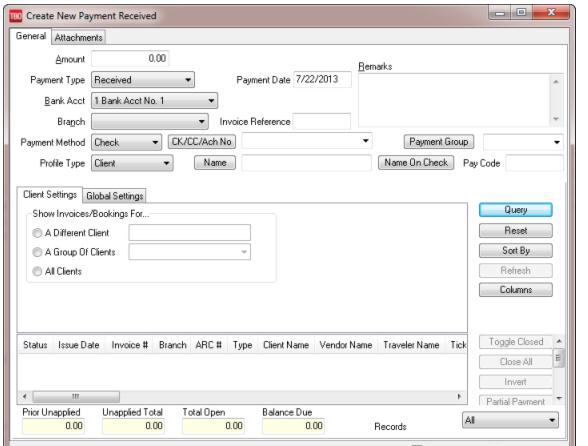
Payment Received/Payment Made Fields
|
Amount |
Enter the Payment amount received/made from client or vendor, deposit or withdrawal amount. |
|
|
Payment Type |
Select Received, Made, Deposit, Withdrawal. Important Note: Enter Payments Received, Made, Deposits, Withdrawal and perform an ARC/BSP Settlement from the same screen without having to return to the Main Menu. |
|
|
Payment Date |
Enter the payment date manually or by clicking the mouse on the date field to display a calendar. Note that the default date is the date entered for the most recently entered payment. The default date for the first entered payment is the system date. |
|
|
Bank Acct |
A number is assigned to each Bank Account. Enter appropriate Bank Account number for the payment or select from pull-down menu. A default bank account can be set up in Utilities|Setup|Global Defaults|Prompt. |
|
|
Branch |
Associate a branch from the drop-down menu with this payment if desired. This can be used for query and sort purposes in Payments, Bank Rec, Receipts, Payment Analysis, Client Statements, Vendor Statements, etc. Assign a branch to a payment if desired and still close out invoices created in more than one branch. |
|
|
Invoice Reference |
Enter an invoice reference when applicable. A warning comes up when saving a payment to the same profile where this Invoice Reference is the same as another existing payment under that profile. (This is an aid in not paying the same expense vendor twice for the same invoice or statement.) |
|
|
Date Cleared |
Date payment is cleared in the bank or credit card reconciliation process |
|
|
Remark |
500 spaces are allocated for free flow alphanumeric remarks. Click the scroll button at the end of the Remarks field to view multiple lines of remarks. These Remarks can also be used as criteria in a query screen. When checks are printed by Trams Back Office, if desired, these remarks appear on the check. |
|
|
Payment Method |
Click the down-arrow and highlight Cash, Check, Credit Card, Other, CC Merchant, EFT - stands for Electronic Funds Transfer, or ACH - Automated Clearing House. The system defaults to a payment method of Check. Use CC Merchant when the agency is processing a credit card. (See section of this chapter entitled Pay Method for Agency Processed Credit Cards for more details. See section of this chapter entitled Electronic Funds Transfer for further details about EFT payment methods, and Automated Clearing House about ACH payment method.) |
|
|
Credit Card/Check Number |
If the Payment Method is Check, enter the check number. If the payment method is Credit Card, enter the credit card number. If the payment method is CC Merchant, enter the credit card number\expiration date and the slash (\) is important. If the credit card is listed in the client profile, click the down arrow and select the credit card. A credit card can be added directly to the client profile from the payment screen by clicking the Check/CC no. button on the payment screen. |
|
|
Payment Group |
This field assigns a unique group name to a group of invoices for selecting in a query or filtering for reports. To create a new payment group from the payment screen, click the Payment Group button. |
|
|
Profile Type |
Click on the down-arrow to select among Client, Vendor,Agent, Other, or ARC. (See section Payment Profile Types above.) |
|
|
Name |
Enter name or a portion of the profile name. Click the down-arrow and Trams Back Office displays a list of all potential names. To select a name from the list, highlight and click on the correct name. If there is no match, there is a TBO message, No matching Profiles found. Do you wish to create a new Profile? Click No and re-try the search, or enter an entire name and select Yes to create a new profile. When finished with the new profile, click OK and return to payment input. Also search by ID by a right click of the mouse in the name field. Query for a name by clicking the mouse on the “Name” field. |
|
|
Name (and/or Address) on Check |
If the name (and/or address) on the check differs from the name (and/or address) of the client, enter this information here for reference. (The profile name and/or address does not change as a result of entering the check name/address here.) |
|
|
Payment Code |
For recurring payments, assign a unique payment code for later selecting in a query and for easy duplication. |
|
|
Client Settings/ Vendor Settings Tab |
With a Profile Type of Client, select invoices for A Different Client, A Group of Clients, or All Clients. For example, a corporate account has a separate profile for each division. Each of the profiles has the same Client group code in the groups tab of the profile. By selecting A Group of Clients, the invoice listing screen reflects any open invoices from all profiles in the group. The receipts report shows a single payment that matches the amount of the check received. With a Profile Type of Vendor, select a Submit To of All, Supplier, Comm Track and/or a Date Payable, A Different Vendor, A Group of Vendors, Vendors by Interface ID, or All. For example, a hotel franchise may have multiple vendor profiles. Each of these profiles has the same Vendor group code in the groups tab of the profile. By selecting A Group of Vendors, the invoice listing screen displays any open invoices from all profiles in the group. This can be used if only one payment is needed to be assigned to the payment received. Multiple vendors can also be displayed by selecting Vendors by Interface ID and entering a hotel chain code such as HI. This displays all invoices from all vendor profiles that start with HI. |
|
|
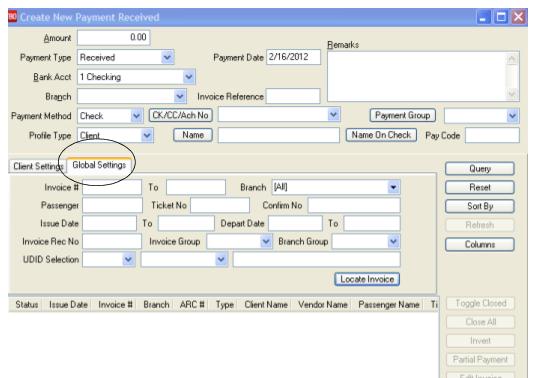
Global Settings Tab |
Select invoices by Invoice # or range, Branch, Passenger, Ticket No.,Confirmation No., Issue Date or Depart Date From/To, Invoice Group, UDID criteria and more. The invoice listing reflects the narrowed down results of the entered filter information. (The branch field on the Global Settings tab of the payment screen defaults to the branch specified at the payment level; if no branch is specified, then all branches are selected.) Click Locate Invoice to find invoice in the invoice query screen. This is used when the invoice number is known or other information about the invoice for the payment being received, but are not sure which Client Name the invoice is under. Once the invoice is located from the Query Screen and selected, the payment screen is populated with the correct Client Name. Only the invoice selected is displayed. |
|
|
Records |
Select All, Invoice Only, or Bookings Only. |
|
|
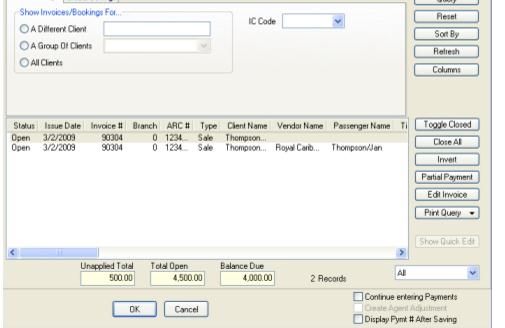
Continue entering payments |
To enter multiple payments at one time, make sure Continue Entering Payments is checked. When entering the last payment, remove the check to return to the main menu instead of the payment entry screen. |
|
|
Create Agent Adjustment |
When the profile type is Agent or Other, a window appears from which an agent commission or payment adjustment can be made. |
|
|
Display Pymt# After Saving |
If checked, the system prompts with the payment number when saving a payment so that number can be recorded. |
|
|
Print Check After Saving |
When creating a Payment Made, the Print Check after Saving check box is located in the lower right-hand corner of the payment screen. Once the option is enabled it will stick until the check mark is removed. When the payment (and journal entry) has been saved, the Check Writer dialogue box is launched and behaves in the same manner as when used from the Reports|Payments|Check Writer area. |
|
After entering a payment to or from a client or vendor, the system displays open invoices and any account balances applicable to the source of the payment when clicking Query.
Columns is used to select columns of data to display in the results screen. Click Columns and choose the columns by highlighting the column in the Available Fields and clicking the right arrow to move it over to Displayed Fields. Using the red up and down arrows, put the columns in the order to appear. Click OK. Return to the results screen and size the columns as desired, go back into Columns and click Save Settings and OK to save. Column settings can also be saved in the Edit Payments screen. Next click Sort to sort the columns of data displayed by up to 3 different fields in ascending or descending order. Click Save Settings.
Note: The column Net Due changes depending on how the invoices and bookings are viewed from the Client side, or bookings from the Vendor side:
From the Client Side:Net Due is “0” when looking at Supplier Invoices unless Partial Payments have been entered against the invoice. When looking at supplier bookings, Net Due equals the amount owed by the client for the booking and is the same as Total Fare.
From the Vendor Side: Only bookings are displayed and Net Due is the amount of the Total Fare less any Commission on a supplier booking and the amount of Commission due on a comm track booking.
All the payment screens are non-modal, meaning that screens can be clicked off while open so another task can be performed in the program. The payment screen is saved on the file menu under Window and can be re-opened. For example, when entering a commission payment received and all invoices are not displayed, minimize the payment screen and create a new invoice. Click /Window on the file menu and reopen the payment screen and click on the Refresh button and the new invoice is displayed.
Note: The payment number is not assigned until the payment is saved. This allows for sequential numbering for all the payments created in TBO.
ATTACHMENTS TAB Fields
In TBO version 3.05, an attachment tab has been added to all profile (Client, Vendor, Agent, Other), all invoice types (sale, refund, adjustment) and the payment screens. The tab is located adjacent to the tab now named General at the top of each screen. Within the workspace area of the new attachment tab, users can manage (add, view, delete, update) electronic documents of any type.
|
Filename |
Click the browse button to locate to the desired file. |
|
Compressed |
Defaults to enabled. Compressing the file helps to reduce the file size (maximum file size is 8MB). |
|
Description |
Enter a user-defined description. |
|
Path |
This field is automatically populated based on the location of the file. |
Add, adds a new file; Update, updates the existing file with a new or updated file; View, opens the file; and Delete deletes the attached file. Extract sends a copy of the attachment to a location on your computer.
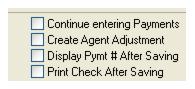
Payments Received From (or Made To) Clients
Once a client is selected, that client's account balances appear on the screen, including a detailed listing of all open invoices and bookings for Sale, Refund, and Voucher. Note that positive amounts indicate payment due to the agency, and negative amounts indicate payment due from the agency. Note also invoices and vouchers are presented in blue, while bookings are presented in black.
Payment Received
Payment Received Columns
|
Prior Unapplied |
The accumulated total of unapplied funds the client had with the agency prior to this payment. Examples include past overpayments, pre-payments, or simply credits on account. Note: This area does not appear unless there are unapplieds in database, or if the Allow Client Unapplieds is NOT checked off in Utilities|Global Defaults|Prompt. |
|
Unapplied Total |
The total of the payment amount plus any prior unapplied; e.g., the amount available to apply towards open invoices. As invoices are closed, Unapplied Total is reduced accordingly. |
|
Total Open |
The amount due for all open invoices displayed. Sales invoices add to this total; refund invoices subtract from this total. As invoices are closed, Total Open is reduced accordingly. |
|
Balance Due |
Total Open less Unapplied Total. Amount owed or balances outstanding. A positive Account Balance represents money owed to the agency from the client; negative Account Balance represents money owed from the agency to the client. |
|
Records |
All displays both Invoices and Bookings on screen. Invoices are shown in blue; bookings are shown in black. Invoices Only shows invoices in blue. Bookings Only show the bookings in black. |
|
Invoice Number, Issue Date, Amount, and Status, and all other selected columns. |
A list of open invoices and/or vouchers for the identified client where the Invoice|Voucher Issue Date does not exceed the Payment Date. The information displayed are the columns selected in the order they were selected. (See details above.) |
Right-Mouse Click to Void a Booking in Create New Payment
Highlight any ARC/BSP, Supplier or Comm Track Booking in the results screen, and right-click to select Void Booking. A booking can be voided without having to use Edit Invoice. (Using Edit Invoice requires selecting that button, clicking OK to close the booking window, clicking Void on the invoice screen, and clicking OK to save the edit and get back to the Payment screen.) Right-mouse clicking saves over 4 key strokes/mouse-clicks! (All present requirements for voiding a booking are in effect. Can't void if a payment is attached until voiding the payment, and can't void in a closed period. The Void Booking feature from the Payment Screen will be disabled for non-booking items (invoices) including client & vendor voucher bookings.)
Payments Received from Client (Steps)
1. Select Payments|Received.
2. In the Amount field, type the dollar amount.
3. Change the Payment Date if necessary by typing in the proper date or clicking the mouse in the date field to display a calendar.
4. In the Branch field, associate a branch from the drop-down menu to the payment if desired.
5. In the Bank Acct field, type in the appropriate bank account number (1, 2, 3, etc.), or click the arrow and select from the list.
6. In the Remark field, type in free flow information, or leave blank.
7. Click the arrow by Payment Method field to choose the form of payment (Cash, Check, Credit Card, etc.)
8. If the payment method is Check or Credit Card, type in the check number or credit card number in the Check/CC No field.
9. If this payment is associated with a group, select the group name from the drop-down menu of the Payment Group field.
10. Change the Profile Type to Client.
11. In the Name field, type in the client’s name or a portion of the profile name and select name from the drop down menu. If there is no match, Trams Back Office prompts to build a new profile. (See section, Entering Client Profiles in the Profiles chapter.)
12. To narrow the list of open invoices, click on Client Settings and/or Global Settings. Use any or all of these fields or, skip this portion altogether. Click Query to display the open invoice(s) and booking(s).
13. To apply the payment, highlight the invoice|voucher to which the payment applies and click Toggle Closed, closing the invoice|voucher. Note that when closing the booking, both Unapplied Total and Total Open are reduced accordingly. Continue closing invoices|vouchers until all Invoices|Vouchers attached to the payment have been closed.
Warning: Do not close invoices unless Unapplied Total is at least as much as the invoice|voucher total to be closed. If the invoice|voucher is closed, and the client is left with a balance due, there is no invoice data to support the balance. The system does not allow a negative unapplied balance. Also, note that an unapplied balance is not allowed when the form of payment is credit card.
Applying Payments to Specific Invoice Bookings
Toggle between three views of the displayed invoices in a payment screen. The default view is All where each invoice and booking is represented by one line in the list (invoices and vouchers are in blue, and bookings are in black). The alternate views are Invoices Only or Bookings Only where each invoice or booking on an invoice is represented by one line in the list. To toggle between the three views, select All, Invoices Only or Bookings Only. When viewing by booking, Individual bookings can be closed without closing an entire invoice. If individual bookings are closed on an invoice, only open bookings show when later payments are entered. Individual bookings on the same invoice can be closed with different payments.
Payment Received Using Invoice/Payment Group
If Invoice/Payment groups have been created in Utilities|Setup|Groups or by clicking on Payment Group raised button in the payment screen, this table can be used in the Payment Group field pull-down menu and also the Invoice Group field under Global Settings.
By using the Global Settings Tab and selecting an invoice/payment group, filter and display only those invoices for the selected group. The invoice remarks and group fields, which are entered on the invoice header when first entering the invoice screen, can also be displayed if selected as displayed fields under Columns. This assists in applying a payment to the proper invoice(s)/voucher(s), based on the information entered in the Global Settings Tab and Invoice Group field.
|
You have received a payment from Bob Jones for his trip with the Hughes Cruise Group. Bob is a frequent traveler and has several open invoices. When you enter his payment, click on the Global Settings Tab and select the invoice group by clicking the down arrow in the Invoice Group field. Click "Query" and only the invoices that are associated with the Cruise Group will be displayed. You then can apply the payment to the proper group invoice. |
Payment Received Group
The Group Codes used in this feature can be entered from the Trams Back Office keyboard or by using the interface from the GDS.
Modifying Pymt Amt Once Account Balances Appear
Modify the payment amount entered while viewing account balances by changing the amount at the top of the screen.
Partial Payments
To apply a partial payment, click Partial Payment. Enter the amount of the partial payment and click OK.
G/L Branch Defaults
If a specific bank account references a G/L Branch, then that branch is used; otherwise, if the specified payment branch references a G/L Branch, then that branch is used. If neither of these apply, the default G/L branch is used set up in Utilities|Setup|Global Defaults|Prompt tab.
Close All/Invert All
To close all invoices at one time, click Close All. To invert (make closed payments open or vice versa), click Invert All.
Show Quick Edit
A Show Quick Edit button assists with streamlining when entering commission track payments. When entering a payment received or made with a profile type of Vendor, the Quick Edit button is enabled. A floating window is launched which users can position anywhere on the payment received screen. The window displays the passenger name and confirmation number which are non-editable as well as the commission amount and booking dates (depart/return dates) that are editable. By modifying the Total Fare totals here, the total fare field in the actual booking is changed to reflect the new amount.
Note: The agent commission percentage or amount is copied from the original supplier booking. Check and/or adjust the agent commission before saving the booking.
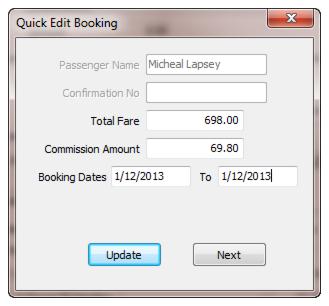
Once information has been edited, upon clicking the update button the booking is toggled closed and the next transaction in the grid is displayed in the quick edit screen. The next button moves to the next transaction in the query grid.
The quick edit button allows editing for commission track items where there are no agent payment dates in place.
Viewing/Editing Invoices by Booking
While viewing invoices by booking, access and modify the original booking by highlighting the booking and clicking Edit. When finished modifying the booking, click OK.
How to Use Client & Global Settings
To receive a commission check from a payment source that covers multiple vendors such as PayMode, Marriott Hotels, Hilton Hotels, etc.:
1. Enter the payment received information for the check as normal.
2. Change the Profile Type to “Vendor”.
3. Change the Submit To field on the Vendor Settings tab.
If only “Comm Track” bookings are needed to apply the check to, select Submit To, “Comm Track”. If only “Supplier” bookings are desired to apply the check to, select Submit To of “Supplier”. To see both “Comm Track” and “Supplier” bookings to apply the check to, select Submit To of “All” on the Vendor Settings tab. This will close both Comm Track and Supplier bookings using the same check on a single payment.
4. Select A Group of Vendors field on the Vendor Settings tab and enter the appropriate “Group” in the field (PayMode, MC, HILTON etc.) These vendor groups are created under Utilities|Setup|Groups.
5. From the Global Settings tab, you can filter your query on a UDID Number with the dropdown or type in a UDID number (or partial number) and land on the desired UDID more quickly than by scrolling through the list. The UDID Description is for those who prefer to search by description. Selecting a value in either dropdown will update the corresponding UDID value in the other dropdown.
6. Add a Profile Name for the Group Vendor in the Name field - PayMode, Marriott Hotels, Hilton Hotels etc.
Important: Each single payment source - PayMode, Marriott Hotels, Hilton Hotels, etc. needs a vendor profile even if no invoices will be created under that profile. The profile is only used to reflect the centralized payments received from this single payment source.
7. Click Query and close off the appropriate queried bookings,and save the payment as normal.
Note: The same procedure would apply for receiving a single check paying for invoices under two or more Grouped client profiles. Just enter client group name in the Group of Clients field instead of vendor information.
Hint: Notice the field Vendors by Interface ID. This field searches for the first two characters of the Vendor Interface ID. This is an alternative time saver for finding multiple hotels in a single chain without having to link them all together using the Groups field in each Vendor profile. For example, by entering HI in the Vendors by Interface ID field, all vendors that have an interface ID beginning with HI will be displayed.
Automated Clearing House (ACH)
Automated Clearing House (ACH) is a system set up by the Federal Reserve Banks in the United States for standardizing the transfer of electronic payments between banking institutions. This Payment Method can be used for handing off data from Trams Back Office to a Payment Distribution Service or the agency’s bank. (This is like a PayMode settlement using EFT, but in reverse.) Instead of the agency receiving a file to reconcile payments being received, the agency sends a file, so that expense payments or payments to a vendor can be made from the file by a bank or Payment Distribution Service. Using a Payment Method of ACH acts like an EFT payment and appears directly on the Check Register and on the Bank Reconciliation. Both Payments Received and Payments Made can be created, however only Payments Made can be exported to a file. The file output conforms to the NACHA format.
Payment Made - The payment can be included in the ACH Export file sent to a bank or Payment Distribution Service for processing. These payments when processed by the agency’s bank or Payment Distribution Service would appear on the bank statement as an EFT payment and would be cleared when doing a Bank Reconciliation.
An ACH Payment Made could be used to electronically pay Vendors that would allow for an electronic payment to them, and to make expense payments for goods and services the agency purchases, like the electric or gas bill.

Payment Received - Not Currently Implemented. Create a payment received using ACH, but the payment cannot currently be included in the ACH Export file sent to a bank or Payment Distribution Service for processing. Therefore the amount of the payment would not show on any bank statement and could not be cleared when doing a Bank Reconciliation. When implemented, an ACH Payment Received could be used by an agency to collect fees from another entity, or for a larger agency chain to collect monthly licensing fees.
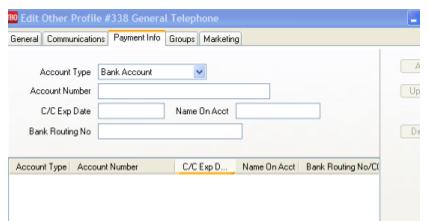
Profiles - New fields have been added under Bank Account Settings, on the Payment Info tab of all profile types for Bank Account and Routing No. The Routing Number field is composed of both the Bank Code and the Bank Branch. The first four (4) digits are for the Bank Code and the last five (5) digits are for the Bank Branch. In the US those two numbers are usually combined into one nine (9) digit Routing Number. In other countries the Bank Code and Bank Branch may be separate numbers. If so, enter both in the Routing Number field with no spaces or dashes. Enter all nine (9) digits including any 'leading' zeros if present.
|
From/To |
Enter a date range for export file. |
|
Bank Acct. |
From the drop-down menu, select the appropriate bank account. |
|
Payment Type |
By default, the Payment Type is hard-coded as Made. |
|
Format |
From the drop-down select report or file. |
|
Client Number |
Enter a the client number (this is the client account number issued by the bank. |
|
File Descriptor |
Type the file name format supplied by the bank. |
Workflow Scenario
1. Agency creates a payment made in Trams Back Office
2. Agency creates an ACH export to send to the Agency's Bank.
3. Agency Bank processes the file which updates the bank account for the Payee in the payment made.
Detailed Steps
1. Create or Query a Profile for the Payee
a. Enter the Payee's Bank information into the Payment Info tab of the profile in the Account Number field
2. Create a payment made as usual
a. Payment Method = ACH
b. Click on the CK/CC/ACH button to access the ACH Account Number information in the Payee profile
c. In the Payee profile, copy and paste the Account Number into the CK/CC/ACH field of the payment made
3. Obtain the Agency client account number from the Agency bank. (This information will be used when performing the Reports|Payment|ACH Export in the Client Number field)
4. Obtain file descriptor (file name format supplied by Agency bank, if they require it). (This information will be used when performing the Reports|Payment|ACH Export in the File Descriptor field)
5. Go to Reports|Payment|ACH Export
6. Enter the date range for the ACH payments created to be included in the Export
7. Select the appropriate Bank Account from which the funds will be withdrawn
8. Select the Format option: File
9. Enter the Client Number from step 3
10.Enter the File Descriptor from step 4
11.Click on preview which will display the save in dialogue box
12.Select where to save the file and enter a file name in the file name field
13.The Save as Type field will be text (.txt)
Electronic Funds Transfer
Record payments made or payments received for EFT’s, or for electronic withdrawals. Select Payments/Received or Made from the main menu. Enter the amount and click the down arrow next in the Payment Method field to select the option for EFT. Enter the Pay Date, Remarks, Profile Type and Name.
A Payment Received with a Pay Method of EFT, does not require a deposit entry. These items are automatically added to the check register. A Payment Made with a Pay Method of EFT, does not require a withdrawal entry. These items are automatically deducted from the check register. Use the Remark line in the payment screen, to identify each EFT payment. The Remark field prints on the check register, making reconciling the bank statement easier. ARC/BSP Settlement, Bank Transfers, and Vendor withdrawals, use the Pay Method EFT. Note: Bank transfers can also be done using the Form of Payment, Check.
|
Your agency subscribes to Trams Back Office and pays monthly with an EFT. You have recorded this payment as a Payment Made in the amount of $90 with a Pay Method of EFT and a Profile Type of Other. The profile Name is Trams Back Office. Because the profile type is Other, you are prompted for a journal entry. Enter the off-setting expense account, add a debit for $90, and click on OK. This EFT entry appears on your check register as an EFT W/D. |
Overpayment from a Client
When a payment is received from a client for more than the amount owed, the overpayment is left on the client’s account as a voucher. (See voucher section also in this chapter.)
1. Click Payments|Received. Enter the payment received as usual.
2. When the invoice(s) appear, close them as usual.
3. Trams Back Office prompts, “Unapplied Payment Option. Create Voucher, Leave Unapplied, or Cancel.” Click the Create Voucher button.
4. Enter the voucher information as usual. (See Entering a Voucher in this chapter.)
5. Click OK to save.
Split Forms of Payment for Client Invoices
When one booking on an invoice is paid by credit card and another booking is paid by cash/check, separate payments are required. If invoice has already been entered. Select All or Bookings Only for the records.All displays both Invoices and Bookings on screen. Bookings Only show the bookings in black.
1. Select Payments|Received from the Main Menu.
2. In the Amount field, type in the dollar amount.
3. Change the Payment Date if necessary by typing in the proper date or clicking the mouse in the date field to display a calendar.
4. In the Branch field, associate a branch from the drop-down menu to the payment if desired.
5. In the Bank Acct field, type in the appropriate bank account number (1, 2, 3, etc.), or click the arrow and select from the list.
6. In the Remark field, type in free flow information, or leave blank.
7. Click the arrow by Payment Method field to choose the form of payment Credit Card.
8. Enter the credit card number in the Check/CC No field.
9. Enter Payment Group if applicable. (See Payment Group section of this chapter.)
10. Select Profile Type of Client.
12. In the Name field, type in a portion of the client's name.
13. To narrow the list of open invoices, use the Client Settings and Global Settings tabs. Use any or all of these fields or skip this portion altogether. Click Query to display the open invoice(s) and bookings.
14. Click the booking being paid by credit card and click Toggle Closed. Click OK to save.
15. Repeat the steps for the Cash/Check payment.
Partial Payment Received From Client
A partial payment in Trams Back Office is a payment received from a client that is less than the amount of the invoice.
1. Select Payments|Received from the Main Menu.
2. In the Amount field, type in the exact amount for that Form of Payment.
3. Change the Payment Date if necessary by typing in the proper date or clicking the mouse in the date field to display a calendar.
4. In the Branch field, associate a branch from the drop-down menu to the payment if desired.
5. In the Bank Acct field, type in the appropriate bank account number (1, 2, 3, etc.), or click the arrow and select from the list.
6. In the Remark field, type in free flow information, or leave blank.
7. Change the Payment Method field to Cash or Check.
8. If Payment Method is check, enter the Check number in the Check/CC No field.
Note: The Credit Card form of payment cannot be used for partial payments.
9. Enter the Payment Group if applicable. (See also Payment Group section of this chapter.)
10. Profile Type is Client.
11. In the Name field, type a portion of the client’s name.
12. Enter the Payment Code if applicable. (See also Payment Code section of this chapter.)
13. If there is more than one invoice listed, click the desired invoice want and click Partial Payment.
14. The Partial Payment Box appears. Type in the amount to apply towards the invoice and click OK.
15. Partial payments can be applied to more than one invoice by repeating Step 13 and Step 14.
16. Click OK to save.
Note: Partial payments can be created against an invoice, but not the booking.
Transfer Funds from One Client Account to Another
Method A: This method can only be used if the payment is in an accounting period that has not been closed. If an End of Period has been created and posted, proceed to Method B. Example: Transferring $50.00 from Jon Smith to Clara Williams:
1. Select Payments|Query|Payment and query the payment that needs to be transferred. (i.e. payment for Jon Smith.)
2. Once the payment is displayed, highlight it and right mouse click. When the menu choices appear, click Re-Apply.
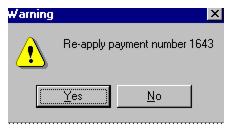
3. Trams Back Office prompts, “Re-apply payment number xx” and click Yes. This voids the original payment and copies the information into a new payment screen.
4. Change the date to the date the payment was originally deposited. The Payment Date defaults to the current date.
5. Click the name field and change the name to the person the money is to be transferred to. (i.e. Clara Williams.)
6. Click OK to save the payment.
Note: If the invoice is also applied to the profile, transfer the Invoice first and the payment automatically comes along with it--that way voucher does not have to be created!
Method B: This method is used if the payment is in an accounting period that was already closed and posted. To transfer money from one client’s account to another, enter a Payment Made from the client’s account from which the money is being taken and a Payment Received to the client’s account to which the money is being given. Example: Transferring $50.00 from Jon Smith to Clara Williams:
1. Click Payment|Made. Enter the payment as usual.
2. In the Amount field, type the amount being transferred (e.g. $50.00).
3. Payment Method is Other.
4. In the Remark field, type To Transfer Balance.
5. Profile Type is Client.
6. In the Name field, type in the client’s name (e.g. Jon Smith).
7. Click OK to save.
8. Trams Back Office prompts, “Create A Journal Entry?” Click YES.
9. Trams Back Office automatically displays a debit to Client Balances. Enter a credit against account 6900-Temporary Holding as the offsetting account. (Is this account created? See section, Add To The General Ledger Chart of Accounts in the Setting Up Trams Back Office chapter.)
10. Click OK to save.
11. Click Payments|Received. Enter the payment as usual. (See Payments Received From Client section in this chapter.)
12. In the Amount field, type the amount being transferred (e.g. $50.00).
13. Payment Method is Other.
14. In the Remark field, type “To Transfer Balance.”
15. Profile Type is Client.
16. In the Name field, type in the client’s name. (e.g. Clara Williams)
17. Click OK to save.
18. Trams Back Office prompts, “Create A Journal Entry?” Click YES.
19. Trams Back Office automatically displays a credit to Client Balances. Enter a debit against account 6900-Temporary Holding as the offsetting account.
20. Click OK to save.
Remove/Write Off Client Balance
1. Go to Payments|Received.
2. Enter the Amount of invoice to be removed/written off.
3. Use date of report run to detect balance.
4. Choose Payment Method of OTHER.
5. Under Remarks, type "Write-off” with additional explanation.
6. In the Name field, enter the Client Name.
7. Toggle the invoice closed by clicking Toggle Close.
8. If the GL is set up, create a JE which credits Client Balances and write it off as a debit to a bad debt account (usually a 6xxx account).
Remove/Write Off Vendor Balance
1. Go to Payments|Made.
2. Enter the Amount of Invoice to be removed/written off.
3. Use date of report run to detect balance.
4. Choose Payment Method of OTHER.
5. Under Remarks, type “Write-off” with additional explanation.
6. In the Name field, enter the Vendor Name.
7. Toggle the invoice closed by clicking Toggle Close.
8. If the GL is set up, create a JE which debits Vendor Balances and write it off as a credit to a bad debt account (usually a 6xxx account).
Gift Certificate
To record the purchase of a gift certificate:
1. Click Payments|Received.
2. In the Amount field, type in the amount of the payment received to purchase the gift certificate.
3. In the Payment Date field, type in the date the payment is being deposited.
4. In the Bank Acct field, type in the appropriate bank account number (1,2, 3, etc.), or click the arrow to select from list.
5. In the Remark field, type Gift Certificate and if available the Gift Certificate number. These remarks can be used as criteria in a query screen.
6. In the Payment Method field, click the arrow to choose cash or check.
7. If the Payment Method was Check, type in the check number in the Check/CC No field.
8. Enter Payment Group if applicable. (See also Payment Group section of this chapter.)
9. Enter the Payment Code if applicable. (See also Payment Code section of this chapter.)
10. Profile Type is Client.
11. In the Name field, type in the name of the client. Click OK (not Query).
12. If there are no open invoices for the client, proceed to step #13. If there are open invoices click OK again, then proceed to step #14.
13. TBO prompts Profile Has No Open Invoices Prior to Payment Date. Create Voucher, Leave Unapplied, Cancel. Choose Create Voucher.
14. Fill in Voucher information and click OK to save.
Note: If one person is purchasing the gift certificate for another person, Trams Back Office recommends that the payment be recorded under the name of the person doing the traveling. This establishes a credit balance for the correct client account. If the name of the person traveling is unknown, record the payment under the name of the person who purchased the gift certificate. When the gift certificate is redeemed, the balance may be transferred from one account to the other or choose All Clients from the Client Settings in payment screen and close voucher and invoice from the two different client profiles.
Petty Cash
Giving Change from Petty Cash
When a client pays for an invoice and change is given out of Petty Cash:
1. Click Payments|Received and enter the payment from the client, as usual, for the actual amount received. (If the invoice is $75.00 and the client pays $80.00, enter the payment received as $80.00.)
2. When Trams Back Office displays the open invoice(s), click Toggle Closed to change the status of the invoice(s) to closed. Click OK to save.
3. Trams Back Office prompts, “Total Unapplied is (whatever the amount is). Create Voucher, Leave Unapplied, Cancel.” Click Create Voucher. (If the invoice is $75.00 and the client pays $80.00, once the invoice is closed the extra $5.00 shows as unapplied. This amount goes on the voucher.)
4. Enter a Payment Made to the client, as usual, for the voucher amount ($5.00). Payment Method is Other. Trams Back Office displays the voucher. Highlight it and click Toggle Closed. Click OK to save.
5. Trams Back Office prompts, “Create A Journal Entry?" Click YES.
6. Trams Back Office automatically displays a debit to Client Balances. Choose the Over/Short account as the offsetting entry. It may be necessary to create this account. (See Adding to the General Ledger Chart of Accounts section in the General Ledger chapter.)
Example Journal Entry
Acct #
Name
Debit
Credit
1100
Client Balances
5.00
6XXX
Over/Short
5.00
7. Click OK to save.
The Over/Short account is cleared when petty cash is reimbursed. (See Reimbursing Petty Cash section in this chapter.)
Note: Make sure to put a receipt in the petty cash drawer to account for the money that was taken out for the change.
Reimbursing Petty Cash
To replace the money taken from petty cash:
1. Click on Payments|Made.
2. In the Amount field, type in the dollar amount.
3. In the Bank Acct field, type in the appropriate bank account number (1, 2, 3, etc.), or click the arrow to select from the list.
4. Change the Payment Date (if it is not the current date) by typing in the proper date.
5. Click the arrow to choose the Payment Method of Check.
6. Type the Check number in the Check/CC No field.
7. Leave the Payment Group field blank.
8. Leave the Payment Code field blank. (See Payment Code section in this chapter for more information.)
9. In the Remark field, type in Petty Cash Reimbursement.
10. Change the Profile Type to Other.
11. In the Name field type in Petty Cash. If there is no match, Trams Back Office prompts to build a new profile. (See Other Profiles section in the Profiles chapter.) Click OK to save.
12. Trams Back Office prompts, “Create a Journal Entry?” Click YES.
13. Trams Back Office automatically displays a credit to the Cash in Bank account. Offset this against the appropriate expense account(s) that represent the various items for which petty cash was used.
Example Journal Entry
Acct #
Name
Br
Debit
Credit
1000
Cash in Bank
100.00
6150
Office Expense
90.00
6180
Postage
10.00
14. Click OK to save.
Note: Journal Entries created directly against the General Ledger account for Petty Cash are done only to set up Petty Cash, or increase/decrease the overall Petty Cash balance carried. Journal Entries are never entered against this account when reimbursing.
Owner/Employee Travel Expenses Paid by Agency
For travel expenses absorbed by the agency, such as FAM trips, seminars, or special classes, enter an invoice as usual.
1. Click Invoices|Sale. Complete the invoice as usual. (See Entering a Sales Invoice section in Invoice chapter.)
2. Once the invoice is complete, click Payments|Received.
3. In the Amount field, type in the dollar amount of the invoice.
4. Change the Payment Method field to Other.
5. Change the Payment Date field (if it is not the current date) by entering the correct date.
6. Since the Payment Method is Other, it is not necessary to modify the Bank Acct field. Skip this field.
7. Enter the Payment Group if applicable. (See also Payment Group section of this chapter.)
8. Enter the Payment Code if applicable. (See also Payment Code section of this chapter.)
9. In the Remark field, type a brief description of what the payment is for. (e.g. FAM Trip, seminar, etc.).
Profile Type is Client.
10. In the Name field, enter the name of the person or entity as recorded on the invoice. (Owner or Employee’s name, Travel Agency’s name, etc.)
11. Click OK to process.
12. Trams Back Office displays all open invoices for the client. Click the invoice to close and click Toggle Closed. Repeat if there are multiple invoices to close.
13. Click OK to save.
14. Trams Back Office prompts, Create Journal Entry? Click YES.
15. Trams Back Office displays a credit to Client Balances. Fill in the offsetting GL account.
Example Journal Entry
Acct #
Name
Debit
Credit
1100
Client Balances
xx.xx
6xxx
Education & Seminars
xx.xx
16. Click OK to save.
Foreign Currency Payments

|
A Canadian agency has Bank Account 2 set up in US Dollars. A customer calls and is paying for a ticket with US Dollars. The price for the travel is $200.00 Canadian Dollars. The exchange rate in the conversion field is .800. Enter the invoice in local currency. The client is quoted $160.00 in US dollars. |
When setting up Bank Accounts, only use a currency code (like USD) on the bank account that there is going to be foreign exchange issued on, and it is recommended to leave the rate at 1.000 so that there is control of the equivalency based on the day’s rate. Add an asset account for Foreign Exchange to the Chart of Accounts and go to Utilities|Setup|GL Accounts to enter the new Foreign Exchange chart number in the Conversion Column for the agency bank account.
Trams Back Office automatically generates the journal entry if the G/L Prompt default settings are set to Recommended|Always (Refer to Utilities|Setup|Global Defaults).
This transaction creates the following EOP entry:
|
EOP Entry |
|||
|
Acct |
Account Name |
Debit |
Credit |
|
4000 |
Sales - Domestic Air |
|
200.00 |
|
1100 |
Client Balances |
200.00 |
|
|
5000 |
Cost of Sales Domestic Air |
181.82 |
|
|
2010 |
ARC/BSP Balances |
|
181.82 |
|
1000 |
Cash In Bank-US Dollars |
160.00 |
|
|
1001 |
Foreign Exchange |
40.00 |
|
|
1100 |
Client Balances |
|
200.00 |
If a payment is made to a vendor for $160.00 on a $200.00 Canadian net remit, the journal entry should read:
|
Acct |
Account Name |
Debit |
Credit |
|
1000 |
Cash In Bank-US Dollars |
|
160.00 |
|
1001 |
Foreign Exchange |
|
40.00 |
|
1100 |
Vendor Balances |
200.00 |
|
Payment Received for Commission Track
To record a payment for commission received from a Vendor (hotel, car, tours, etc.):
1. Click Payments|Received.
2. In the Amount field, type in the amount of the commission check received.
3. In the Payment Date field, type in the date the payment is being deposited.
4. The Bank Acct field should be the appropriate bank account number (1,2,3, etc.). To change the default, type in the new number, or click the arrow to see the list.
5. In the Remark field, enter free flow information.
6. Change the Payment Method to Check.
7. Type the Check number in the Check/CC No field.
8. If this payment is associated with a group, type the group name in the Payment Group field.
9. Enter Payment Code if applicable. (See also Payment Code section of this chapter.)
10. Change the Profile Type field to Vendor and in the Vendor Settings Tab select Submit To to CommTrack.
11. In the Name field, type in the name of the Vendor from whom the check was received.
12. To narrow the list of open invoices, select from the Vendor Settings and/or Global Settings tabs. Use any or all of these fields to locate an invoice(s), or skip this field entirely. If the payment is for a group of vendors select A Group of Vendors and select the group name. Click Query to display open invoice(s).
13. If there is more than one invoice listed, click the first invoice to close, then click Toggle Closed. Repeat until all appropriate invoices are closed.
Note: Sometimes the payment received from the Vendor differs from the amount invoiced. For Commission Track bookings, the amounts can be edited in the payment screen. Click the invoice to close, then click Edit Invoice. Change both the Commission amount and the Total Fare. If the exact amount of the Total Fare is not shown on the receipt, estimate (e.g. the commission check was $10.00 and earn 10% commission, the total fare is $100.00).
14. Click OK to save the changes to the booking.
15. Click OK to save the payment.
Commtrack Vendor Pays the Commission Due Agency via the Agency's Credit Card
If the vendor on a Commtrack invoice indicates that they want to pay the commission they owe by crediting the agency credit card, use the following steps:
1) Query the Commtrack invoice and view the booking. Change the total fare and commission to $0. Enter a payment received of $0 from the vendor with a payment method of Cash, and close the booking. If the Commtrack booking is voided, this may affect reports and the ability to track the booking activity with that particular vendor.
2) Enter a second payment received for the amount of the commission with a pay method of CC Merchant and a Profile Type of Other.
Debit 1150 - the CC Merchant Receivable account
Credit 4xxx Sales for gross amount
Debit 5xxx Cost of Sales for the net amount
3) When money is actually deposited into the bank account, enter payment received with pay method of and a Profile Type of Other.
Debit 1xxx for amount in bank
Credit 1150 full amount charge to cards
Debit 6xxx Credit Card fees or Bank fees for the processing fee amount
Commission Received - No Invoice
When a commission check is received and there is not a commission tracking booking in Trams Back Office (this usually happens with commissions coming in on bookings made prior to implementing Trams Back Office), there are two ways that the check can be recorded.
Option One: This option is the Trams Back Office recommended method, since it can track the history for the vendor.
1. Click Invoices|Sale.
2. Create a sales invoice as usual with the Submit To field as Comm Track. (See Entering a Sales Invoice in Invoices chapter.)
3. Next, click Payments|Received.
4. Enter the commission check as usual.
Note: Remember payment screens are non-modal. If in a payment screen and an invoice needs to be entered, minimize the payment screen, create an Invoice|Sale as above, click Window from main menu and reopen the payment screen. Refresh displays the newly entered invoice.
Option Two: With this option, no sales information is available for the management reports, nor will production volume be reported by Vendor or Client.
1. Click Payments|Received.
2. In the Amount field, type in the amount of the commission check.
3. Leave the Payment Method as Check.
4. In the Payment Date field, type in the date the payment is being deposited.
5. In the Bank Acct field, type in the appropriate bank account number (1, 2, 3, etc.) or click the arrow to the right of the field to select from list.
6. Leave the Name on Check field blank.
7. Type in the check number in the Check/CC No field.
8. Enter the Payment Group if applicable. (See also Payment Groups section of this chapter.)
9. Enter the Payment Code if applicable. (See also Payment Code section of this chapter.)
10. In the Remark field, type Commission Received.
11. The Profile Type is Other.
12. In the Name field, type in the name of the Vendor from whom the check was received. Click OK.
13. Trams Back Office prompts, Create A Journal Entry? Click Yes.
14. Trams Back Office displays a debit to Cash in Bank for the amount of the check.
The first offsetting account number should be the Sales account being affected. Credit that account for the gross sale amount. The next journal entry line is the account number for the Cost of Sales account being affected. Debit that account for the gross sale amount less the amount of commission received.
15. Click OK to save.
Note: When using this option, it may be necessary to estimate what the gross sale amount is. If a commission check of $10 is received from Alamo Car Rental and 10% commission is usually earned, the journal entry is as follows:
|
Debit |
Cash Account |
$10.00 (commission received) |
|
Credit |
Sales-Car |
$100.00 |
|
Debit |
Cost of Sales-Car |
$90.00 |
Entering Commission Payments Received from a Clearing House
Some hotels such as Marriott Hotels, Courtyard by Marriott, Fairmont Hotels, etc., belong to a clearing house such as Pegasus. These clearing houses issue commission checks for all hotels using their services. Therefore, one commission check is issued for all bookings to these hotels. Use the steps below to manually enter the payment. Pegasus, PayMode, and TACS (Perot Systems) offer files that Trams Back Office uses to automate this process. (See the Pegasus/PayMode/CommTrak/TACS Reconciliation section of this chapter.) To link the profiles:
1. Click Profiles|Query.
2. In the Vendor Name field, type in the name of the hotel belonging to the clearing house, (e.g., Marriott, Hilton, etc.).
3. Change Profile Type to Vendor. Click Query to see all hotels matching the name.
4. Highlight the profile and click View.
5. Click the Group tab. In the Group/Batch field, select a vendor group that has been created in Utilities|Setup|Groups (e.g, PayMode, Pegasus, TACS). Click Add to add it to the group list. Click the OK to save.
6. Repeat Steps 2 through 6 until all profiles are edited.
Create a Negative Sales Invoice for the Processing Fee
1. Click Invoices|Sale. Enter the invoice as usual (see Entering a Sales Invoice section in the Invoice chapter.)
2. In the Client Name field, type in the name of the agency. Submit To is Comm Track.
3. In the Vendor Name field, type in Pegasus. (If there is not a Vendor Profile, create one. Make sure to put Pegasus in the Group/Batch field of the profile.)
4. In the Commission/Rate field, type in the service fee amount as a negative number.
5. Click OK to save.
To Receipt the Payment
1. Click Payments|Received.
2. In the Amount field type in the amount of the check received.
3. Change Profile Type to Vendor.
4. In the Name field, type Pegasus
5. Under vendor settings select a Group of Vendors and from the drop down menu select Pegasus.
Note: Sometimes the payment received from the vendor differs from the amount invoiced. For Commission Track bookings, edit the amounts in the Payment screen. Highlight the invoice to close and click Edit Invoice. Change both the Commission/Rate amount and the Total Fare. If the exact amount of the Total Fare is not shown on the receipt, estimate (e.g., the commission check is $10.00 and 10% commission was earned, the total fare is $100.00). Click OK to save the changes made to the booking.
6. Highlight the invoice to close and click the Toggle Closed button. Repeat for all invoices being paid. Make sure to also close the service fee invoice. Click OK to save.
Note to Canadian Agencies
On the Pegasus Payment Import routine, the GST Amount and rate included in the Pegasus import file is read and altered in the more taxes tab to match the amount in the file. There is also a column for the Commission on GST on the Payment Import screen. The Pegasus Payment Import subtracts the GST Amount from the Commission Amount column. When the payment is closed, the Commission on GST field is updated.
Agency Processed Credit Card aka CC Merchant
There are two methods with which to account for Agency Processed Credit cards, also known as CC Merchant transactions: CC Merchant Vendor Bills for Service Charge and CC Merchant Vendor Deducts Service Charge at Time of Deposit. For both methods the End of Period journal entry summarizes all invoices with a pay method of CC Merchant and debits the default account 1105. Both methods reduce the total amount back to zero. Note: There is also a CC Merchant Automated CC Service Fee Processing utility (agencies that are processing credit cards with NTC (National Transactions Corporation), BluePay Canada (formerly Caledon), or Ticketmaster (no longer taking new customers), can process directly into TBO).
Account for CC Merchant Vendor Bills for Service Fee
The credit card charges are deposited directly into the bank account. The credit card company withdraws a processing fee periodically (Visa, MasterCard, Diners, etc.).
1. Enter the invoice bookings with submit to set to Supplier and record all pertinent information (travel type, vendor name, etc.)
2. Enter a payment received from the client with pay method set to CC Merchant. Enter the full amount of the payment, recording the credit card number and all pertinent information (date, client, etc.), and close the applicable invoice.
Note: This can also be accomplished through the Interface process from the GDS with a *CP4 code in the accounting line.
3. Print a Credit Card Merchant Report (Reports|Payments|CC Merchant) for the day, with Included CC’s set to Visa, MasterCard & Diners. Verify that the report matches the amount of the deposit.
4. Enter a payment received with a payment method of EFT for the deposit amount. Set profile type to other. A profile should be created for use specifically for this type of deposit. The journal entry is a debit to Cash in Bank and a credit to the Credit Card Merchant receivables account. (Create this account under General Ledger|Accounts in the 1000 series, if not already done.)
5. When the service charge from the credit card company is deducted from the bank account, enter that amount as a payment made with a payment method of EFT and profile type of other. The journal entry is a credit to Cash in Bank and a debit to Bank Fees.
Account for CC Merchant Vendor Deducts Service Charge at Time of Deposit
In this method, the credit card charges are reported to the credit card company. The credit card company then makes a deposit into the agency’s bank account, less any service fees (American Express).
1. Enter the invoice bookings with submit to set to Supplier and record all pertinent information (travel type, vendor name, etc.).
2. Enter a payment received from the client with payment method set to CC Merchant. Enter the full amount of the payment, recording the credit card number and all pertinent information (date, client, etc.) and close the applicable invoice.
Note: This can also be accomplished through the Interface process from the GDS with a *CP4 code in the accounting line.
3. Print a Credit Card Merchant Report (Reports|Payments|CC Merchant) with Included CC’s set to American Express. Verify that the report matches the amount of the credit cards that were processed.
4. When the credit card company sends a reconciliation report of the charges, enter a payment received with a payment method of EFT for the deposit amount. Set profile type to Other. A profile should be created for use specifically for this type of deposit. The journal entry will be a debit to Cash in Bank, a credit to the Credit Card Merchant receivables account (create this account under General Ledger|Accounts in the 1000 series if not already done) and a debit to Bank Fees.
|
Bob and Mary Jones are booking a tour with your agency. The total cost is $1000. They want to pay with their VISA Credit Card. This vendor does not take credit cards, so you process it directly, and pay the vendor with an agency check. To record this transaction, go to the main Payments menu, then to Received. Enter the $1000 in the Amount field. Fill in the date and change the Pay Method to CC Merch. Be sure to include the client credit card number because this lets you use the CC Reconciliation to clear the CC Merch payments. Fill in any necessary remarks, change the Profile Type to Client, and type Jones in the name field. When the $1000 tour invoice appears, press <Enter> to close it, and click on OK. When VISA deposits this money in your bank account, go to the main Payments menu, then to Received. Enter the amount, and select EFT in the Pay Method field. Select a Profile Type of Other, and enter VISA in the Name field. Click on OK. To complete your journal entry, debit your Cash In Bank Account, and credit your CC Merchant Receivables Account. This offsets the End Of Period journal entry made for the original booking and sets your CC Merchant Receivables account back to zero. The EFT entry appears on your check register as an EFT Dep. |
EFT Payment Received
There is no need to do a Deposit entry, the Payment Received EFT automatically updates the check register.
Payment Made to a Vendor
To account for a payment made to a vendor for a tour, cruise, etc., enter a Payment Made. This closes the payable created by the sales invoice entered.
1. Click on Payments|Made from main menu.
2. In the Amount field, type in the dollar amount.
3. Change the Payment Date (if it is not the current date) by typing in the proper date.
4. In the Branch field, associate a branch from the drop-down menu to the payment if desired.
5. In the Bank Acct field, type in the appropriate bank account number (1, 2, 3, etc.), or click the arrow to select from the list.
6. In the Remark field, type in free flow information, or leave blank.
7. Click the arrow next to the Payment Method field and choose Check.
8. Type the check number in the Check/CC No field.
9. If this payment is associated with a group, type in the group name in the Payment Group field.
10 To make the payment recurring, type in a Payment Code. (See Payment Codes section in this chapter.)
11. Change the Profile Type to Vendor and Submit to, to Supplier.
11. In the Name field, type in a portion of the vendor’s name.
12. To narrow the list of open invoices, select Vendor Settings and/or Global Settings Tabs. Use any or all of these fields or skip this portion altogether. Click Query to display the open invoice(s).
13. If there is more than one invoice listed, click the first one being closed to highlight it and click Toggle Closed. Repeat for each invoice to close. Click OK to save.
Note: If you add a checkmark to the box next to Agent Adjustment, you will automatically go to a Create Agent Adjustment screen.
Payments Made to Agents
To account for a check written to the agent enter a Payment Made. This payment affects the bank account and updates the General Ledger.
1. Click on Payments|Made.
2. In the Amount field, type in the dollar amount.
3. Change the Payment Date (if it is not the current date) by typing in the proper date.
4. In the Branch field, associate a branch from the drop-down menu to the payment if desired.
5. In the Bank Acct field, type in the appropriate bank account number (1, 2, 3, etc.), or click the arrow to select from the list.
6. In the Remark field, type in a description of the payment. (Client Gift, Overnight Fee, etc.).
7. Click the arrow next to the Payment Method field and choose Check.
8. Type in the check number in the Check/CC no field.
9. To make this payment to be recurring, type in a Payment Code. (See Payment Code section in this chapter.)
10. Enter the Payment Group if applicable. (See Payment Group in this chapter).
11. Change the Profile Type to Agent.
12. In the Name field, type in the name of the agent. Click OK to save.
13. If you would like to show this amount on the agent statement, add a checkmark to Agent Adjustment and create an agent adjustment
14. Trams prompts, "Create a Journal Entry?" (This prompt is determined by how the set up was completed in the Global Defaults Prompt Tab in Utilities.) If maintaining the General Ledger in Trams, click YES.
15. Trams automatically displays a credit to the Cash in Bank account. Choose the appropriate expense account as the offsetting account.
Example Journal Entry
Acct #
Name
Br
Debit
Credit
1000
Cash in Bank
XX.XX
6010
Agent Commissions
XX.XX
16. Click OK to save.
17. If you checked the box next to agent adjustment, you will now have a Create Agent Adjustment screen. In the Amount field, type in the adjustment amount. If the adjustment amount is being added to the amount owed to the Agent, enter a positive (+) amount. If the adjustment amount is being subtracted from the amount owed to the Agent, enter a negative (-) amount.
18. The Adjustment Date is the statement date that the adjustment affects. Type the correct date in this field.
19. Click the Agent Name field and type in the agent name.
20. Click the Remark field, and type a brief description about why the adjustment is being made. (e.g., Overnight Fee, Client Gift, etc.)
Payments Made for Expenses
To account for a check written for rent, utilities, or any other office expenses, enter a Payment Made. This payment affects the bank account and updates the General Ledger.
1. Click on Payments|Made.
2. In the Amount field, type in the dollar amount.
3. Change the Payment Date (if it is not the current date) by typing in the proper date.
4. In the Branch field, associate a branch from the drop-down menu to the payment if desired.
5. In the Bank Acct field, type in the appropriate bank account number (1, 2, 3, etc.), or click the arrow to select from the list.
6. In the Remark field, type in a description of the payment. (Rent, Utilities, etc.).
7. Click the arrow next to the Payment Method field and choose Check.
8. Type in the check number in the Check/CC no field.
9. To make this payment to be recurring, type in a Payment Code. (See Payment Code section in chapter.)
10. Enter the Payment Group if applicable. (See Payment Group in this chapter).
11. Change the Profile Type to Other.
12. In the Name field, type in the name of the Payee. If there is no match, Trams prompts to build a new profile. (See Other Profiles in the Profiles chapter.) Click OK to save.
13. If this payment affects an agent, add a check mark to Agent Adjustment.
14. Trams prompts, “Create a Journal Entry?” (This prompt is determined by how the set up was completed in the Global Defaults Prompt Tab in Utilities.) If maintaining the General Ledger in Trams, click YES.
15. Trams automatically displays a credit to the Cash in Bank account. Choose the appropriate expense account as the offsetting account.
Example Journal Entry
Acct #
Name
Br
Debit
Credit
1000
Cash in Bank
XX.XX
6150
Office Expense
XX.XX
16. Click OK to save.
17. If you checked the box next to agent adjustment, you will now have a Create Agent Adjustment screen. In the Amount field, type in the adjustment amount. If the adjustment amount is being added to the amount owed to the Agent, enter a positive (+) amount. If the adjustment amount is being subtracted from the amount owed to the Agent, enter a negative (-) amount.
18. The Adjustment Date is the statement date that the adjustment affects. Type the correct date in this field.
19. Click the Agent Name field and type in the Agent Name.
20. Click the Remark field, and type a brief description about why the adjustment is being made. (e.g., Overnight Fee, Client Gift, etc.)
Note: Recurring Expense Payments can be copied from previous payments made from prior months. See Payment Codes section of this chapter to see how to set up and use Payment Codes so as not to have to re-enter payment information. If Payment Codes have not been previously entered, query by a date range by profile name for the previous month’s expense and copy and adjust it as above.
Void or Spoiled Checks
To enter a void or spoiled check:
1. Click Payments Query Screen and click New, and pick Payment Type, Made.
2. Leave the Amount field at zero.
3. Click the arrow to choose the Payment Method of Check.
4. Change the Payment Date to the date the check was voided.
5. In the Bank Acct field, type in the appropriate bank account number (1, 2, 3, etc.), or click the arrow to select from the list.
6. Type the voided check number in the Check/CC No field.
7. Leave the Payment Group field blank.
8. Leave the Payment Code field blank.
9. In the Remark field, type To Account For Voided Check.
10. Change the Profile Type to Other.
11. In the Name field, type any Other Profile Name or create a profile named Void Check. If there is no match, Trams prompts to build a new profile. (See Other Profiles in the profile chapter.) Click OK to save.
12. Trams prompts, “Create a Journal Entry?” Click NO.
13. Now if that payment appears on the query results screen and is highlighted, click on Void and say Yes to Track Voided Payment.
14. If the payment does not appear on the query results, query the payment and click on Void and say Yes to Track Voided Payment.
Bounced Checks
When a check deposited and entered in Trams has bounced, there are three options to account for it.
OPTION ONE
Use this option when the bounced check is in an accounting period already ended and posted.
1. Click Payments|Withdrawal.
2. In the Amount field, type in the amount of the bounced check.
3. In the Withdrawal Date field, type in the date of the banks notice.
4. Change the bank account number to the account number into which the check was originally deposited (1,2, 3, etc.) by typing in the appropriate account number, or click the arrow to select from the list.
5. Leave the Payment Group field blank.
6. Leave the Payment Code field blank.
7. In the Remark field, type any free-flow information. It is recommended to record the name of the client whose check bounced, plus the check number.
8. Click OK to save. Trams prompts, “Create A Journal Entry?” Click YES.
9. Trams displays a credit to Cash in Bank. In the Account Name & Number field, type in the account number for Bounced Checks and debit that account. (Was this account created already? See Adding To the General Ledger Chart of Accounts.) Click on Add to add the entry to the journal entry box. Click OK.
10. When the payment is deposited again (or replaced) enter a Payment/Received with a profile type of Other. In the Name field, type in the client’s name.
11. Click OK to save. Trams prompts, “Create A Journal Entry?” Click YES.
12. Trams shows a debit to Cash in Bank. In the Account Name & Number field, type in the account number for Bounced Checks and credit that account. This clears the balance on the Bounced Checks account.
OPTION TWO
Use this option to keep client statements accurate, and when the bounced check is in an open accounting period.
1. Click Payments|Query|Payment.
2. Query the payment for the check that bounced. Right click on the payment and if "Query Bank Deposit" is not grayed out, select it and 'Void' the Bank Deposit. After voiding the Bank Deposit, close that screen to be back on the Payment that was part of the voided deposit. Click Void. Trams prompts, "Void Payment Number xxx? Yes or No." Click YES to void. This opens up the client balance again and shows it on the Client Balance Report.
3. Enter a payment received with the payment date of the original date of the receipt. Select the Profile Type of Other and Payment Method of EFT. Enter the name of the client in the Name field. Create an Other profile for the client when prompted. Click Yes to create a journal entry. Debit Cash in Bank and credit a 6000 account.
4. Click Payments|Withdrawal and enter a withdrawal for the amount of the bounced check to reduce the bank balance. When prompted, "Create A Journal Entry?" Click Yes. Credit Cash in Bank and debit the 6000 account utilized in Step 3.
5. When the payment is deposited again or replaced, enter a Payment/Received as normal and close the invoice again. Include as part of a new Bank Deposit.
OPTION THREE
(To keep original receipt and deposit in place and show that client still owes money.)
1. Click Payments|Made.
2. Enter the amount of the check. Use the Pay Method of EFT and the Profile Type of Client.
3. Enter the name of the client in the Name field.
4. Create a negative voucher.
5. When the payment is deposited again or replaced, enter a Payment/Received as normal and close the client's voucher. Include as part of a new Bank Deposit.
Payroll Entry
To enter payroll checks and journalize the expense:
1. Click on Payments|Made.
2. In the Amount field, type in the amount of the payroll check.
3. Click the arrow to choose the Payment Method of Check.
4. Change the Payment Date (if it is not the current date) by typing in the proper date.
5. In the Bank Acct field, type in the appropriate bank account number (1, 2, 3, etc.), or click the arrow to select from the list.
6. Type the Check number in the Check/CC No field.
7. Leave the Payment Group field blank.
8. To create a recurring payment, type in a Payment Code. (See Payment Codes section in this chapter.)
9. In the Remark field, type in free flow information, e.g. Payroll Ending 1/31/xx.
10. Change the Profile Type to Other, or Agent.
11. In the Name field, type in the name of the Employee. If there is no match, Trams prompts to build a new profile.
12. Click OK to save. Note: In the Group/Batch field in the Employee’s profile, type in “Payroll.”
13. Trams prompts, “Create a Journal Entry?” If a General Ledger is being maintained in Trams, click YES.
14. Trams automatically displays a credit to the Cash in Bank account. Choose the appropriate expense and liability accounts as the offsetting accounts. Example journal entry:
Amount
G/L Account
Debit
Credit
Net Check
(1XXX) Cash in Bank
411.00
Gross Pay
(6XXX) Salaries Expense*
500.00
Withheld Fed.Tax
(2XXX) Federal Withholding
45.00
Employer FICA
(2XXX) Federal Withholding
24.00
Employee FICA
(2XXX) Federal Withholding
24.00
FICA Expense
(6XXX) Tax Expense
24.00
Withheld State (if applicable)
(2XXX) State Withholding
15.00
Withheld City (if applicable)
(2XXX) City Withholding
5.00
TOTAL
524.00
524.00
Payroll Tax Report and Payment
To show the amount owed for payroll taxes, print these reports:
1. Click Reports|General Ledger|Account History.
2. Type in the G/L Acct No or the G/L Account Name of the tax account. (2000 series account)
3. In the From and To date fields, type in the desired dates.
4. If paying taxes for one of multiple branches, enter the appropriate branch in the Branch field. Otherwise, leave it blank.
5. The Format defaults to Detail.
6. Leave the Pseudo Post box checked.
7. Leave the Active Accts Only box checked.
8. Click Preview to view on the screen. (Or click Print to send the report directly to the printer without viewing first.)
9. The Ending Balance shown is the amount owed.
Note: Repeat these steps for each General Ledger tax account. The accounts match the journal entry accounts of the employees check. (See Payroll Entry section in this chapter.)
To enter the payroll tax payment:
1. Click Payments|Made.
2. In the Amount field, type in the dollar amount.
3. Change the Payment Date (if it is not today) by typing in the proper date.
4. In the Bank Acct field, type in the appropriate bank account number (1, 2, 3, etc.), or click the arrow to select from the list.
5. Payment Method is Check.
6. Type in the Check number in the Check/CC No field.
7. Enter the Payment Group if applicable.
8. To create a recurring payment, type in a Payment Code. (See Payment Codes section in this manual.)
9. In the Remark field, type a description of the payment. e.g. 1/31/03 Tax Payment.
10. Change the Profile Type to Other.
11. In the Name field, type in the name of the Payee. If there is no match, Trams prompts to build a new profile. Click OK to save.
12. Trams prompts, “Create a Journal Entry?” If a GL is being maintained in Trams, click YES.
13. Trams automatically displays a credit to the Cash in Bank account. Choose the appropriate 2000 series accounts as the offsets.
Example Journal Entry
Acct #
Name
Br
Debit
Credit
1XXX
Cash in Bank
XX.XX
2XXX
Payroll Tax Account
XX.XX
14. Click OK to save.
To View Individual Employee Payroll Information:
1. Go to Reports|Payments|Payment Analysis.
2. Change Payment Type to Made.
3. Enter desired dates.
4. Select Profile Type of Other or Agent.
5. Check Print J/E box.
6. Click Preview.
Vouchers
A voucher acts as a container for money received and held on account, or money sent to vendors for items not yet invoiced. This feature is particularly useful when selling group travel. (See Handling Groups in TBO section of invoice chapter.) Voucher is not a main menu option. Create a voucher by going to Payments|Received or Payments|Made and entering a payment that does not apply to an invoice.
If there are no open invoices for a client or vendor, when clicking on OK to save the payment, a message will be received, Profile has no open invoices prior to payment date. This presents three unapplied payment options: Create Voucher, Leave Unapplied, and Cancel. The system does not allow closing vouchers or creating new vouchers on a credit card payment.
No Open Invoices Message/Create Voucher
1. Create voucher allows voucher creation. Click on Create Voucher to enter a group name and add remarks. (When creating a client or vendor voucher, the branch entered into the Payment Screen defaults to the voucher screen, so the branch for the payment and the voucher are the same. If there is no branch entry on the Payment screen, then the default branch setup in Utilities|Setup|Global Defaults|Prompt Tab is used when creating a voucher. A voucher cannot be saved without a branch entry.) Click OK to save. Vouchers reduce the Invoices Total due on the Client and Vendor Balances Summary Report. They show up as an invoice number followed by a “V” in the Client Balances or Vendor Balances Detail Report
Client vouchers also show on Client Statements. Vendor vouchers show on Vendor Statements. There will be a line item for each voucher created on a Client or Vendor account. They reduce the Vendors Total Open Balance to provide a net amount due from the agency. They reduce the client's Total Open Balance to provide a net amount due.
To close a voucher, enter a payment of the final balance due. Close any open invoices and vouchers that close this open balance. Click Close All to close the vouchers and invoices on this accounts. This closes the balance on the Client Balances Report and the Client Statement or the Vendor Balance Report and the Vendor Statement.
Query for a voucher in the Invoice Query menu. Vouchers have the letter “V” after their number when searching for them in the invoice screen, or choose Invoice Type Voucher.
2. Leave unapplied - Saves the payment without applying the payment to an invoice and without creating a voucher. Note: Unapplied balances appear as one lump sum on the reports, so there is not payment details. This is not recommended. The system does not allow an unapplied CC payment. The unapplied option can be turned off under Utilities|Setup|Global Defaults|Prompt. Query for unapplied payment detail in the Payment Query menu. Select the Advanced Tab and change the Only Unapplied field to Yes.
3. Cancel - Goes back to the payment to make any changes, apply the payment to an invoice, or cancel the payment.
Note: A confirmation number field in a vendor voucher allows users to enter confirmation numbers in the Payments Received/Made|Global Settings tab to find both the invoice and the voucher by confirmation number and close both.
Track Voucher Payments Allocated Across Multiple Invoices
To track how voucher payments have been allocated across multiple invoices, follow the steps below.
1. Go to Payments|Received and create the voucher as usual. Note: To partially apply a voucher, consider creating a Payment Group for the original payment that created the Voucher and use that Payment Group for all subsequent partial payments for the voucher. Example: Voucher 142 would be the Payment Group name for the original payment that created Voucher 142 and is then added to all subsequent partial payments of Voucher 142.
2. To partially apply a voucher to close an existing invoice or invoices, create a Payments|Received. The Payment Amount is $0. The Payment Method is either Cash or Other. Close each of the sales invoices, but do not close the voucher. The amount of the sales invoices closed is in the Unapplied Balance area at bottom of screen.
3. Next, select the voucher, right-click, select Partial Payment, and enter the amount of the unapplied balance (total amount of invoices closed) as a negative amount. Since the amount of the voucher is being reduced, the partial payment must be entered as a negative amount equal to the amount of the invoice(s) being closed. When saving the zero payment, do not create a Journal Entry.
4. This process of partially using the balance of a voucher to close more invoices can be repeated as needed. Only close the voucher when applying the final amount of the voucher against the final invoice.
5. To see the pay down of the original voucher, query for the voucher in the Invoice Query Screen, then right-click on the voucher, and select Query All Payments, and print if desired. All payments are attached to the original voucher. To see the invoices paid by the voucher, right-mouse click on any payment and select Query All Invoices, and print if desired.
6. To close out multiple invoices attached to a single vouchers by multiple payments, run a Payment Analysis Report using the Payment Group assigned to the original Voucher and the Voucher Partial Payments, to see the complete history of the voucher from initial creation to final closing.
Adjusting Client and Vendor Balances
(Bad Debts, Over/Underpayments, Travel Expenses, Errors)
When Client Balances or Vendor Balances need adjusting or “writing off,” enter a payment to adjust the balance. Print the Client Balance report (Reports/Core/Client Balances) or the Vendor Balance report (Reports/Core/Vendor Balances), with format set to detail, as of the date to correct the balance.
To Zero Out Account Balance:
If the Balance Due amount (column on the right) on the Client Balance or Vendor Balance report is a positive amount, enter a payment received.
1. Click Payments|Received.
2. In the Amount field, type in the amount of the balance being zeroed out.
3. Click the arrow to the right of the Payment Method field and select Other.
4. In the Pay Date field, enter the same date the report was printed.
5. In the Remark field, type a brief description as to why the balance is being zeroed out. (i.e. Bad Debt, Under Payment, etc.)
6. Click the arrow to the right of the ProfileType field and choose Client (or Vendor-Supplier).
7. In the Name field, type in the name of the client (or vendor). Click OK to process.
8. Trams displays the open invoice(s) for the client (or vendor). Highlight the invoice(s) being closed and click Toggle Closed. Click Query to process.
9. Trams prompts, “Create A Journal Entry? Yes or No.” If The GL is NOT maintained, click NO. If the GL is maintained, click YES.:
|
Example Journal Entry |
|
|
Credit |
Client Balance account or Vendor Balance account (depending on what profile type entered.) |
|
Debit |
Offset with an account that best describes the reason for the adjustment (i.e. Bad Debt Expense, Accounting Adjustments, etc.) |
10. Click OK.
If the Balance Due amount (column on the right) on the Client Balance or Vendor Balance report is negative (-), enter a payment made.
1. Click Payments|Made.
2. Repeat step #2 through step #8 above.
3. Trams prompts, “Create A Journal Entry? Yes or No.” If the GL is NOT maintained, click NO. If the GL is maintained, click YES.
Example Journal Entry
Debit
Client Balance account or Vendor Balance account (depending on what profile type entered.)
Credit
Offset with an account that best describes the reason for the adjustment (i.e. Bad Debt Expense, Accounting Adjustments, etc.)
4. Click OK.
Clear Balance-Acct Balance Zero w/Total Invoices & Total Unapplieds Same
If the Balance Due (column on the right) on the Client Balance report or Vendor Balance report is zero and Total Invoices and Total Unapplied are the same amounts, this was probably caused by entering a payment before an invoice was created. Therefore, apply the unapplied payment to the invoice.
1. Click Payments|Received.
2. Leave the Amount field as zero.
3. In the Pay Date field, enter the same date the report was printed.
4. In the Remark field, type To Apply Unapplied Balance.
5. Click the arrow to the right of the Payment Method field and select Other. Note: If the bookings being closed with a Voucher or Unapplied amount are COMM TRACK bookings, use Payment Method of Check, so that both the bookings and the payments are correctly reflected on financial statements through the End of Period close.
6. Click the arrow to the right of the ProfileType field and choose Client (or Vendor-Supplier).
7. In the Name field, type the name of the client (or vendor). Click OK to process.
8. Trams displays the open invoice(s) for the client (or vendor). Highlight the invoice(s) being closed and click Toggle Closed. Click OK to process.
9. Trams prompts, “Create A Journal Entry? Yes or No.” Click NO. (Since the payment amount is zero, a journal entry is not necessary.)
Clear Check That Will Never be Cashed
1. Click Payments|Received.
2. Enter the payment received as usual for the amount of the check that was never cashed.
3. Enter a remark such as, “Check Was Never Cashed.”
4. Using a profile type of Other, fill in the name with the entity to which the check was originally written.
5. Click OK and Trams Back Office prompts, “Create a Journal Entry?” Click YES.
6. Trams Back Office displays a debit to Cash in Bank. For the offsetting account, choose the account number affected when the payment was originally recorded and credit that account. Click OK to save.
7. Next, click Payments|Deposit.
8. Enter a deposit for the amount of the payment entered in Step 2, entering the same date.
9. In the Remark field, Note the check number that was NOT cashed. Click OK to save.
10. When the Bank Reconciliation is done at the end of the month, clear both the check that was written and the deposit offsetting it.
Interest Income
1. Click Payments|Received.
2. Enter payment.
3. In the Payment Method field, change the method to EFT by clicking the arrow to the right of the field.
4. In the Remark field, type Interest.
5. Profile Type is Other.
6. In the Name field, enter the name of the bank from which the interest was received.
7. Click OK to process.
8. Trams Back Office prompts, “Create A Journal Entry?” Click YES.
9. Trams Back Office displays a Debit to Cash in Bank. Enter the account number for Interest Income (4000 series account) as the offsetting account as a Credit.
10. Click OK to save.
Deposits and Withdrawals
Keep an updated bank reconciliation and check register by entering all deposits and withdrawals on a daily basis. Deposits should always represent the sum of cash and check Payments Received entered for that period. A receipts report for the day for the specific bank account should match the actual deposit amount (it is always a good idea to run a tape of the checks and make sure it matches what was entered into TBO). Trams Back Office suggests printing the receipts report and attaching it to the deposit slip.
Deposits
(Please see the Daily Routine in the Setting Up Trams Back Office chapter for proper procedure for entering deposits and coordinating them with receipts). Entering the total amount of the deposit in Trams updates the Check Register Core Report--entering each individual receipt that makes up the deposit updates the general ledger cash in bank accounts during an EOP. To enter a new deposit, select Payments|Deposit and the system prompts for the following information:
Notice the new deposit screen. Continue to enter deposits the old way, by just not querying for or including any receipts in the deposit. Complete the fields at the top of the deposit and a deposit entry will be created without receipts being linked to the deposit.
Bank Deposit Fields
|
Amount |
The amount of the deposit. |
|
Payment Type |
Select Deposit. |
|
Payment Date |
The date of the deposit. |
|
Branch |
If on multi-branch version, enter a branch number from the drop-down menu. |
|
Bank Acct |
Select the bank account to be affected from drop-down. |
|
Invoice Reference |
Enter an invoice reference which can be used as a search parameter. |
|
Remarks |
Remarks allow alphanumeric free-flow characters and are used for reference. |
|
Payment Group |
For group payments, choose from the drop-down menu the group name assigned for future reference in queries and for easy duplication. To create a group, click on the raised Payment Group button. |
|
Payment Code |
For recurring payments, assign a unique payment code for future reference in queries and for easy duplication. |
|
Receipt Date |
Enter the date of the receipts that are to be linked to the deposit. |
|
Total Receipts |
Reflects the actual amount of the queried receipts. |
|
Included Receipts |
Reflects the total amount of the receipts linked to the deposit. |
|
Continue entering payments |
To enter multiple deposits at one time, make sure the Continue entering Payments box is checked. After entering the last deposit, click on the box and remove the check. Returned to the main menu instead of the payment entry screen. |
Deposit entries do not prompt for a journal entry if Utilities|Setup|Global Defaults|Journal Entry Prompting is set to Recommended or Recommended Always.
Receipts can be linked to a deposit entry. Query for receipts by entering a specific date rate and clicking Query. Click Toggle Included receipts to be included for a specific deposit and when included, these are linked to the deposit entry created. (The Include in Deposit column indicates what has been included.) To include all receipts at one time, click Include All. To invert any receipts selected or not selected, click Invert All. To make any changes to receipts that are linked to the deposit, use Edit Receipt.
WARNING: A deposit that links receipts for more than one day, will make the GL Reconciliation report reflect that receipts and deposits for each day are different. This may cause the check register to be out of balance with the Trial Balance at month’s end.
A deposit slip can also be printed from the new deposit screen, if receipts are linked to the deposit. The deposit slip printed contains the bank name, the routing number, followed by the account number. (The Name on Check also prints on the Deposit Slip as the Payor, if present.) The totals for cash and checks are displayed at the bottom of the report with the deposit total. Most banks will accept this deposit slip report along with a copy of the normal bank deposit slip, with only totals for cash, checks and total deposit completed. Since the TBO deposit slip does not have the routing/account numbers in the magnetic ink required for bank scanners, the original slip still is required. Save considerable time by entering receipts into TBO before making bank deposits.
Notice the Columns, Sort By and Refresh buttons. The Columns button is used to select which columns of data is displayed in the results screen. Click Columns and choose the columns to be displayed in the results screen by highlighting the column in the Available Fields and clicking the right arrow to move it over to Displayed Fields. Using the red up and down arrows, put the column in the order to appear. Click OK. Go out to the results screen and size the columns as desired, go back into Columns and click Save Settings and OK to save. Next click Sort to get up to 3 sorts in ascending or descending order of selected columns and click Save Settings. Note: There is a Name On Check field under Columns. If a Name on Check is present on a payment it will be displayed in the column on the Receipts List portion of the Deposit Screen.
Withdrawals
To enter a Withdrawal, select Payments|Withdrawal and the system prompts for:
Bank Withdrawal Fields
|
Payment Type |
Select Withdrawal. |
|
Payment Date |
The date of the Withdrawal. |
|
Branch |
If on multi-branch version enter a branch number from the drop-down menu |
|
Remarks |
Remarks allow alphanumeric free-flow characters and are used for reference. |
|
Bank Acct No |
Select the bank account to be affected. |
|
Amount |
The amount of the withdrawal. |
|
Payment Group |
For group payments, choose from the drop-down menu the group name assigned for future reference in queries and for easy duplication. To create a group, click on the Payment Group raised button. |
|
Payment Code |
For recurring payments, assign a unique payment code for future reference in Query and for easy duplication. |
|
Continue entering payments |
To enter multiple withdrawals at one time, make sure the Continue entering Payments box is checked. When finished entering the last withdrawal, click on the box and remove the check to return to the main menu instead of the payment entry screen. |
Any time the bank balance is reduced and no check was written, account for that transaction as a withdrawal or EFT.
10. Trams Back Office prompts for a journal entry upon completion of a withdrawal entry. This should always be entered if using the general ledger
Bank Transfers
To accommodate the transfer of money between bank accounts, there is a Transfer option in the main Payments menu. This creates a Payment Made and a Payment Received and creates the journal entries automatically.
1. Before starting a bank transfer, set up a new general ledger account in the asset series (1000 accounts), and call it Bank Transfers.
2. Then set up an Other profile called Bank Transfer. The profile screen has a Default G/L Account field under the General Info tab. Enter new Bank Transfers account number here.
3. Once this is set up, begin recording the transfer of money between bank accounts. Select the main Payments menu, then Transfer.
4. Enter the amount to be transferred, the date of transfer, the bank account number to transfer from, and the bank account number receiving the money.
5. Enter Bank Transfer in the profile name to access the new profile just created. Verify the accuracy of each account number, adding any remarks (Payment Group and Remarks appear in the journal entries).
6. Click OK. All entries to the general ledger and check register are automatically processed.
Trams Back Office generates a Payment Made EFT from the account the money is coming out of, and a Payment Received EFT to the account the money is going in, and creates the journal entries for both. Both check registers are updated and the remarks on each payment indicate the transfer. All entries to the general ledger and check register are processed in one step.
Bank Transfer
|
The agency is transferring $1,000 from the checking account to the savings account. The checking account is Bank Account 1. The savings account is Bank Account 2. There is a Bank Transfer general ledger account number 1025 and an Other profile called Bank Transfers with 1025 in the Default G/L Acct field. Select the main Payments menu, then Transfer. Enter $1,000.00 in the amount field, using the current date, then enter “1” in the From Bank Account field, and “2” in the To Bank Account field. Bank Transfer is entered in the Transfer Profile field, and add the Note “To cover the ARC/BSP withdrawal” in the Remarks field. |
Bank Transfer by Issuing a Check
(An Alternate Method of Transferring)
To record the check being written:
1. Click Payments|Made.
2. In the Amount field, type in the amount being transferred.
3. In the Payment Date field, enter the date of the transfer.
4. The Bank Acct field should be the corresponding bank account number. To change the default, type in the new number or click the arrow to the right of the field.
5. Payment Method is Check.
6. Leave the Name on Check field blank.
7. Enter the check number in the Check/CC No field.
8. Leave the Payment Group field blank.
9. Leave the Payment Code field blank.
10. In the Remark field, type “Bank Transfer.”
11. Click the arrow to the right of the Profile Type field and change Profile Type to Other.
12. In the Name field, enter the name (or part of the name) on the check.
13. Click OK and TBO prompts, Create a Journal Entry? Yes or No.
If maintaining the General Ledger in TBO, click Yes and journalize to the Bank Transfer Account (1000 series).
To record receipt of the check:
1. Click Payments|Received.
2. Repeat steps 2 - 13 from above.
3. Next, click Payments|Deposit.
4. In the Amount field, enter the amount of the transfer.
5. In the Deposit Date field, enter the date of the transfer.
6. The Bank Acct field should be the corresponding bank account number. To change the default, type in the new number or click the arrow to the right of the field.
7. Leave the Payment Group field blank.
8. Leave the Payment Code field blank.
9. In the Remark field, type in “Bank Transfer”.
10. Click OK to save.
Bank Transfer by Withdrawal
(This is an alternate method of transferring funds between different accounts in the same bank, but using the Payments|Transfer [see above] is recommended since it saves time and effort).
1. Click Payments|Withdrawal.
2. In the Amount field, type in the amount of the withdrawal.
3. In the Withdrawal Date field, type in the date the transfer took place.
4. In the Bank Acct field, type in the appropriate bank account number or click the arrow to see the list.
5. Leave the Payment Group field blank.
6. Leave the Payment Code field blank.
7. In the Remark field, type Bank Transfer.
8. Click OK to process.
9.Trams Back Office prompts, “Create a Journal Entry?” If maintaining the General Ledger in Trams Back Office, click Yes and journalize to the Bank Transfer Account (1000 series).
10. Click OK to save.
To record receipt of the check
1. Click Payments|Received.
2. In the Amount field, type in the amount of the transfer.
3. In the Payment Date field, enter the date of the transfer.
4. The Bank Acct field should be the corresponding bank account number. To change the default, type in the new number or click the arrow.
5. Payment Method is Cash.
6. Leave the Check/CC No field blank.
7. Leave the Payment Code field blank.
8. Leave the Payment Group field blank.
9. In the Remark field, type in “Bank Transfer”
10. Click the arrow and change Profile Type to Other.
11. In the Name field, enter the name (or part of the name) of the account from which the money came.
12. Click OK and Trams Back Office prompts, “Create a Journal Entry? Yes or No.”
13. If maintaining the General Ledger in Trams Back Office, click Yes and journalize to the Bank Transfer Account (1000 series).
14. Next, click Payments|Deposit.
15. In the Amount field, enter the amount of the transfer.
16. In the Deposit Date field, enter the date of the transfer.
17. The Bank Acct field should be the corresponding bank account number. To change the default, type in the new number or click the arrow.
18. Leave the Payment Group field blank.
19. Leave the Payment Code field blank.
20. In the Remark field, type in “Bank Transfer”.
21. Click OK to save.
Bank Reconciliation
To use the Bank Reconciliation, the Check Register Core Report and Bank Reconciliation feature need to be setup (please see chapter entitled, Setting Up Trams Back Office). Bank Reconciliation is a tool to help reconcile the monthly bank statement.
1. Click Payments|Reconciliation|Bank Reconciliation.
2. In the Bank Acct field, enter the appropriate bank account number (1, 2, 3, etc.). To change the default, type in the new number, or click the arrow to the right of the field to see the list.
3. In the Clearing Date field, type in a date range From and To.
4. In the Stmt Ending Balance field, type in the ending balance on the bank statement and click OK to process.
5. Verify that the Beginning Balance on the Bank Statement and the Beginning Balance on the Trams Back Office screen match. If the balances are different, go to the previous month and correct.
Note: It may be necessary to keep going back, month by month to find a month in balance — and begin there.
Apply is always active on the Bank Reconciliation screen so the user can save any cleared or uncleared items without closing the Bank Reconciliation window. Refresh presents any changes or additions made when outside the Bank Reconciliation window (but while it was still open). New allows entering new transactions that automatically appear on the Bank Reconciliation Screen without clicking Refresh. On the bank reconciliation screen, use <Shift> left-mouse click for selecting a range of items for closing, deleting etc. Using <Ctrl> left-mouse click allows for selection of multiple individual items in any order for closing, deleting etc.
Trams Back Office displays a list of items (deposits, withdrawals & checks) that have never been marked cleared. If there is heavier concentration of bank transactions toward the end of the month, leave the status to Not Cleared, to not have to change as many transactions to mark them cleared. If there is an even flow of checks, withdrawals, and deposits during the month, change the status to cleared by clicking on Clear All. In this case, only a few transactions need to be changed.
6. Next, match the items on the screen against the bank statement. Highlight any item appearing on the screen that is not on the bank statement, and click the Toggle button (or use <ALT T>) or double-click on the entry to revise the status. Also use the space bar to clear or unclear multiple items.
7. If there is an item on the bank statement that is not on the screen, add it by clicking New.
8. Trams Back Office gives the option of adding a new Deposit, EFT Received, Withdrawal, or Check. Click one, then OK and enter the item. Once complete, click OK again to return to the Bank Reconciliation screen.
9. Once all the appropriate items have been “uncleared,” verify that the total Deposits and Withdrawals/Checks match the Bank Statement. The Ending Balance on the Trams Back Office screen should now match the Ending Balance on the Bank Statement. To print the Bank Reconciliation Report, click the Print button to display the report on the screen. Then click on the printer icon to print to the printer. When the report is in balance, click the OK button to save.
10. Trams Back Office prompts, “(xxx) Payment(s) Will Be Marked Cleared and (xxx) Payment(s) Will Be Marked Uncleared. Continue? Yes or No.” Click YES.
11. Print a Report./Core/Check Register with Bank Reconciliation as NOT Cleared, along with a Check Register Report for the month with Bank Reconciliation as All.
Notes: Clear or unclear items by using the space bar. This works well with clearing multiple, consecutive items. Also, column headings in the Bank Reconciliation can be sorted by clicking on them. Select the columns to display in the reconciliation screen by clicking Columns, choosing the columns in the desired by using the up and down arrows, adjust column widths and return to columns to Save Settings.
The Bank Reconciliation now includes un-cleared checks, deposits, withdrawals, and the book balance (check register balance less total of un-cleared items).
Also, changes to the Bank Reconciliation can be “Applied” to save an incomplete reconciliation. Re-enter the Bank Reconciliation for the same Clearing Date. A prompt warns of cleared items - click OK to continue. All the items previously cleared or left uncleared are displayed as they were saved. Continue the reconciliation routine until completed.
|
You own a small agency and plan to go on vacation for two weeks. Julie, the manager has access to the checkbook, but only for emergencies. She does a weekly deposit while you are gone, but you paid all the bills before you left. Julie wrote five “emergency” checks in your absence. When you receive your bank statement and use the Bank Reconciliation routine, you notice 20 out of 25 checks have cleared the bank. Instead of changing the status on all these checks one at a time, you choose Clear All and only change the status on the five cleared checks by highlighting each and clicking on Toggle. |
Making Additional Payment Entries Through Bank Reconciliation
To make additional payment entries, click the New button. This launches a Payment screen to enter a new Check|Deposit|Withdrawal|EFT Transaction. Trams Back Office updates the item list and the balance, and returns to the Bank Reconciliation screen. Hint: Make sure the date is correct!
Modifying Payment Entries from Bank Reconciliation
To modify an entry, highlight it and click on Edit. Only “Other” payments can be modified as long as this function was enabled in the Utilities|Setup|Global Defaults Prompt Tab.
Bank Reconciliation from File
A reconciliation can be aided by using a file downloaded from the bank’s web site. (The only bank file formats that can currently be used is the .CSV format which is pretty standard) Both checks and deposits can reconciled. Any transactions where a check number is present is reconciled to, and if not an exact match, an error notation appears under the Error column on the screen. Any deposit or non-check transactions that doesn’t have identifying numbers attached to them, is matched by the Amount and Date. The amount must match exactly and the date must be either the same date or one day later. There is no Error listed for non-check items that do not match.
1. Set up the bank reconciliation as usual as outlined above and click Reconcile on the Bank Rec Screen.
2. On the Bank Rec From File screen, browse for the location of the file downloaded from the bank's web site, and click Next.
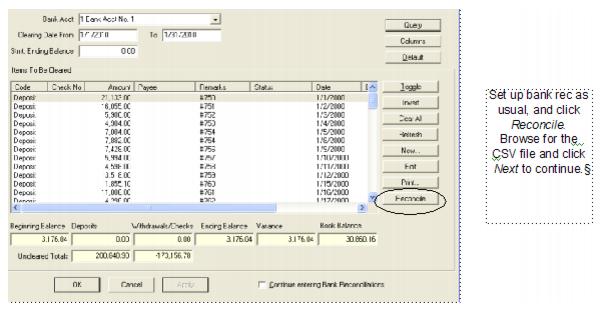
3. Select the File Type from the drop down. Any CSV type file is acceptable.
4. 'Map' fields 1 - 6 to the correct field information as displayed on the query screen below the fields, based on the bank’s file.
Example: The Query Screen for a CSV file shows this information:
Field 1 to be the "Date" of the check.
Field 2 to be the "Amount" of the check.
Field 3 to be "Unknown/Not Used"
Field 4 to be the "Check Number" of the check
Field 5 to be the "Remarks" on the check
Field 6 to be blank or "Unknown/Not Used"
Ensure that the correct description for each field appears in the drop down field based on the example above. Click Next to continue.
5. All checks and non-check items from the file are displayed on the screen with an indication on whether they Match to an existing check or non-check item in TBO, along with the TBO Payment Number. If an exact amount match was not found for a check that shows 'Yes' under the Matched column, an Error
message is displayed, Amount is Different.
6. For those checks that have been found to be in TBO and are Matched, or Matched and have an "Error" message, click Find Payment to be brought back to that specific payment on the primary Bank Reconciliation Screen, where the payment can be viewed or made corrections to. After a
correction is completed, click Reconcile again to go directly back to the Bank Rec From File screen where the Refresh button updates the screen.
7. After correcting any found payments with errors, click Next, to return to the standard Bank Reconciliation Screen and all Matched checks and non-check items from the previous screen are as Cleared on the Bank Reconciliation Screen. Complete the rest of the bank reconciliation as normal.
CC Merchant Reconciliation
The CC Merchant Reconciliation function designates items that have cleared the CC Merchant credit card account. Go to Payments|Reconciliation|CC Merchant Reconciliation. Before querying the CC Merchant payments, select the included CCs from the drop-down list, the bank account, the clearing date (ending date on the statement received from the credit card company), and the statement's ending balance. Leave CC Processor set to All. To make a Payment Received or EFT from this area, click Enter CC Merchant Receipt. To continue making another CC Merchant Reconciliation, click Continue Entering CC Merchant Reconciliations.
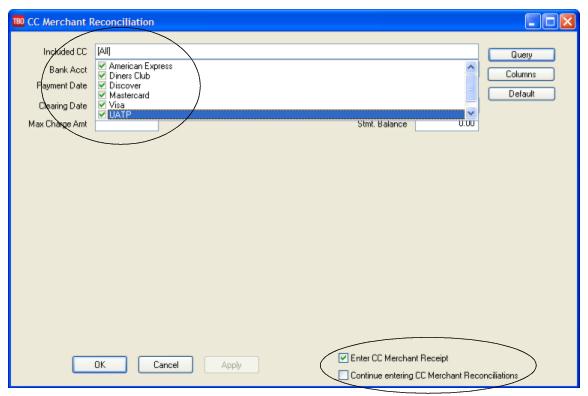
Note: MasterCard numbers beginning with 22 - 27 are supported.
The system lists all items not previously marked cleared showing the credit card code, credit card number, date, amount, payee, remark, and status. (Any Reject Code or Message that is captured in the Auth Msg field on the CC Merchant Reconciliation Screen is stamped in the Remarks field of the payment.)
So any payments that are rejected by the processor will retain the reason the payment was rejected in that payments' 'Remarks' field so action can be taken to correct the problem and then reprocess the payment.
All items entered prior to the clearing date are not marked Cleared automatically. Highlight those items that have cleared the CC Merchant account and click Toggle to change to a cleared status. Click Invert and change the status of all items, or click Clear All.
The CC Merchant Reconciliation screen displays at the bottom, the Total Receipts, Total Disbursements, the Balance and the Variance from Statement. When adding or changing items from Cleared to Not cleared (or vice versa), the Balance updates accordingly. (If there is a heavier concentration of transactions toward the end of the month, leave the Cleared Status to Not Cleared, so there are fewer steps to mark them cleared. If there is an even flow of receipts and disbursements during the month, change the status to Cleared by clicking Clear All. In this case, only a few transactions need to be changed.)
Note: CC Merchant Payments with a completely invalid CC Number (i.e. no digits), are excluded in the CC Merchant Reconciliation screen. The payment screen requires the CC Number field to have at least one digit if the pay method is CC Merchant.
The column headings in the CC Merchant Reconciliation can be sorted by clicking on them. To select desired columns in the results screen and the desired order, click Columns. Also select which card types first appear on the reconciliation screen by setting up the screen and clicking Default. Save settings Globally or Per User.
To continue working on the CC Merchant Reconciliation later, click Apply to save the items already cleared, Next click Cancel. When returning to complete the reconciliation, change the Cleared Status to All. To save the finished CC Merchant Reconciliation, choose OK. Once the CC Merchant Reconciliation is balanced to the CC Merchant statement, print a CC Merchant Reconciliation Report by clicking on Print. Keep this report each month with the CC Merchant statement provided by the credit card for audit trail purposes.
On the CC Merchant Reconciliation Screen, use <Shift> left-mouse click for selecting a range of items for closing, deleting, etc. Using <CTRL> left-mouse click permits selection of multiple individual items in any order for closing, deleting etc.
CC Merchant Reconciliation
An EFT (Electronic Fund Transfer) Payment needs to be entered for the amount the credit card company deposits and the fees charged to the bank account. This whole process can be automated using the Trams Back Office CC Merchant Program with Ticketmaster (no longer taking new customers), BluePay Canada (formerly Caledon, or NTC (National Transactions Corporation). See section below on Automatic CC Merchant Reconciliation, or visit Sabretravelnetwork.com/trams and select Products/Services to learn more!
Modifying Payment Entries from CC Merchant Reconciliation
To modify an entry, highlight it and click Edit.
Printing the CC Merchant Reconciliation
To print the CC Merchant Reconciliation in its current status, click Print, and once the report is displayed, click the printer icon at the top of the screen.
CC Merchant Automated CC Service Fee Processing
Agencies that are processing credit cards with BluePay Canada (formerly Caledon), NTC (National Transactions Corporation), or Ticketmaster (currently not taking on any new customers), can process directly into TBO using these directions. CC Merchant for Trams Back Office Automated Service Fee Processing program takes the payments from TBO, double checks them and sends them electronically to Ticketmaster, NTC (National Transactions Corporation), or BluePay Canada (formerly Caledon).
Credit card transactions are then processed and sent back to TBO, where the system clears the payments, and creates the journal entry to record the activity in the General Ledger. Setup needs to be completed before processing the payments. For complete setup instructions, go to the chapter Utilities and the section CC Processors print this document located here.
For more information on these processors, go here.
Contact info:
**NTC (National Transactions Corporation), contact Jerry Miller (jmiller@nationaltransaction.com ).
**BluePay Canada (formerly Caledon) support@bluepay.caor call 855-812-5191.
Step 1: Select Payments| Reconciliation| CC Merchant Reconciliation and enter the selection criteria.
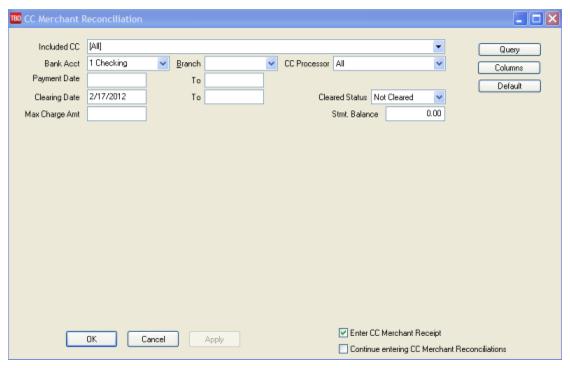
Bank Acct: Select the bank account number the CC Merchant payments were created under.
Branch: If processing items for a specific branch, select the appropriate branch number. Leave the field blank to process all branches.
Note: Process multiple branches all at once as long as the CC Merchant fee is not being processed by branch (i.e. payments were entered under different management branches, but are all tied together under the same GL branch.) If the CC Merchant fee needs to be expensed by branch then process each branch separately.
CC Processor: Select the credit card processing vendor that is processing the cards.
Clearing Date: The Clearing Date field defaults to the current date. This date is stamped into the CC Merchant payment record once the record is processed. Once a CC Merchant payment has a clearing date, it always shows a cleared status and therefore will not be selected for processing again.
Stmt Balance: Leave this field blank. It is not needed for CC Merchant processing.
Max Charge Amt: To process transactions up to and including a certain amount, enter the amount in this field.
Example: Agency has a certain employee that is responsible for processing service fee transactions only. Service fees for the agency are $20.00. The employee enters $20.00 as the Max Charge Amt so that only transactions of $20.00 or less appear in the query for processing.
After entering the appropriate selection criteria, click Query.
Note: UATP cards can be used for Pinnacle Payment Solutions. Add UATP as a new card if processed through Pinnacle, under Utilities|Setup|CC Processors. The UATP CC Merchant Payment is created the same as any other CC processed. When going to the CC Merchant Reconciliation Screen, select only UATP as the Included Card and process those transactions, but the processor selected must be Pinnacle. Both charges and refunds may be processed.
Note: NTC CC Merchant Processing now allows users to send multiple batches within the same day without being rejected as duplicate submissions.
Step 2: Trams displays the query results for the CC Merchant transactions that will be submitted for processing.
Step 3: Click Process. Select the option All Items if processing everything in the query. Select the option Selected Items if processing certain transactions only. Once a selection is chosen, the CC Merchant transactions are sent to the credit card processing vendor via the internet connection.
Note: If processing Selected Items, highlight those transactions prior to clicking Process. Select multiple transactions by holding the Ctrl button and doing a right-mouse click.
Step 4: Trams displays a status message box on the CC Merchant reconciliation screen that gives the user feedback about the charges currently being processed.
Step 5: Once all cards are sent to the credit card processor, the status message box clears the screen. Each record processed shows as "Charged" in the column labeled "Status". Also, an authorization code, a decline code, or an error code appears in the column labeled "Auth Msg". If the record is approved, Trams Back Office updates the payment record with a "Date Cleared" of the date the transaction was processed. Once the "Date Cleared" is entered, those records will not be processed again. Records that are declined or are in error are not marked cleared. The "Date Cleared" field for those payment records is left blank. The decline code or error code, however, is appended to the remarks field of the payment record for future reference.
If the processor is Ticketmaster, updated descriptions for the decline codes and error codes are available on their web site at: https://www.iats.ticketmaster.com/english/help/rejects.html.
If the processor is Pinnacle Payment Solutions, please call Merchant Services at 800 228-0210 and ask for customer support for the meaning of the code(s).
Click OK to continue.
Step 6: Trams prompts, "XX Payment(s) Will Be Marked Cleared and XX Will Be Marked Uncleared. Continue?" Click Yes.
Step 7: The payment screen is displayed to create the EFT payment for the amount being deposited into a bank account (card amounts processed less fees).
The payment screen defaults to a Payment Method of EFT, Profile Type of Other, and Name as the name of the credit card processing vendor, based on the profile selected when setting up Utility defaults. Click OK to save the payment information. Trams prompts, "Create a journal entry?" Click Yes.
Step 8: Trams defaults the journal entry as follows:
Cash in Bank (1000 series) Debit
CC Merchant Receivable (1000 series) Credit
Credit Card Processing Fees (6000 - 9000 series) Debit
Transaction Fees (6000 - 9000 series) Debit
Click OK to save the journal entry.
Agent Reconciliation
The Agent Reconciliation function displays invoices for which agents are being paid and then creates an agent payment if desired. Go to Payments|Reconciliation|Agent Reconciliation to setup.
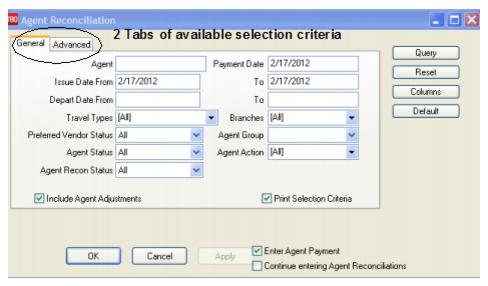
Agent Reconciliation Selection Screen - General Tab
|
Agent |
Enter the appropriate Agent Name by entering a few letters and selecting from drop-down menu. |
|
Payment Date |
Enter the date the Agent is being paid by clicking on drop-down arrow or entering the date manually. |
|
Issue Date From |
Enter the issue From date of the range of invoices for which the agent is being paid. (Use this range to pay agent, or Invoice Depart From/To Date as range.) |
|
To |
Enter the issue To date of the range of invoices for which the agent is being paid. |
|
Depart Date From |
Enter the depart From date of the range of invoices for which the agent is being paid. (Use this range to pay agent, or Invoice Issue From/To date as range.) |
|
To |
Enter the depart To date of the range of invoices for which the agent is being paid. |
|
Travel Types |
From the drop-down menu, designate the travel types for the range of invoices for which the agent is being paid. |
|
Branches |
Designate branch/es by checking/unchecking branch locations. |
|
Preferred Vendor Status |
From drop-down menu, indicate All, Preferred, or Non-Preferred. |
|
Agent Group |
Select agent group from drop-down if applicable to create payments for multiple agents when saving the Agent Reconciliation. When Enter Agent Payment is checked on the Agent Reconciliation and more than one agent is being reconciled, multiple agent payments, one for each agent reconciled as part of an Agent Group can be created. (Host agencies with many IC's agent accounts to reconcile and pay will use this feature. After the auto-completion of multiple payments for the Agent Group being reconciled, the Host user queries for the completed payments for the day to issue the checks for the auto-created multiple payments.) |
|
Agent Status |
From drop-down menu, indicate All, Inside, or Outside. |
|
Agent Action |
From drop-down menu, select Ticketing or Booking. |
|
Agent Payment Status |
From drop-down menu, indicate All, Open, or Closed. Note: Agent items that are linked to a payment never appear again on the Agent Reconciliation Screen, since they are already reconciled and can only be unreconciled by voiding the payment. The Agent Payment Status of Closed setting only applies to items that are cleared but not linked to a payment. This aids users in finding reconciliations where a payment was not created, and they now want to complete that payment and have Closed items attached to the payment for future reference. |
|
Include Agent Adjustments |
Check here to make Agent Adjustments while in the reconciliation. |
|
Print Selection Criteria |
When unchecked, will not print a separate selection criteria page when printing out the agent reconciliation report. |
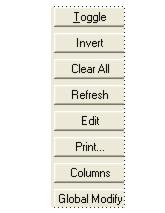
Toggle - Open or close item. Close many items at once by using <Ctrl> Toggle.
Invert - Select one item of a group of items and invert selection.
Clear All - Clears all amounts.
Refresh - Changes can be seen by clicking here.
Edit - Edit the invoice.
Print - Used to print out an agent reconciliation report.
Columns - Used to select which columns of data to display in the results screen. Click Columns and choose the columns to display by highlighting the column in the Available Fields and clicking on the left arrow to move it over to Displayed Fields. Using the red up and down arrows, put the column in the order it will appear on the results screen. Click Save Settings and OK to save. To save the filters in the query, set up the selection criteria and click Default. Save the filters on a Personal or Global level, so settings are retained. To alter the settings, click Default, remove the defaults and re-do.
Available columns are: Issue Date, Invoice No, Branch, Ticket/Confirm No, Passenger Name, Client Name, Vendor Name, Total Fare, Commission, Agent Commission, I/O, Remarks, Status, Depart Date, Agent Name, RecNo, Travel Type. (A user running a query for an agent for all travel types and then sorting by Travel Type can easily use Global Modify to adjust commission rates & amounts for a specific travel type.)
Global Modify - Globally modify an agent’s Commission Rate Percentage % or amount to all bookings or bookings selected by travel type in the query screen, for a specific agent. This globally applied percentage can be used by agencies that are wanting to pay agents a base salary plus a commission bonus based on exceeding an identified commission 'threshold'. The Total Commission field should be used as an aid to easily see whether an agent has exceeded the threshold and then calculate the percentage to be used for the Global Modify of the agent commission rate, without running an additional report.
Example: Agent salary $1500.00 per month - Commission Revenue Threshold - 5000.00/month
Any Commission Revenue exceeding 5000.00/month is paid to the agent at 30% of the excess. Agent books 6000.00 of commission revenue exceeding the threshold by 1000.00 or 300.00 extra compensation to the agent.
Agent Total Compensation for the month = 1800.00 (1500.00 + 300.00)
Calculation of percentage to apply to all this agents bookings across the board for the month:
300.00 / 6000.00 = .05% (.05% X 6000.00 = 300.00 of extra commission revenue from all bookings during the month to be added to the base salary of 1500.00)
The Global Modify feature for agent commission percentage % would be 5% applied to all the booked commissions for the agent for the month and display as 5.00% in the 'Rate' Field for the agent on the Agent Tab of the Booking Screen.
Note: Agent Payments are linked to the Cleared Agent Bookings when using the Agent Reconciliation. If a query for the payment made to the agent is performed on the Payment Query Screen, right-click to Query All Invoices, the invoices cleared and paid to the agent when using the Agent Reconciliation, are displayed. A View Pymt button has also been added to the Agent Tab of the Booking Screen that also links to the Agent Payment.
The Advanced Tab contains the same selection criteria we use to set up our Agent Statement. Recommended settings are listed below:
Agent Reconciliation Selection Screen - Advanced Tab
|
ARC Non CC |
From drop-down menu, select Issue Date, Client Pymt Date, Vendor Pymt Date or Exclude. (Recommend Client Pymt Date.) |
|
ARC CC |
From drop-down menu, select Issue Date, Client Pymt Date, Vendor Pymt Date or Exclude. (Recommend Issue Date or Vendor Pymt Date.) |
|
ARC Debit/Credit Memos |
From drop-down menu, select Issue Date, Client Pymt Date, Vendor Pymt Date or Exclude. (Recommend Issue Date.) |
|
Supplier Non CC |
From drop-down menu, select Issue Date, Client Pymt Date, Vendor Pymt Date or Exclude. (Recommend Client Pymt Date.) |
|
Supplier CC |
From drop-down menu, select Issue Date, Client Pymt Date, Vendor Pymt Date or Exclude. (Recommend Vendor Pymt Date.) |
|
Comm Track |
From drop-down menu, select Issue Date, Client Pymt Date, Vendor Pymt Date or Exclude. (Recommend Vendor Pymt Date.) |
|
ARC Client Status |
From drop-down menu, indicate All, Open, or Closed. |
|
ARC Vendor Status |
From drop-down menu, indicate All, Open, or Closed. |
|
Supplier Client Status |
From drop-down menu, indicate All, Open, or Closed. |
|
Supplier Vendor Status |
From drop-down menu, indicate All, Open, or Closed. |
|
Comm Track Vendor Status |
From drop-down menu, indicate All, Open, or Closed. |
|
Enter Agent Payment |
To issue a check for this agent, check here. |
After entering selection criteria on the General and/or Advanced Tabs, click Query. Toggle for individual items in results screen to pay the agent for, or Clear All. This reconciliation ensures an agent is not paid again for the same transactions, as it marks the booking paid with a Date Paid inside the agent tab. The total amount open for the agent selected is displayed in the Total Commission Amount field, the amount cleared is displayed in the Cleared Amount field, and the amount not yet cleared is displayed in the Uncleared Amount field. As items are added or changed from “cleared” to “not cleared” (or vice versa), the cleared balance updates accordingly.
Note: Total Commission (to see when an agent exceeds a specific threshold), Total Agent Commission, Cleared Amount,and Uncleared Amount are totaled at bottom of the results screen. Enable sorting on results screen by double-clicking on the column heading.
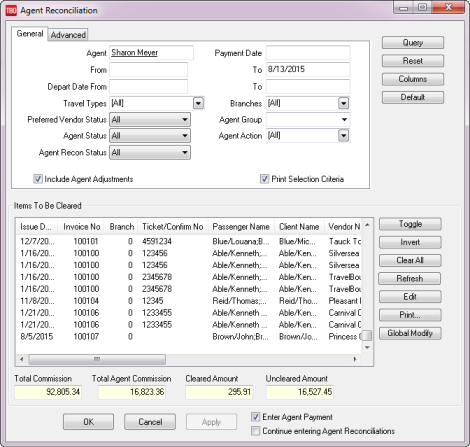
Quick tips: Use <Shift> and left-mouse click to select a range of items for closing, or deleting, etc. Use <CTRL> left-mouse click to select multiple individual items in any order for closing, deleting, etc. If the reconciliation has not been completed, use Apply to save the items marked Cleared. Items marked Cleared are redisplayed when next entering Agent Reconciliation. Items stamped Paid are not redisplayed. Once all desired items are marked cleared, click OK to save.
If the Enter Agent Payment box is checked, a Payment Made screen is displayed to enter a payment to the agent just reconciled. To keep Cleared items from re-appearing on the screen after saving an Agent Reconciliation, enter a payment to the agent through the Agent Reconciliation Screen. Entering the payment to the agent through the Payments|Made screen does not remove Cleared items from the Reconciliation screen.
Modifying Entries from Agent Reconciliation Screen
To modify an entry, highlight it and click Edit.
Printing the Agent Reconciliation
To print the Agent Reconciliation in its current status, click Print, or once the report is displayed, click the printer icon at the top of the screen. Once the Agent Reconciliation is complete, click OK to enter the Payment Made feature and issue a check: To view Cleared Agent Invoices that an agent has been paid for using the Agent Reconciliation routine, go to Reports|Agents|Statement. Change the “Agent Payment Status” to Closed to view all invoiced cleared and paid for the period specified.
Go to the Agents Tab on the invoice booking screen to view a selected invoice and note the date the agent was paid under the Date Paid field. The Agent Reconciliation routine automatically stamps this with the date paid.
Bank Charges
To account for Bank service fees, charges, etc., create an EFT payment.
Note: Bank charges can also be entered by using Payment|Withdrawal (see Bank Transfer by Withdrawal) section above.
1. Click Payment|Made.
2. In the Amount field, type in the amount of the bank fee.
3. In the Payment Date field, enter the date of the bank charge.
4. In the Branch field, enter a branch or click the down arrow to select a branch.
5. In the Bank Acct field, enter the appropriate bank account number (1, 2, 3, etc.), or click the arrow to select from the list.
6. Enter free flow information in the Remark field. (e.g. bank charge, etc.)
7. Payment Method is EFT.
8. Leave the Name on Check field blank.
9. Leave the Check/CC No field blank.
10. Leave the Payment Group field blank.
11. Leave the Payment Code field blank (see Payment Code in this chapter).
12. Click the arrow to the right of the Profile Type field and change Profile Type to Other.
13. In the Name field, enter the name (or part of the name) on the check.
14. Click OK and Trams Back Office prompts, “Create A Journal Entry? Yes or No.” If the General Ledger is NOT being maintained, click NO. If the General Ledger is being maintained, click YES.
15. Trams Back Office displays one-half of the journal entry, Cash in Bank. Enter the appropriate offsetting General Ledger account. (i.e. Bank Fees.) Click the Add button.
16. Click OK to save.
Create Payables
By setting up payables, this creates accrued liabilities. This means expensing the item when it is received, rather than when it is paid. If there is not an Operating Payables account set up in the general ledger, add one by going to the main General Ledger Menu, then to Accounts.
1. Add a new account, using a number in the 2000 series. Call this account Operating Payables.
2. Next, go to Utilities|Setup|GL Accounts and click on the Others tab. Enter the same account number in the Operating Payables field.
3. Operating payables can be set up in Trams Back Office under the main Payments menu, in the Create Payable menu option.
Enter the amount of the payable and click on Status. The status can be changed by clicking on the down arrow to toggle between To Be Paid and Recurring. For a non-recurring payment, select To Be Paid. Date Entered field defaults to current date, and enter the date payable. The Invoice Reference field can capture the Invoice Number or Statement Number of the bills being paid. Trams prompts user if a duplicate invoice or statement number exists for the same profile. You are able to save any way. This alerts to possible double payments for the same invoice or statement
Note: Create a Negative Operating Payable if the agency is paying more to the account than the actual invoice requires.
4. Enter the name, or create the new Other profile.
5. There is a prompt to Create Journal Entry. Click on Yes and Trams Back Office credits the Operating Expense Payable automatically. Add the debit to the correct expense account.
6. Click on OK to save the payable.
When the payable is created, the following Journal Entry is automatically generated expensing the transaction.
| Acct | Acct name | Debit | Credit |
|
6xxx |
Expense Account |
124.51 |
|
|
2xxx |
Operating Payables |
|
124.51 |
A second journal entry is created when the check is issued. (Please note when issuing a payable check for an Operating Payable, the Amount, Profile Type, Profile Name, and Payment Type fields are disabled and cannot be changed.)
You receive the phone bill from MCI on October 17th for $124.51. The payable date is November 30.
You set up this Payable with a Payable Date of 11/30/xx, an amount of $124.51, and a profile name of MCI. You enter your MCI account number in the remarks field.
The journal entry for this transaction looks like this:
Acct Acct name Debit Credit 2xxx
Operating Payables
124.51
1000
Cash in Bank
124.51
This journal entry clears the operating payable account, reducing the cash in bank account.
Operating Payables Query
With Query, retrieve an existing (or a previously entered) Operating Payable. Access the Operating Query screen in 2 ways:

Click the Operating Payables tab at bottom of the main TBO screen, or click Payment|Query|Operating Payables. The query screen is broken into two sections. The top section is used to enter the data for the query and the bottom section displays the results of the query.
The fields displayed in the top section show how an Operating Payable can be found. Each of these fields are fields within the Operating Payable and can be used to locate that Operating Payable again. As few as none and as many as all can be completed to retrieve an Operating Payable.
Buttons on the right side of the screen are also broken into two sections. Query, Reset, Count, Sort by, Columns and Default are buttons related to the query.
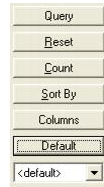
Use Reset to clear away any previous query criteria. Count is used to give the number of items that match the query criteria. Sort By customizes how the query screen displays the results once the query is executed.
Columns is used to select which columns of data to be display in the results screen. Click Columns and choose the columns to display by highlighting the column in the Available Fields and clicking on the left arrow to move it over to Displayed Fields.
Using the red up and down arrows, put the column in the order to appear on the results screen. Click OK. Go out to the results screen and size the columns, and then back into Columns and click Save Settings and OK. Click Sort to get up to 3 sorts in ascending or descending order of selected columns, and click Save Settings.
Also drag and drop the columns to re-position them on the results screen if desired. Do this by clicking on the column to move, holding down the left mouse button, and sliding the column to any position on the query screen.
To place a column to the right or left of any existing column, stop on the column to the right or left, drag and release the mouse. The moved column is inserted in the correct place. Click Columns,Save Settings, and OK.
Default saves the filters in the query. Follow these directions to create a new Saved Query:
1. Change the selection criteria on the results screen for the new query to save.
2. Click Default.
3. Type in the new query name in the Setting Name field.
4. If this saved query is the default, at the top of the drop-down window, check Set As Default.
5. Select Per User (on this one workstation only) or Global (on everyone’s sets).
6. Click OK to save.
To remove a saved query from the list, check the Remove the Current Named Setting box, click OK and the saved query is no longer available for use in the drop down field.
To the right of the Remarks field is a separate field with selection options or operators, Is Equal To, Is Not Equal To, Is Blank, Is Not Blank, Starting With, Contains, In, and Not In.
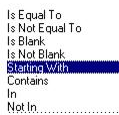
These operators help to more narrowly define the search. (When doing searches on fields containing “wildcard” search criteria using the selections of “IN” and “NOT IN," look for the field to contain the complete string entered between the delimiters or the exact match).
If the remarks field contains the word ONE, and a search is initiated for IN ONE,TWO,THREE then there should be a result. If a search is initiated for NOT IN ONE,TWO,THREE then there should be no results. Basically using IN "ONE,TWO,THREE" is like doing: (IS EQUAL TO "ONE") OR (IS EQUAL TO "TWO") OR (IS EQUAL TO "THREE"). Using NOT IN "ONE,TWO,THREE" is like doing: (IS NOT EQUAL TO "ONE") AND (IS NOT EQUAL TO "TWO") AND (IS NOT EQUAL TO "THREE").

The second section includes New to create a new payable; View to open an existing payable entry; Void to delete a payable; and Copy to clone a payable so the basic information doesn’t have to be re-entered, but the dates, etc. of the payable can be changed. Issue Check launches a Payment Made screen to create the payment for an payable To Be Paid. Only one entry can be selected at a time to Issue Check.
To generate a payable from a recurring payable, change the Payable Status to Recurring and click Generate. By changing the Payable Status to To Be Paid, these recurring payables are ready to Print Check. To print a hard copy of the highlighted payable, click Print Payable. (To print more than one entry, hold down the CTRL key and select those entries to include). To print the entire contents of the results screen, or selected entries (using CTRL key), click Print Query. Help accesses the on-line help files.
Note: By right-mouse clicking in the results screen, create a New operating payable, View, View Payment (without leaving the operating payment screen), Query Payment (without leaving the operating payment query screen).
Right-Mouse Click Menu in Payables Query
New - create a new payable.
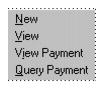
View the payable.
View Payments related to this payable.
Query Payments related to this payable.
Sorting Payment Data
Sort data in all query screens in two ways:
1. “Quick” sort by one field by clicking on a column in the results screen. The first click sorts the column in ascending order (first to last or earlier date to more current date), and clicking on the same column a second time sorts in descending order (last to first or current date to earlier date).
2. Sort in Ascending or Descending order by up to 3 columns. When clicking Sort By, select the first, second or third column sort and what order (ascending or descending) to display. Enter the selection criteria and click Save Settings and OK.
Recurring Payables
Recurring is used for payments made on a consistent time increment for the same payment amount. The Date Entered field and the Date Payable field must be entered as formulas rather than dates.
Note: Pay special attention to that little “=” sign. You can’t get the right date without it! If the Date Entered is the formula =1,0,0 this payable appears on the general ledger the first of every month. If the Date Payable formula is =10,0,0 this payable shows in the Issue Payable Checks screen the 10th of every month.
To create the recurring payable toward the end of the month, to be payable after the first of the next month, here’s what to do; for example, if the date entered is the 15th of the month, enter =15,0,0 in the Date Entered field, and the payment date is the first of the next month, enter =1,+1,0 in the Date Payable field.
Examples of Date Formulas
|
=1,0,0 |
1st day of this month |
|
=31,0,0 |
Last day of this month |
|
=1,1,0 |
1st day of this year |
|
=31,12,0 |
Last day of this year |
|
=+7,0,0 |
Seven days from now |
|
=Mon |
Last Monday (will show today if today is Monday) |
|
=Mon+1 |
Next Monday |
|
=Mon-1 |
A week from last Monday |
|
=0,+3,0 |
Three months from now |
|
=0,-6,0 |
Six months ago |
|
=0,0,+1 |
One year from now |
|
=0,0,0 |
Today |
Remarks, Payment codes, and Payment group are optional fields. The Invoice Reference field captures the Invoice Number or Statement Number of the bills being paid. Trams prompts if a duplicate invoice or statement number exists for the same profile, but will save it any way. This alerts to possible double payments for the same invoice or statement. Enter the profile name in the Name field. When prompted for a journal entry, select Yes to enter the proper expense account.
Operating Payable
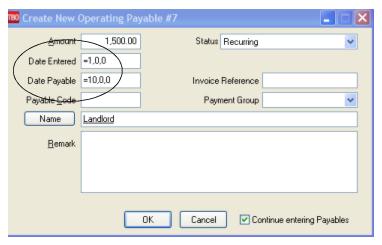
Recurring payables need to be generated before issuing the checks. Many agencies like to generate their recurring payables on the first of every month for payment at a later date during that month. To do this:
1. Click on the Operating Payables tab at the bottom of the screen (or enter through the Payments|Query|Operating Payables menu).
2. Select Query and complete as many or as few of the selection criteria fields as desired.
3. Highlight the payable to generate and click on the Generate tab.
When it is time to issue the check:
1. Click on the Operating Payables Query tab at the bottom of the screen and bring the “to be paid” entries onto the screen.
2. Highlight the entry to pay and click on the Issue Check tab. The check now appears on the screen to modify fields such as amount and pay method.
3. When satisfied with the data, click OK to launch the check.
Note: If payables are generated for the whole year, a new payable cannot be added without regenerating (duplicating) the original recurring payables.
ARC/BSP Settlement
Approximately ten days after submitting the ARC/BSP report, ARC/BSP either deposits or withdraws payment to/from the bank account.
1. Click Payments|ARC or BSP Settlement. Also access the settlement screen from the payment made/received by selecting ARC/BSP from the Profile Type drop down menu.
2. In the Amount field, type in the amount received from or paid to ARC/BSP.
3. The Payment Type field defaults to: Made. If owed money from ARC/BSP, (Credit Card Sales totaled more than the Cash Sales), click the arrow to the right and select Received.
4. Click the Payment Date and select a date for the ARC/BSP Settlement Date. The ARC/BSP Settlement Date is the date the money was deposited or withdrawn from the bank account.
5. If on the Multi-Branch version of Trams, select a branch from the drop down menu.
6. Click on the Bank Acct field and enter the appropriate bank account number, or click the arrow to the right to select the number from the list of the bank accounts.
7. In the Remark field, clicking inside the Remark box to enter free flow information.
8. The Payment Method field defaults to EFT. If payment is made to ARC/BSP or payment is received from ARC/BSP in a different manner, click the arrow and choose the correct payment method.
9. If payment is received or made by check, enter the check number in the Check/CC No field.
10. If the ARC/BSP number in the ARC/BSP Number Field differs from the default, type in the ARC/BSP number, or click the arrow to the right of the field and select the appropriate one.
11. If the dates in the ARC/BSP Period fields differs from the default, type in the appropriate dates.
12. If an ARC/BSP Settlement, then click the arrow to the right of the Included Items field to choose All, Non-IAR Only or IAR Only.
13. In the ARC/BSP Vendor field, type in the name of the ARC/BSP profile.
14. Click the Query button and Trams Back Office displays all unsettled ARC/BSP bookings in ticket number order for that period.
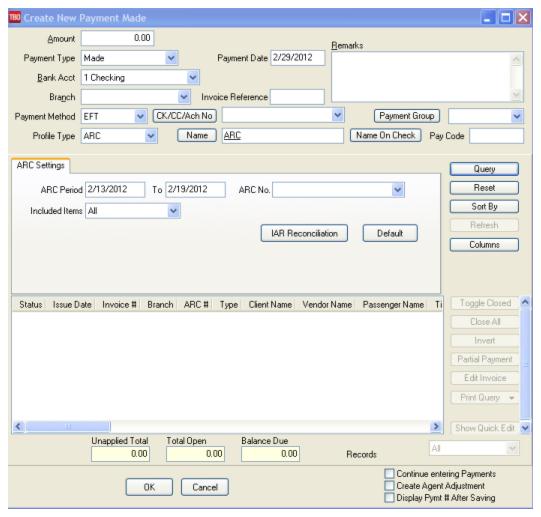
15. Click the Toggle Closed button to change the Status of each ticket/booking to Closed. When Total Open is 0.00, the ARC/BSP Settlement is balanced. If there is an amount other than 0.00, compare each ticket/booking to the ARC/BSP report. To edit a ticket/booking, highlight the line and click the Edit button. To change the Status of a ticket/booking from closed to open, highlight the line and click the Invert button. To change the ARC/BSP Settlement Amount, click the Amount field.
16. When the Total Open is 0.00, click the OK button.
Note: If the agency has more than one ARC/BSP number, complete a separate ARC/BSP Settlement for each. The End-Of-Period routine automatically updates the GL Accounts for Cash in Bank and ARC/BSP Balances for all ARC/BSP Settlements for the period. Any invoices closed by an ARC/BSP Settlement have a Vendor Status of Closed. To make a change, void the ARC/BSP Settlement. The ARC/BSP Settlement creates a Payment Received or Made with a Payment method of EFT. (To void, see Void a Payment in this chapter.)
Reminder: The ARC/BSP Sales Summary is printed from ARC/BSP's point of view. Remember that positive numbers in Trams Back Office are negative numbers on the ARC/BSP Sales Summary.
Before clicking OK to save the closed status once unapplied total and total open balance out to zero, click Print and bring up the ARC Settlement report that should match the ARC/BSP Sales Summary. This speeds up reconciling the ARC/BSP report to the ARC/BSP Sales Summary to verify the ARC/BSP withdrawal/deposit, make adjustments, and resubmit tickets in one step.
|
You have just received your ARC/BSP Sales Summary Report for week ending July 12. You complete the ARC/BSP Settlement routine. Go to the main Payments menu, then to ARC/BSP Settlement. Enter the withdrawal amount as indicated on your Sales Summary Report. The Pay Date is the date on the statement, July 22nd. You selected the Payment Type as Paid To ARC/BSP, and entered the ARC/BSP period From and To dates. Click on Close All to mark each booking as Closed. You notice an error in the commission amount on one ticket. You highlight the ticket that needs adjusting and click on Edit to go to the invoice. You make the necessary change to the commission amount, click on OK, and return to the ARC/BSP Settlement screen. As you scroll down the list, you notice a ticket that needs to be resubmitted. You click on Edit to enter the invoice, click on the Resubmit Date field and enter today's date, putting this ticket into your current ARC/BSP report. Click on OK, saving your changes. This brings you back to the ARC/BSP settlement screen. You now click on OK saving the ARC/BSP Settlement and the corrected withdrawal amount. Once the settlement is saved, each ARC/BSP booking shows a vendor payment status of closed with a payment number. |
Note: Any edited items not adjusted correctly will need to be followed up either through the next ARC/BSP Report using a Travel Agency Automatic Deduction form (TAAD), or directly with the airlines using a Sales Summary Adjustment Request form.
Reconciling IAR Using the ARC Settlement Feature
After receiving the Weekly Sales Summary from ARC, follow these steps for reconciliation:
1. Go to Payments|ARC Settlement.
2. Query for the weeks ARC tickets so they are displayed on the settlement screen.
3. Click IAR Reconciliation on the ARC Settlement screen.
4. Click IAR Filename and map to the weekly IAR file.
5. Click Query to see the standard IAR Reconciliation Report.
6. For tickets where Net Remit Do Not Match, Ticket Is Voided in IAR but Not in Trams, or Missing IAR Ticket, click Find Ticket and the cursor lands on the appropriate ticket on the ARC Settlement screen to Edit Invoice as normal.
7. For tickets that are Voided In Trams but Not In IAR, click Find Ticket to go to the booking containing that voided ticket in TBO, to Unvoid it, allowing the ticket to now show correctly on the ARC Settlement Screen.
8. For any exceptions that are Missing Trams Ticket, click off the IAR Reconciliation screen and manually add the missing tickets.
Accounting for ARC/BSP Settlement When Authorization Amount Not Enough
If the amount authorized for ARC/BSP was not enough (i.e. the ARC/BSP draft should have been $3000 but only $2800 was authorized), follow these steps.
1. Select Payment|ARC or BSP Settlement.
2. Enter the ARC/BSP Settlement for the full $3000 and reconcile as normal. (See section ARC/BSP Settlement in this chapter.)
3. Enter a payment received for the $200 difference, with payment method as EFT and profile type as other. Date the payment the same date as the ARC/BSP Settlement. When prompted, create a journal entry as a debit to Cash in Bank and a credit to ARC/BSP Balances. This accounts for the incorrect amount that was entered when the ARC Settlement was done. This also creates a message on the GL Reconciliation report (Payment Invalid That Affects ARC Balances). Ignore this message.
4. When sending ARC/BSP the check for the shortage amount (or if they are going to do another draft from the account), enter a payment made for $200, with a profile type of Other. Create a journal entry as a credit to Cash in Bank and a debit to ARC Balances.
Payroll Import
There are two payroll import programs for Trams Back Office.
Import AssetHR Payroll+
Oryel Payroll + is now AssetHR Payroll +. AssetHR is a leading provider of the industry's most robust and sophisticated web-based HR technology solutions. AssetHR Payroll+ is a web-based payroll solution that fully integrates with the Trams financial package, providing a smarter, more straightforward, and more malleable system than other outsourced offerings or installed off-the-shelf packages. Payroll+ is also distinctive in that, as a web-based application, it allows Trams affiliates to easily and securely complete payroll transactions from anywhere at any time.
Visit AssetHR on the Web: http://www.assethr.com
Call Us: 952-746-9508
E-mail Us:info@assethr.com
Note: Import KIS Payroll
KIS Payroll is no longer TBO vendor, hence, the menu selection was removed from Payments|Payroll Import; however, the KIS import can still be accomplished using the AssetHR Payroll + import routine.
Z-Pay PayWindow
Trams Back Office (TBO) offers an import routine for customers using the Z-Pay PayWindow Payroll application. Users perform the payroll functions to calculate payroll information in PayWindow, then, by way of the export routine within PayWindow, can export the information to a text delimited file.
Upon importing that file into TBO, the import routine creates a payment made with the corresponding journal entries for each payroll check for the applicable pay period that was entered in PayWindow. Check numbers can be generated in PayWindow and shipped via the export file to populate the check number in the TBO check number field, or check numbers can be assigned by TBO after the import routine is completed by issuing the check from within TBO.
ACH direct deposit payroll payments can also be imported into TBO however, no check numbers apply so the check number field will be blank.
Either Agent or Other profiles must exist in TBO with an Interface ID that matches the Employee ID in PayWindow. The file will not import if an Employee ID exists in the export file where no match in an Agent or Other interface ID field can be found during the import routine in TBO. The Employee ID field in PayWindow is alpha numeric and accepts up to 10 characters. Suggestion when setting up is to make the Employee ID match the Interface ID in TBO.
Questions regarding exporting from PayWindow should be directed to Z-Pay (support@zpay.com).
To Export the Trams file from PayWindow
1. Go to Payroll/Report Center/Misc. Reports/GL Export Tab.
2. Select Trams Format.
3. Check the box for Check Printed by Accounting System to print the checks from Trams Back Office. Leave the box ‘unchecked’ if the checks were printed from PayWindow.
4. Select the payroll Period Date which is the date paid the employees.
5. Click on the Export Button.
Note: On saving the file, PayWindow will create a short filename using tx for Trams export and the pay date with a .txt file extension. Example – tx031512.txt. Select the location to save the file in this File Save Window for the import into Trams.
To Import the PayWindow Export file into TBO
Map the TBO general ledger account to the file.
Add any general ledger accounts in TBO necessary to accommodate all of the payroll details being populated in PayWindow (federal taxes, state taxes, salaries, etc.) under General Ledger|Accounts.
In TBO, go to Payments|Payroll Import|Import Z-Pay Payroll to map the general ledger accounts to the appropriate fields in the mapping grid. Ensure that any fields in the grid not being utilized are mapped to an error account (generally account 6666). No fields should be blank.
Payroll Filename: Browse to locate the PayWindow export file and select the file.
Profile Type: Select the appropriate Profile Type (Agent or Other) as it relates to how the profiles were setup).
Note: The Agent Code in the Employee Record in PayWindow must match to the code in the Interface ID field in the TBO profile or the file will not import properly.
Bank Account: Select the appropriate Bank Account as it relates to payroll entries.
G/L Branch: Enter a G/L Branch only if the option to Force Branch on Journal Entry option has been enabled (Utilities|Setup|Global Defaults|Prompt Tab). If that option is not enabled, the field may be left blank.
Example Mapping Configuration
Within PayWindow (see notations in red) – note the Comp 1-4 and misc. deductions 1-6 line up with the mapping screen in TBO Comp1 G/L – Comp4 G/W and Misc Deduct 1 G/L – 6: GL.
Note: SUTA, FUTA and SDI information is not exported from PayWindow. This information can be obtained from Z-Pay reports and manually entered into TBO at the time payment is being made with the corresponding journal entries to update the general ledger. The reports in PayWindow are found under Report Center/Pay Periods/Employer Totals Tab.
To accrue SUTA or FUTA liabilities, enter an Operating Payable in TBO. At the time a payment is made to pay the expense, the journal entry will reduce the liability.
Payments/Import
The Payment Import feature provides the ability to import a file containing payment information and match the payments with invoices in TBO. Invoices that are paid by that provider can be modified if information differs between the imported file and the existing TBO bookings. Once the Payment Import process is completed, reconciled bookings will be closed with the payments from the file.
The payment import feature can be used with the following providers. Please see the section Payment Import Provider Details for specifics on how to sign up with these processors and obtain Trams-compatible import files.
* Paymode (formerly GCP and NPC)
* Onyx (formerly called Pegasus)
* Onyx II (formerly called Pegasus II)
* Marriot Payment used with Ritz files supplied by Marriott.
The following are the fields in a TBO booking that can be modified using this feature:
* Commission Amount
* Agent Commission Amount (provided the agent has not been paid)
* Gross Fare Amount
* Vendor GST/QST
* Vendor Remarks
* Start Date/End Date
Special Note: Any Payment Import item (TACS, etc.) that has a total fare of zero in the file will not update the total fare to zero in TBO, although the commission amount will be updated to reflect the amount in the payment file.
Payment/Import Setup
1. Create a vendor profile for the desired provider (Paymode, Onyx (formerly called Pegasus), CommTrak, Onyx II (formerly called Pegasus II), Trams Host, Sabre Card Services, and/or TACS - Perot Systems). This vendor profile will be the payee for the invoice created at the end of the payment import process.
2. Go to Utilities|Setup|Global Defaults|Payment Import Options to set up the secondary match default settings. These settings control how strict the match on secondary criteria must be for a booking to reconcile with the payment import file.
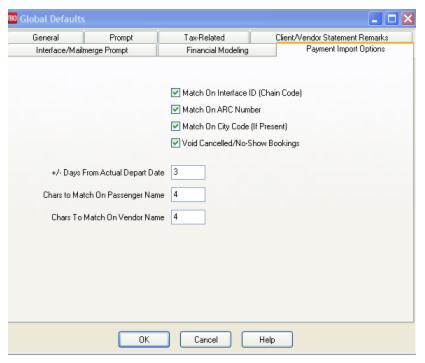
The primary match criteria are used before these secondary criteria come into effect. A booking must match both (1) Confirmation number AND (2) the Travel Category associated with the booking's Travel Type.
If no match is possible based on primary match criteria, the import process looks to the secondary criteria:
* Passenger Name. Use the setting Chars to Match on Passenger Name to determine how many characters must match. The default is 4 characters. A higher number will be more restrictive; a lower number, less so.
* Depart Date. Use the setting +/- Days from Actual Depart Date to control how closely the Depart Date in the payment file must match the Depart Date in the TBO booking. The default is +/- 3 days. A higher number will be less restrictive; a lower number, more so.
* Vendor Name. Use the setting Chars to Match on Vendor Name to determine how many characters must match. The default is 4 characters. A higher number will be more restrictive; a lower number, less so.
If a match is found using the three secondary criteria, an additional check takes place when the following settings are enabled (checked):
* Match on Interface ID/Chain Code. The Chain Code in the file must match the Interface ID of the Vendor Profile in the TBO Database.
* Match on BSP/ARC Number. The ARC or BSP number in the file must match the ARC or BSP number in the TBO database.
* Match on City Code (if present). The City Name in the import file must match the City Code in the TBO database.
The final setting controls what happens if the booking was cancelled or a no-show.
*Void Cancelled/No-Show Bookings. When checked, if the payment import file reports that the booking was cancelled or a no-show, the corresponding booking is voided in TBO. Leave this option unchecked if you do not want these bookings voided. Note: Voided bookings will not be included in most reports.
Payment/Import Run the Import and Reconciliation
To import the file and begin the reconciliation process.
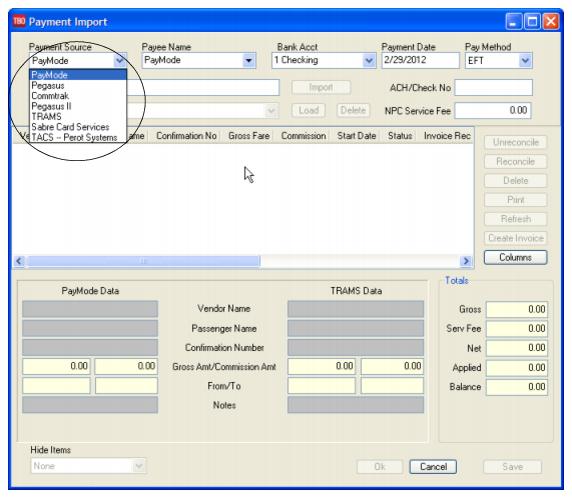
1. Select the payment import provider name for the file being imported from the drop-down.
2. For Payee Name, enter the vendor profile you created for the payment import provider.
3. Select the bank account you wish to use.
4. For Payment Date, enter the date the money is actually deposited into the bank account.
5. For Pay Method, select either EFT or Check.
6. Enter the ACH or Check Number.
7. Leave the Service Fee field blank. Paymode and Onyx files include this fee and will populate this field once the file is imported. The fee is also displayed in the Totals box at the bottom of the screen.
8. Click Import Filename to browse to the downloaded payment import file. Once selected, click Import. The reconciliation process will now begin. TBO compares the data in the file with the bookings in the database, using the hierarchy explained in the setup section above.
9. When all possible matches have been made, click OK. This closes all invoices that have found a match. See the section on Manual Reconciliation Options below for further information on manually reconciling bookings that were not automatically matched.
10. If there is an unmatched balance remaining (Onyx and Paymode service fees are considered unmatched balances), a prompt appears to create an invoice or voucher with the remaining balance. See below for more details on creating the invoice.
Reconciliation Codes
R= Reconciled. When a match is found, it is marked with a status of R for Reconciled.
M= Multiple TBO bookings match a single record in the payment import file. This indicates the booking was interfaced or entered more than once. One of the bookings should be marked with zero total fare and commission in TBO or should be deleted altogether.
D= Multiple records in the payment import file match a single Trams Back Office booking. When saving the reconciliation, the commission amount applied to the booking is the sum of all the corresponding "D" and "R" items. There should be at most one "R" item for each booking, but there can be multiple "D" items for each booking.
|
Unreconcile |
Change the status from R, D, or M to blank. If a payment has been reconciled to an incorrect booking, use this option to unreconcile that item. |
|
Reconcile |
Use this option to manually match an imported transaction with a TBO booking. Clicking this button brings up an Invoice Query Screen pre-populated with the data from the import file. If, when pressing query, no results are returned, broaden the search by removing some of the selection criteria, then re-query. Tip: Removing everything except the confirmation number, then re-querying, is often the best option here. |
|
Delete |
Use this option to delete transactions that have zero amounts that are not to be recorded, or items that have a status of D that should be removed in order to make the correct items match. |
|
|
Print a report of the transactions for the period being reconciled. Different views of this data can be shown by changing the options in the Hide Items field: None, All Reconciled, 0 Unreconciled, or All Reconciled. Columns on the report include Vendor, Chain Code, Customer, Confirmation Number, Total Fare, Commission, Start Date, Status, Invoice Number and Notes (for Vendor Remarks such as "No Show"). |
|
Refresh |
If there were unreconciled items or newly added invoices for TBO to reconcile, using the Refresh button reruns the query and displays the new results on the screen. |
|
Create Invoice |
In an open period, create a Supplier or Comm Track booking for a commission received that had not been invoiced. (In a closed period, only Comm Track bookings can be created.) |
|
Save |
Click Save if the reconciliation is not finished to complete it at a later time. After saving the reconciliation, click Cancel (not OK) to exit the Payment Import screen. Upon returning to the reconciliation, click the drop-down arrow in the Saved Reconciliations field to select the desired file, then click Load. |
Invoice
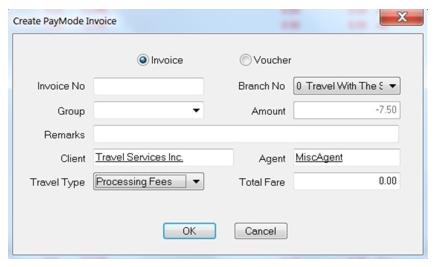
Once the reconciliation process is complete, any difference between the total fare of the TBO bookings and the payment import file that were not marked as reconciled (R) is adjusted to the Total Fare field:
1. Click OK to create the invoice.
2. Select the Invoice radio button.
3. Enter a Client name (TBO recommends that the agency create a client profile for itself and use it here.)
4. Select a Travel Type from the drop-down.
All other fields are optional.
Click OK to create the invoice. A Comm Track invoice is created for the vendor profile entered in the Payee Name field. This invoice is incorporated into the End of Period and the journal entry as a Credit to the Sales account of the selected Travel Type and a debit to the Cost of Sales for the same travel type.
The option to print the report or save to a file is presented. Select Yes to view the report, then print or save.
Voucher
Click OK to create a voucher in the amount of the fees being charged for the Vendor Profile specified in the Payee Name field.
1) Select the Voucher radio button.
2) Enter a Client name (TBO recommends that the agency create a client profile for itself and use it here.)
All other fields are optional.
Click OK to create the voucher. Once the voucher is created, create a Payment Received using Pay Method of Other, and close off the vendor voucher. Journalize to an expense or cost of sales account named Commission Processing Fees.
After clicking OK, the option to print the report or save to a file is presented. Select Yes to view the report, then print or save.
Payments/Import Participants
To receive the Trams-compatible payment import file, the agency needs to contact the company for enrollment. Files that may be obtained from a third party's website are: Paymode, Sabre Card Services, and WPS Hotel Commissions. Files that may be e-mailed to the agency are Onyx, Onyx II, and TACS.
1. Onyx at https://www.onyxcentersource.com/
2. Paymode at https://secure.Paymode.com/Paymode/login.jsp
Customers settling Paymode Commission Payments manually in TBO, or wanting a printed report to go with the electronic file provided by Paymode, go to https://secure.Paymode.com/Paymode/login.jsp to sign in, query for, and print weekly reports.
3. TACS at http://www.TACSNet.com. In the free-form field request that the electronic payment and data files be sent to the agency. The Trams-compatible file e-mailed from TACS will be a .txt file.
4. WPS Network - Address an e-mail to: dori@wpsnetwork.com with Trams File in the subject line. Subsequent WPS uploads to the download area on the WPS website will be populated with the properly formatted .tsv file extension.
5. CommTrak - CommTrak provides Hotel commission recovery services to travel agencies. Typically, an agency uses CommTrak to chase unpaid hotel commissions over 16 to 18 months old. These are commissions that have never been successfully obtained through the Onyx, TACS, or Paymode process. CommTrak splits the recovered commissions with the agency. Contact CommTrak Corp to set up an account - Roger@CommTrak.com.
After establishing an account with CommTrak Corp, send CommTrak a data file (extract) containing aged, unresolved records. This CommTrak Export file is a Crystal Export and can be found at http://static.Trams.com/Tramslibrary/reports/tbotcr.html. (Click on TBO: Vendor Reports.)
Download the "CommTrak Export" under "Vendor Reports" and save to the desktop. Run the export and forward the results to CommTrak. When CommTrak has reconciled the export sent to them, they forward a file back that can then be reconciled to the open Back Office Hotel bookings.
6. Onyx II - This Onyx II fee-based option gives TBO customers another solution for reconciling hotel bookings with a Submit To of Comm Track. A file is exported from a TBO Database to Onyx II, using a TBO Crystal Export found at http://static.Trams.com/Tramslibrary/reports/tbotcr.html. (Click on TBO: Vendor Reports.)
Download the Onyx II Export report under Vendor Reports and save to the desktop. Run the export and forward the results to Onyx II. Onyx II performs the reconciliation on their servers. They then send the TBO user an externally reconciled file. The settled file returned to the Trams user is already matched and paid. This reconciled file can now be read by TBO as a Onyx II (formerly called Pegasus II) reconciliation and will close off the original TBO bookings that were exported to Onyx II for reconciliation. (The Back Office Export file sent to Onyx II contained the Trams Booking Number and that same Booking Number is also included in the returned file from Onyx II. There should be close to a 100% match on bookings.)
Onyx II may include in its reconciled file bookings that were not in the TBO database at the time the export file was created sent to Onyx II. These bookings do not show as an "R" on the screen. Click off the Reconciliation Screen and manually add these non "R" bookings to TBO. Click back on the Reconciliation Screen and manually reconcile the added bookings by clicking the Reconcile. When finished reconciling all items, click OK.
7. Marriott & Ritz Hotels - Contact Intermediary Partner Care via email at ta.help@marriott.com or via phone at 1-800-831-3100, Option 3 or 402-390-1651. Ask for the Marriott’s Centralized Travel Agency Commission (CTAC) system electronic statement format.
Sabre Card Services
The Sabre Card Services reconciliation option allows TBO users to daily close individual items in TBO that reconcile to the customer's Sabre Card Services' file by transaction, and to enter a payment for the daily Sabre Card Services deposit to the user's bank account. Monthly they will record an additional processing Sabre Card Services Fees.
Notes:
1) All invoices should be entered for the vendor that is designated for capturing the service fee bookings in TBO.
2) All Service Fee bookings MUST be Supplier in TBO.
3) The client side of the Service Fee Bookings MUST be closed with FOP of CC (Not CC Merchant)
4) Insure that the correct Travel Category of Service Fee is indicated for the Service Fee Travel Type being used in the TBO booking, under Utilities|Setup|Travel Types.
5) In General Ledger|Accounts, set up a new 5000 series chart of account for Cost of Sales - Sabre Card Services or use an existing Cost of Sale account. In General Ledger|Accounts, set up a new Expense chart of account for Sabre Card Services CC Processing Fees or use an existing processing fee expense account. In Utilities|Setup|Travel Types, set up a new Travel Type for Sabre Card Services CC Processing Fees or use an existing fee travel type. Insure that the correct Travel Category of Service Fee is indicated. In Utilities|Setup|GL Accounts, link the Sabre Card Services CC Processing Fees Travel Type to the Cost of Sales - Sabre Card Services GL Account, so the EOP will correctly handle the processing fee invoice created when saving the Sabre Card Services reconciliation.
6) Agency will contact Sabre Card Services and request Sabre Back Office report be added to the agency's list of Merchant Reports.
7) Refunds are not currently reconciled. Refunds do not reconcile because the client payment is closed to CC.
Daily
Step 1) The Sabre Card Services users log in to the Sabre Card Services website with their user name and password:
https://www.merchante-solutions.com/jsp/secure/b2f/b2flogin.jsp
Once logged in, click Merchant Reports from the Main Menu, and on the Merchant Reports screen, click Sabre Back Office Report.
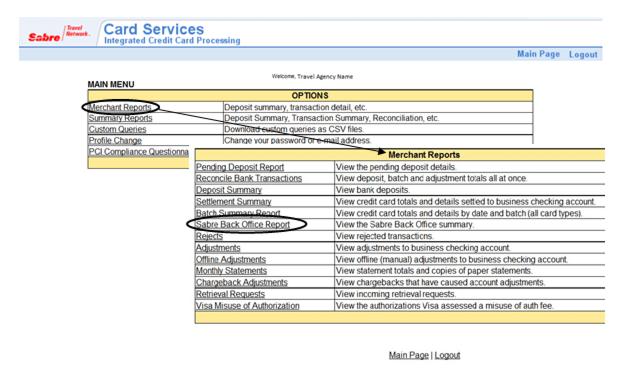
Set the Date Range on the Sabre Back Office Report to include the transactions to download and click Select.
When the page refreshes a dollar amount link will be on the right hand side of the table displayed below the Date Range. Click on the dollar amount link for the Net Amount of the transactions to download. Once the dollar amount link has been clicked, a window appears prompting to save the file to the computer. Be sure to click Download all Details. This is the file to import into the Trams Back Office Program for reconciliation.
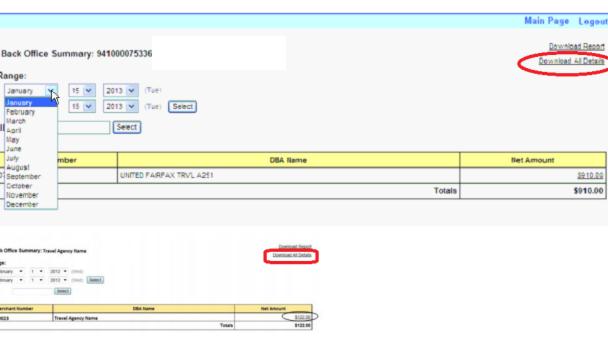
Step 2) The TBO user reconciles via the Payments|Import Reconciliation using the option that reads the Sabre Card Services file. TBO also reads the amount of Sabre Card Services fees that apply to the file and adjusts each booking by the amount of the fees involved. This insures that when agents are paid for any portion of the service fees, they are paid on only the net portion after processing fees that the agency actually received. Upon saving the Reconciliation an Invoice is created for the remaining amount of the processing fees to be charged by Sabre.
Saving the reconciliation closes off the vendor side of the bookings, so nothing more needs to be done with the bookings.
a. Open the Payment Import Reconciliation screen in TBO.
b. Select Sabre Card Services as the Payment Source.
c. Select Payee Name for the vendor profile. This may be the same as what is assigned on the client invoice. Payee Name chosen will be viewed on the Check Register and Bank Reconciliation.
d. Select the Bank Acct the Sabre Card Services will be deposited into.
e. Payment Date is when the gross charges for the file being reconciled will be deposited in the bank which is usually 8 business days from the date of the transaction. (Fees created and included in the daily file for June 9, 2012 would be deposited into the bank on June 17, 2012.)
f. Select a Pay Method of EFT so the payment created on saving will appear on the Check Register and Bank Reconciliation.
g. Click Import Filename and locate the file downloaded from the Sabre Card Services website.
h. Click Import and reconcile the file.
i. When reconciled, click OK to save the reconciliation.
j. When prompted for creating an Invoice or Voucher for the left over amount of the fees charged, select Invoice. Enter a Client, usually the agency, and enter an Agent if desired. Select a Travel Type for the Sabre Card Services CC Processing Fees travel type created in Utilities|Setup|Travel Types.
k. Click OK to save the fee invoice and the reconciliation.
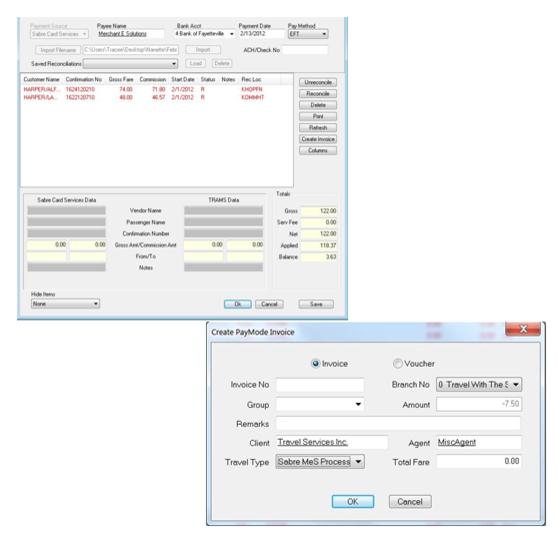
Monthly
Enter a Payments|Withdrawal for the monthly amount of the Sabre Card Services CC Processing Fees deducted from the bank account. Journalize to Sabre Card Services CC Processing Fees expense GL account to reflect the expense for the fees charged.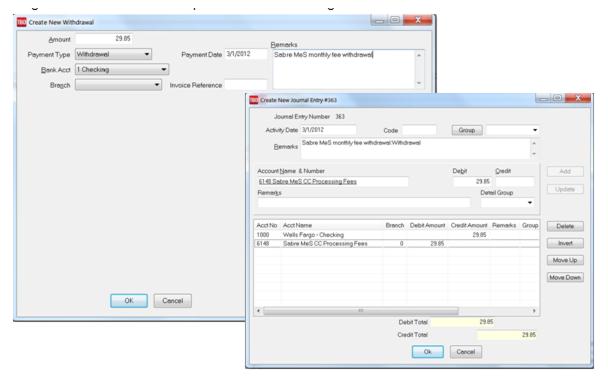
Trams Host
The Trams Host option to Payments/Onyx-PayMode Import is used by an IC (Independent Contractor) to reconcile the file received from the HOST agency for CC and Cash/Check Commissions due from the Host. The Reconciliation is for the Total Fare & Total Comm from the Host bookings. A final Voucher may need to be created for any Transaction Fees that may be included.
Trams Host is also used for importing files from WPS Network to reconcile hotel commissions.
Payment Query
Query can retrieve an existing (or a previously entered) payment. Enter the query screen by either selecting Payments|Query|Payments from the main menu or using the Payment tab at the bottom of the screen. The query screen is broken into two sections. The top section is used to enter the data for the query and the bottom section displays the results of the query.
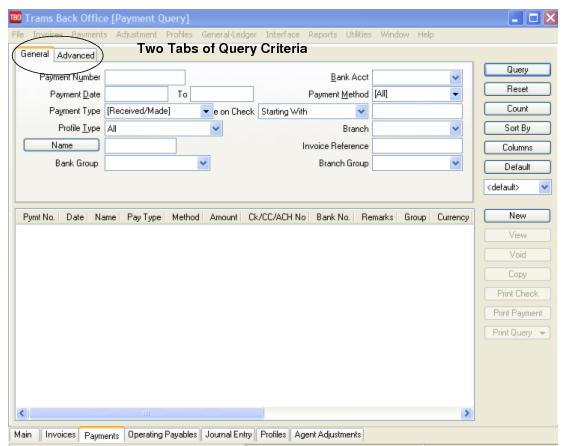
The fields displayed in the top section show how a payment/s can be found. Each of these fields are fields within a payment to locate an existing payment. As few as none and as many as all can be completed to retrieve a payment. The more criteria entered in query, the more selective the search for matching payments.
The most frequently used query fields show on the General tab and additional fields are found in the Advanced tab. Enter the criteria available (or applicable) and the system brings up a complete listing of payments matching that criteria.
To the right of the Name field is a separate field with selection options or operators: Is Equal To, Is Not Equal To, Is Blank, Is Not Blank, Starting With, Contains, In, and Not In. These operators help to more narrowly define the search. (When doing searches on fields containing “wildcard” search criteria using the selections of “IN” and “NOT IN," it is desired for the field to contain the complete string entered between the delimiters or the exact match). In other words, In and Not In works like Is Equal to or Is Not Equal to except that the list of values when using In and Not In when separated by a comma will search for each value in the list. The entire text would need to match exactly for Is Equal to or Is Not Equal to.
|
For example, if the only criteria entered into the Query screen is the Payment Type of Made, then all disbursements ever entered are displayed in date order for you. If, in addition to the Payment Type, a range of Check Numbers is entered into the Query fields, the list is narrowed and only disbursements with Check Numbers matching your criteria are included. To select a specific Payment Type or Pay Method, click on an item to select (or de-select). That action places a checkmark next to the selected item. Note: You can also select or de-select by right mouse clicking in the field. |
Buttons on the right side of the screen are also broken into two sections. Query, Reset, Count, Sort by, Columns and Default are buttons related to the query, while the bottom buttons are related to do with the query results. Use Reset to clear away any previous query criteria in both the General and Advanced tab. Count is used to give the number of items that match the query criteria. Sort by customizes how to display the results once the query is executed.
Columns is used to select which columns of data to display in the results screen. Click Columns and choose the columns to display by highlighting the column in the Available Fields and clicking on the left arrow to move it over to Displayed Fields. Using the red up and down arrows, put the column in the order to appear on the results screen. Click OK. Go out to the results screen and size the columns, and go back into Columns and click Save Settings and OK. Next, click Sort to get up to 3 sorts in ascending or descending order of selected columns and click Save Settings.
Drag and drop the columns to re-position them on the results screen if desired. Do this by clicking on the column to move, holding down the left mouse button, and sliding the column to any position on the query screen. To place a column to the right or left of any existing column, stop on the column to the right or left and release the mouse. The moved column is inserted in the correct place. Click Columns,Save Settings, and OK to save.
Default is an area to save the filters in the query by following these directions to create a new Saved Query:
1. Change the selection criteria on the results screen for the new query to save.
2. Click Default.
3. Type in the new query name in the Setting Name field.
4. If this saved query is the default, at the top of the drop-down window, check Set As Default.
5. Select Per User (on this one workstation only) or Global (on everyone’s sets).
6. Click OK to save.
To remove a saved query from the list, check the Remove the Current Named Setting box, click OK and the saved query is no longer available for use in the drop down field.
Once the listing of matching payments is displayed through query, any payment can be created(New), viewed (View), copied (Copy), or voided (Void). Highlight an entry and print a check directly from this menu (Print Check), or print a copy of a payment (Print Payment). Help screens are easily accessed by clicking Help or F1. To view a history of what has been changed in a queried payment, click History.
If querying for a payment made to the agent, and then right-click the payment to Query All Invoices, invoices that have been cleared and paid to the agent when using the Agent Reconciliation, are displayed.
Helpful Tips: On the Payment Query Screen, use <Shift> left-mouse click for selecting a range of items for closing, deleting, etc. Use <CTRL> left-mouse click to select multiple individual items in any order for closing, deleting, etc. By right-mouse clicking in the results screen, create a New payment, View, Void, Copy, Print a Check, Print a Payment, Re-Apply a Payment, Query All Invoices (without leaving the payment query screen, or Query All Payments (without leaving the payment query screen).
Sorting Payment Data
Sort data in all query screens in two ways:
1. “Quick” sort by one field by clicking on a column in the results screen. The first time click sorts the column in ascending order (first to last or earlier date to more current date), and clicking on the same column a second time sorts in descending order (last to first or current date to earlier date).
2. Sort in Ascending or Descending order by up to 3 columns. When clicking Sort By, select the first, second or third column sort and what order (ascending or descending) the data displayed is to be displayed. Enter the selection criteria and click Save Settings and OK.
Create New Payment, Deposit, Withdrawal & ARC/BSP Settlement From Payment Query
Click New to access the payment screen. Although this screen defaults for a Payment Received with a Payment Method Check from a Client, change the payment type to do a Payment Made, Deposit, Withdrawal or ARC/BSP Settlement. After completing the new payment from the query screen, it is displayed in the query screen, if the “Add Newly Inserted Items To Query Screens” box has been checked under Utilities/Setup/Global Defaults/Prompt.
Note: Also access the payment screen by going to Payments in the file menu and clicking on Received, Made, Deposit, Withdraw or ARC/BSP Settlement.
View & Void Invoices from Payment Query
View and void invoices from the payment query screen. Highlight any queried payment and right mouse click to Query All Invoices. This navigates to an invoice query screen that displays all invoices to which this payment is attached. View, Modify, Delete, or Create new invoices.
Changing Existing Payments
1. Click Payments|Query|Payment or click on Payment Query tab on the bottom of the screen.
2 Query by any one (or more) of the fields shown. Fill in two or three fields and click Query.
2. Click to highlight the payment and click View. Or double-click the desired payment.
3. Enter all necessary changes.
4. Once the changes have been entered, click OK.
Tip: Use Ctrl-PgDn/Ctrl-PgUp to access next or previous payment.
Copying Payments
To copy information from an existing Payment as defaults into a new Payment, highlight the appropriate Payment and click Copy. The system displays a new Payment record with all defaults completed from the copied Payment.
Note: The date and check number do not default to the copied payment's information. Instead, it defaults to the system date and the last check number entered, plus one. Any of these defaults can be changed or deleted and additional information can be entered before clicking on OK to save. Expense items such as Salaries and Rent are commonly copied and revised each month.
Void a Payment
To void Payments Received, Made, Deposits, and Withdrawals:
1. Click Payments|Query|Payment or click on Payment Query tab on the bottom of the screen
2. Query by any one (or more) of the fields shown. Fill in two or three fields and click Query.
3. Click and highlight the payment and click Void.
4. The payment information is displayed and Trams Back Office prompts, “Void Payment (xxxx). Make sure it is the correct payment. Make a Note of date; check number, etc.or print the payment if it is to be re-entered. A dialog box now appears that asks Track Voided Payment. Click Yes if this is a spoiled check that is needed to appear on the Bank Reconciliation, and click No if there is no tracking because the payment is being re-entered. If Always Track Voided Payments is checked in Utilities|SetUp|Global Defaults|Prompt Tab, there is no option track a payment.
5. Click YES.
Note: When a payment is voided in Trams Back Office, and No to tracking is selected, There is no history of that payment the payment record is erased from the system. Voiding undoes any effects of that payment, therefore, voiding a payment received reopens any invoices closed by that payment.
Voiding a payment also removes any record of the transaction. Voided payments cannot be retrieved but can be reentered. To void a bank transaction, such as a check, and still be able to track the check, enter the amount as 0 and Note in the remarks that the item has been voided. For payments being voided but later re-entered, Trams Back Office recommends printing the payment by clicking Print Payment before voiding the payment.
Also void a payment from within an Invoice Query by highlighting a booking line. Look at the right-hand side of the screen. There is a prompt, Void Client Payment (or Void Vendor Payment). Select the payment to void and click on it. This voids the payment and opens the invoice for modification.
Void Payment
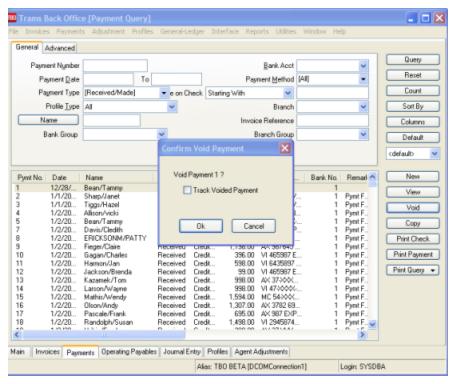
Note: Selecting cancel after voiding a payment from within a booking only cancels changes made to the invoice after the void. If querying for a partial payment and voiding a payment linked to a closed invoice, there is this prompt: This payment represents a partial payment for one or more invoices. Are you sure you want to void? Yes. No.
|
Donna wants to edit a cruise booking that has already been closed with a payment. First, Donna queries for the payment by clicking on Print Payment, she will have a copy of the payment to reenter. When she tries to void the vendor payment, she gets a warning message that reads: Warning: Void payment number xxx. OK Cancel Although Donna is thankful for the reminder, she selects Yes. She uses the information from her print out to immediately reapply and clear the payment when she is done with her invoice edits. |
Print Check from Payment Query
Using Print Check brings up the check writer screen and defaults to the check number selected. Use this option if only printing one check or printing a duplicate check for the agency’s records. (For more information on Printing Check see Check Writer in the Reports chapter of the manual.)
Use <Shift> left-mouse click for selecting a range of items. Use <CTRL> left-mouse click to select multiple individual items in any order. When selecting multiple items to Print Checks for on the Payment Query Screen, these only print if there are NOT assigned check numbers in Payments. Ensure that in Utilities|Setup|Global Defaults|Prompt, the Assign Ck #'s in Payments box is UNCHECKED. If checked multiple checks cannot be printed at one time from the Payment Query Screen.
Print Payment
To void and reenter a payment, use the Print Payment button to take a snap shot of the payment to use as a reference for data entry.
1. Query the payment.
2. Click the payment to highlight the selection.
3. Click Print Payment.
Receive a payment report for the selected payment. A confirmation warning message prevents the Trams Back Office operator from inadvertently voiding a payment.
Print Query
Use Print Query to print out the isolated list created in the payment query screen. The report shows the payment number, Date, Payee name, Payment Type, Payment Method, Amount, Check or Credit Card Number, and Bank account.
Tip: Print selected payments by using SHIFT or CTRL and the mouse.
Re-apply a Payment
To reapply a payment highlight the payment in the results screen, right mouse click and select Re-apply Payment. When re-applying a payment, the new payment screen Date field will default to the current system date. Re-apply the payment by changing the Name of the payment and toggle the payment closed as usual.
Note: As soon as the Create New Payment screen is displayed, the original payment is deleted. Be aware that if canceling from this screen and not completing the Re-apply process, that original payment is still deleted and must be re-entered again.
Right-Mouse Click Menu in Payment Query
New - create new payment.
View the payment.
Void the existing payment.
Copy the existing payment.
Print check for the payment.
Print payment the payment.
Re-apply payment - voids exiting payment, create new payment with different payment information.
Query all Invoices related to this payment.
Query all payables related to this payment.
Query for the Bank Deposit so it can be voided in addition to just viewing it.
Payment Codes
Payment Codes are used for recurring payments such as rent and payroll. This code is used to Query the payment later, so the payment can be easily duplicated. All Payment Types can be set up for Payment Codes. For example all payments made at the beginning of the month could be coded beginning with the letter "B". All payroll entries could be coded beginning with the letter "P." All payments made automatically through the bank accounted could be coded beginning with the letter "E."
1. Click Payments|Made.
2. In the Amount field, type in the dollar amount.
3. Change the Payment Date (if it is not the current date) by typing in the proper date.
4. The Bank Acct field should be the bank account number (1, 2, 3, etc.). To change the default, type in the new number, or click the arrow.
5. In the Remark field, enter free flow information.
6. Select the Payment Method.
7. If Payment Method is check, type in the check number in the Check/CC No field. Otherwise, leave blank.
8. If this payment is also associated with a group, type the group name in the Payment Group field.
9. Type in the Payment Code, such as BRent, BPhone, etc. for payments paid the beginning of the month.
10. Click the Profile Type field and change it to Other by clicking the arrow.
11. In the Name field, type in the name of the person (or company) being paid. Trams Back Office displays any matching profiles. Click the profile of choice. If there is no match, Trams Back Office prompts to build a new profile. (See Other Profiles in Profiles chapter.) Click OK to process.
12. Trams Back Office prompts, “Create a Journal Entry? Yes or No.”
13. If maintaining the General Ledger in Trams Back Office, click YES. (See Journal Entry in General Ledger chapter) Click OK to save.
To Create a New Payment Using the Payment Code
1. Click Payments|Query|Payment.
2. Click on the Advanced Tab.
3. In the Payment Code field type in the letter "B" to query all payments to be paid the beginning of the month.
4. Click Query to process.
5. Click on the desired payment, then click Copy. Make the necessary changes (Date, Check #, and Amount). Click OK to save. Trams Back Office prompts, “Is Payment Information Correct?” Click YES.
6. Trams Back Office prompts, “Create a Journal Entry?” Click YES if maintaining the General Ledger. Make the necessary changes (Remarks and Amount). Click OK to save.
|
You always pay your rent and gas bill the beginning of each month. Last month you put a Payment Code called Brent in the Payment Code field for the rent check and a Payment code called Bgas in the Payment code field for gas company check. You can query for both of last month’s payment by entering "B" in the Payment Code field (under Payments|Query|Payments) and clicking on OK. When you see the payment in the query box you can click on the Copy button and make a copy of the original payment. The new payment has today’s date and you can adjust the rest of the fields if needed. Click on OK to save. |
Payment Code Query

Processing TAFP Service Fees - ARC Only
There is a TAFP service fee processing report for agencies who process their credit card service fees through ARC. The TAFP complies with ARC standards with the details of all service charges paid with a client credit card.
The following is the suggested method of entering TAFP transactions into Trams Back Office:
1. Create a Vendor profile called TAFP. (This can be done when entering the service fee booking by typing TAFP in the Non ARC Vendor field, or the profile can be created through the main Profiles menu.)
2. When creating this profile, enter TAFP in the GROUP/BATCH field. This is important.
3. Create a 6000 series expense account called Credit Card Processing Fees.
Now:
1. Enter a Supplier booking with a Travel Type of Svc Fee, the Non-ARC Vendor as TAFP and enter the document number in the Confirmation Number field.
2. Enter the amount of the fee in the Total Fare field.
3. Leave the Tax field blank and enter a commission amount equal to the net amount expected to be received from ARC (presumed to be 96.5% of the Total Fare).
4. Close the supplier booking with a credit card payment. This creates a negative Vendor Balance for the vendor TAFP.
5. At the end of the week run the TAFP report and submit to ARC for the previous Monday to Sunday dates.
6. When processing this report, be sure the Vendor Group field reads TAFP.
7. Please see Section entitled “Processing TAFP Service Fees” in this chapter for complete instructions.
8. When money is received from ARC, enter a payment received with profile type of Vendor Supplier and a name of TAFP, and close the booking(s) to which it applies.
In certain cases:
1. If, in the invoice commission field, there was entered the net amount less the fee ARC/BSP charges, close the booking.
2. If a commission amount entered on the invoice equaled the total fare, close the booking and leave the balance unapplied. This is the 3.5% ARC/BSP fee.
3. Enter a second payment received for this ARC/BSP fee amount, with a Pay Method of Other, Profile Type of Vendor/Supplier and Name of TAFP.
4. This clears the unapplied balance. When prompted for the debit side of the journal entry, enter the 6000 series Credit Card Processing Fees expense account created in Step 3.