
Chapter 15: Build Reports/Report Generator Overview
Build Reports/Report Generator Overview
This chapter contains:
- Directions on Building Reports
- Listing of Report Generator Fields
- Practical Examples
- Back Up Reports
- Mail Merge
What is a Report Generator?
The Trams Back Office Report Generator provides the option of designing and printing custom reports tailored to the agency’s specific (and unique) needs. Trams Back Office comes with a number of "canned" reports for ARC/BSP reporting, Vendor Balances, Client Balances, Statements, etc.; however, the variety of reports possible from the data in Trams Back Office is virtually infinite. If Trams Back Office were to build every possible report, the program would become so large that it would be unstable. Instead, the program has the capability to design unique reports for the agency’s needs. For example, perhaps a corporate customer needs a summary of travel business in a particular format, by Travel Type (Hotel, Car). Use an existing “canned” report, or use the Report Generator to tailor a report precisely to the client's needs.
What is a Report?
A report is a collection of data arranged in a format understandable -- and wanted-- by the reader. When creating a report, ask two questions:
1. What data does the reader want to see?
2. What is the best way to arrange that data so it is understandable?
Building Reports
When creating an original report, select Reports|Report Generator|Build Report. Trams Back Office defaults to a blank canvas.
New: For a blank canvas on which to build a report, choose New. This option is usually selected to capture data from Trams Back Office and export to another program such as Excel.
Open: Choose a report already put together and modify it to meet the agency’s specifications. No need to reinvent the wheel when the major part of the report is already designed. Reports are found in the C:\Users\Public\Documents\TRAMS\Reports\ directory by default.
Save: Saves the file in the same location, with the same name.
Save As: After the report meets the design specifications, select Save As. Each report must have a unique name. The name assigned to a report is how to refer to the report when printing. It is advantageous to use descriptive names, such as AIR_PROD (for Airline Productivity).
Important: Before modifying, rename the report -- carefully! When using a Report Generator Report, rename it FIRST, so not to lose the canned report to changes forever.
By putting a "1" in front of the new report (1AIR_PROD), it appears at the top of the reports listing and it is the newly created one.
Exit: When the report specifications are completed, Exit.
Designing a Report – Definition
When a new report is created, the Description field will be the title on the new report.
Note: All the functions previously under the file menu in earlier versions have been moved to the bottom of the screen (new, open, save, save as and close).
Specify What Data Appears on Report
The Invoice Booking (the source of the data) is the detailed part of an invoice, with information such as ticket number, passenger name, start/end dates, and fare amounts. When printing a report using the Report Generator, select a set of Invoice bookings, based on some criteria, and the computer shows information from those selected bookings in a particular order and format.
Selection of Data Fields for Report
The data in an invoice is available for use in the Report Generator. Choose only those items desired from a list of fields. In addition, there are certain calculated fields, such as Fare Savings. In the process of building a report, create a list of fields that make up the report.
Specify the Order and Field Format
Each field is printed on the report in a format dependent on the nature of the data. For example, numeric fields such as Invoice Number print as a series of digits (123456); Decimal Fields, such as Total Fare print with commas separating the digits and a decimal point (10,000.00); Text fields print as text; Date fields print in MM/DD/YY format.
Calculation Option
A calculation drop-down box is available for use. Calculations can be used on any numeric field (including UDIDs), but must be used in conjunction with at least one non-calculated field. A report can contain multiple calculations. Calculated field options include:
- Sum (also used to collapse detail information)
- Min/Max
- Average
- Median
- Count
- Percentage of total
When adding an amount field value and a calculated value, both should be on the same level.
Ability to Trim Field Length
Each data item has a maximum field length. The field only holds so many characters in the printed report, without condensing the print size of the field. To reduce the size of a selected field is especially useful to fit many fields on a single line. For example, the Client Name field has a maximum size of 40 characters. If including the name field in a report and leaving the field length at the default (the maximum length), the amount of space the name field occupies in the report is always 40 characters. If shortening the name field to, say, 25 characters, and the field contains more than 25 characters, the report shows the entire field in condensed print.
Ability to Sort on One or More Fields
With the report generator, sort and arrange data by telling the program what to do. What is Sorting? Sorting means putting a list of items in a particular order. For example, there is a list of numbers: 45, 17, 81, 27, and 6. This list of numbers, sorted lowest to highest (ascending) is: 6, 17, 27, 45, and 81. The numbers haven't changed; they have just been rearranged. By sorting, easily find a particular item. In the list of numbers, if looking for the number 25, only look at the first three numbers, since 25 is between 17 and 27.
The other advantage of sorting is grouping similar items together. Sorting is a powerful aspect of the Report Generator, allowing us to see, for instance, a report in Issue-Date order or to look at a report grouped by Airline.
Sorting On One or More Data Items
When selecting fields in the report, decide if a field should be a sorting key. A sorting key means that the sorting sequence is directly dependent on the value of that field. Report Definition
Select as many fields for sorting as fields in the report. Generally, though, sort on two or three fields. When selecting multiple sort keys, the sort gives precedence to the initial sort keys. For example, if sorting by Invoice Number and Ticket Number, the sort sequence is based primarily on Invoice Number; within records having the same Invoice Number, the sequence is in Ticket Number order. Thus, sorting by Invoice Number and Ticket Number, means sorting by Invoice Number and when there are two or more records with the same Invoice number, putting them in Ticket Number order. The precedence of each sort item corresponds directly to the item's position in the report.
Sort Keys Correspond to Sequence of Fields Displayed
It is a good idea to ensure that the sequence of sorting fields corresponds to the sequence of the items in the report. For example, if the report prints Issue Date, Invoice Number, Passenger Name, and Total Fare, sort by Issue Date, Invoice Number, and Passenger Name, in that order. Doing otherwise, makes the report more difficult to follow. In general, sorted fields appear before the non-sorting fields.
Single vs. Multiple Level Reports
Reports are either one level or two levels allowing for the data to be arranged in a hierarchical manner. A single level report looks like this:
Single Level Report
Multiple Levels Present Information More Clearly and Avoid Redundant Data
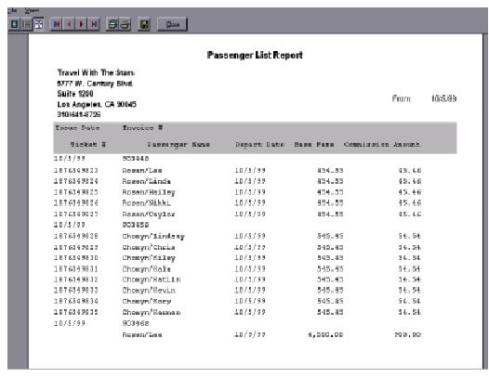
The multiple level report conveys more information because it shows patterns in the data. Note that the invoice number and date appear only once for each invoice thus avoiding redundancy.
Two-Level Report
Know What Data Goes On Which Level
Don't arbitrarily assign items to different levels. Keep in mind that for a given list of sorted records, certain items change more frequently than others. Try to get an overall view of the data being presenting in the report. Want the data grouped by Carrier for an Airline Productivity Report? The Invoice Booking level? By Agent ID for an Agent Summary Report? The Invoice Level? Sometimes designing a report for a single level, then breaking it up into two levels, is easier than initially designing a multi-level report.
Level Breaks on Changed Sort Item from Prior Level
In a multi-level report, the report level breaks at the point when one or more of the sorting fields in the primary level changes. When the Report Generator prints, printing starts on Level 1. Then, for each record, a line is printed at Level 2. When a field in the record that is a sort key for Level 1 changes, two things happen: subtotals are printed for the selected items at the current level (2), and a new Level 1 line is printed. Printing continues at Level 2 and the subtotals are reset to 0.
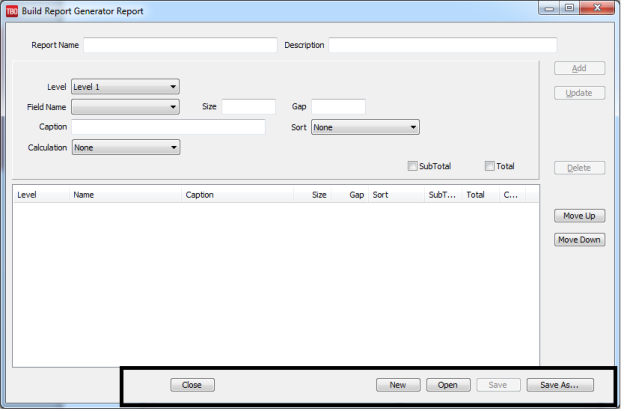
Building the Report
Here is a picture of the Report Generator screen used to create custom reports. This screen is where to arrange data fields.
Report Generator Build Report
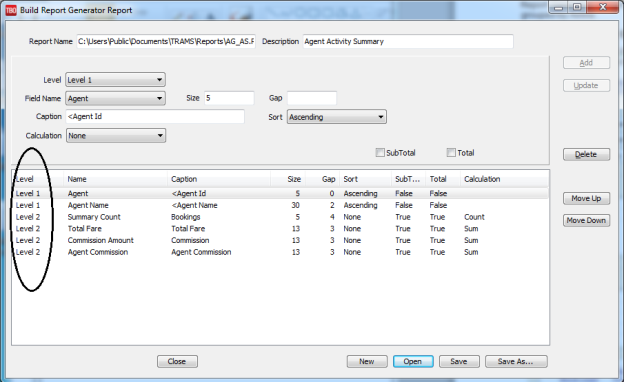
These two Report Field Boxes are where to specify the data items and the order, format, and positioning of those items in the report. Notice there two levels of data items included in a report. Level 1 is completed for all reports; Level 2 is completed for those reports requiring two levels of information.
Click on the first line in either box to toggle between field levels. Each Report Fields Box corresponds to a level in the report. For a single-level report, Report Fields Level 2 is empty. The total of the widths of each field, including the spacing between fields, must not exceed 132 characters.
|
Report Definition Table |
|
|
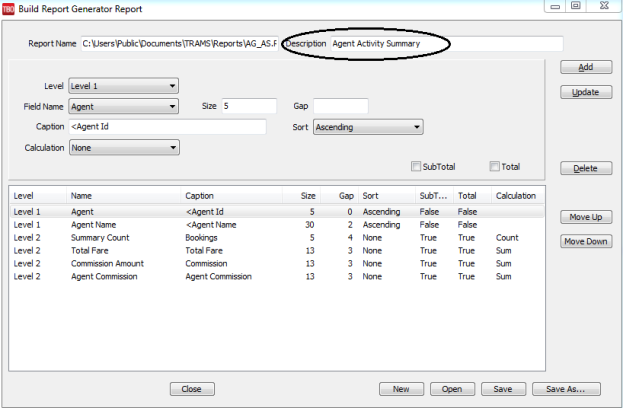
Report Name |
The Report Name field is where to decide the name of a Report Generator report. There is no limit to the number of reports possible with the Report Generator, each report, however, must have a unique name. The report name can be any number of characters including spaces. Be careful not to use non-alpha characters such as asterisks ('*') or periods ('.') as part of the report name. The name assigned to a report is the name used to find it when ready to print. Use descriptive names for the reports, such as AIR_PROD for Airline Productivity. |
|
Report Title/Description |
The Report Title or Description is centered on the top of every page of the report. The title also appears next to the report name when selecting an existing report. Make the title descriptive of the report, e.g., Client Fare Savings Report. |
|
Format: Detail |
The Format can be either Detail or Summary. If Format is set to Summary, all records at the lowest level with identical sorting keys are printed as one summary record. |
|
Print Report Definition |
To print a hard copy of a report setup format, click on the Print Report Definition button and then the printer icon. |
In the Report Fields Box, each row represents a data item on the report. There are six criteria for each data item:
|
Report Fields Box |
|
|
Criteria |
Description |
|
Field Name |
The name of the data field. Select a field by clicking the down arrow. |
|
Field Size |
The size, in characters, of the data field |
|
Gap |
The number of blank characters between the previous field (or the left margin, if first) and the current field. There is no explicit positioning information entered: each field is positioned relative to the previous field; thus, if a field is deleted, all successive fields move over automatically. (0=default) |
|
Caption |
The text that should appear in the Report Header above this field. The caption defaults to "left". The data is always left justified while the dollar amount field is right justified. |
|
Sort |
The sort option defaults to None. Set this field to Ascending if the output is desired from "A - Z", or 1-10. Set to Descending if the output is desired from "Z-A", or 10-1. If there are multiple items, precedence proceeds from left to right as printed on the report or from top to bottom in the Report Fields Box. |
|
Subtotal |
Subtotal is local to current level break and prints when Level drops back to 1 or report ends. (Does not apply to fields at Level 1. Also DO NOT use for Name Fields which are identified by a dash line on the report.) |
|
Total |
If the field is at Level 2, then the total includes all of this field and prints once at the end of the report in BOLD print. (DO NOT use for Name Fields.) |
The caption is printed at the top of page one, just below the Title and Agency Name (starting on page two, the agency name and title are not printed). The caption is generally made up of a description of different data items appearing on the report. The description of a data item should be positioned in the report so it is above the same column as the data item itself. Someone looking at the report can look at the header and scan straight down the page for the information.
There are two lines for the Caption. For a two-level report, then the header for the first level goes on the first line and the header for the second level goes on the second line.
Delete a Report
To delete a report, use Windows Explorer or My Computer to go an unwanted report in the reports directory and click Delete to remove.
Report Generator Buttons
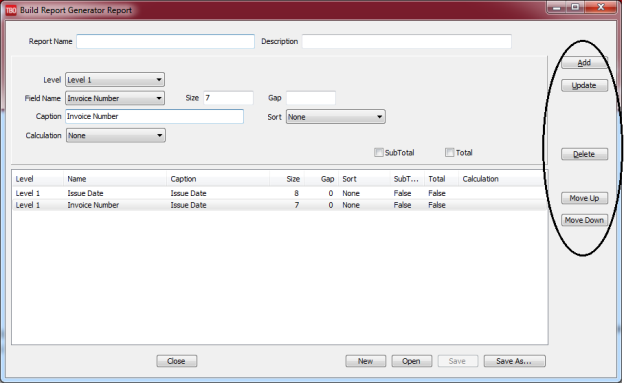
Add a new field to the report.
Update enables modification of an existing field on the report. Select the field, modify the entry and then click Update.
Delete existing field.
Move Up and Move Down are used to rearrange the order of the fields on the report. Notice the fields from top to bottom on the field box. They appear in the same order on the report and they’ll be in left-to-right order. Highlight the field to move. By pressing Move Up, this line switches places with the field currently above it. By selecting Move Down, the highlighted item switches places with the field below the line.
Navigation
List of Data Items and Maximum Field Sizes
The data source used in Trams Back Office Report Generator is an Invoice Booking. Each Invoice Booking record contains many fields which may be used as data to be printed on a report. The table has a listing of all fields in the Report Generator.
 NOTE: Two field options further separate Canadian agency tax codes in Report Generator: GST (XG) and HST (RC). Previously both fields were only available as combined GST/HST.
| Booking Rec No | ||
|
Booking Record Locator |
5 |
Booking Record Locator |
|
Branch |
3 |
Invoice Branch |
|
Branch Name |
50 |
The Agency name for specified branch |
|
City Names |
25 |
City Names |
|
Class Of Service |
2 |
The Class of Service for the first segment on the ticket is used by default. |
|
Client Acct No |
8 |
'1234' or '23' |
|
Client Address 1 |
40 |
First line of Client Address |
|
Client Address 2 |
40 |
Second line of Client Address |
|
Client City |
40 |
Client City |
|
Client Country |
40 |
Client Country |
|
Client GST Amount |
13 |
Client GST Amount |
|
Client Interface ID |
10 |
Interface ID From Client Profile |
|
Client Name |
40 |
LastName/FirstName or CompanyName |
|
Client Pay Status |
6 |
Payment status |
|
Client Phone |
20 |
Client phone number |
|
Client Pymt Ck/CC No |
30 |
Displays either the Check Number or the Masked CC Number |
|
Client Pymt Date |
8 |
Date of Client Payment for this booking |
|
Client Pymt Method |
9 |
Cash, Check etc. |
|
Client Remarks |
30 |
Booking Client Remarks |
|
Client State |
5 |
Client State |
|
Client Type |
10 |
'Leisure' or 'Corporate' |
|
Client Zip |
15 |
Client Zip Code |
|
Combined CC No |
30 |
Displays the Credit Card number for ARC, or Supplier, or Comm Track |
|
Commission GST Amount |
13 |
Commission GST Amount |
|
Commission QST Amount |
13 |
Commission QST Amount |
|
Comm Track CC No |
25 |
Displays only the Comm Track CC Number if it is in the expanded Info Tab |
|
Commission Amt |
13 |
Booking Commission Amount |
|
Commission Rate |
7 |
Booking Commission Percent |
|
Confirm No |
20 |
Alphanumeric |
|
Daily Rate |
13 |
For Supplier/Comm-Track Bookings, the Total Fare divided by the Number Of Days. |
|
Date Payable |
8 |
Date Payable |
|
Depart Date |
8 |
Start/Depart Date |
|
Discount |
13 |
Difference between Actual Fare and Face Value |
|
Dom/Intl Indicator |
12 |
Dom/Intl Indicator |
|
E-Ticket Indicator |
1 |
A 1 in this column indicates it’s an e-ticket. Nothing in this column indicates it’s not an e-ticket. |
|
Face Value |
13 |
ARC/BSP Booking Face Value |
|
Fare Basis |
8 |
The first Fare Basis indicator on an ARC/BSP booking (from the segment information) |
|
Fare Justification |
60 |
Fare Justification Text |
|
Fare Justification Code |
2 |
Booking Fare Code |
|
Fare Lost |
13 |
Booking Total Fare - Booking Low Fare |
|
Fare Savings |
13 |
Booking High Fare - Booking Total Fare |
|
Final Pay Amount |
13 |
Booking Final Payment Amount |
|
Final Pay Commission |
13 |
Booking Final Payment Commission Amount |
|
Final Pay Date |
8 |
Booking Final Payment Date |
|
Fixed CC No |
35 |
Displays the entire cc number without the Prefix and expiration date |
|
Flown Carrier |
15 |
Flown Carriers for Booking |
|
Full CC No |
35 |
Displays the prefix credit card number and expiration date |
|
High Fare |
13 |
Booking High (Full) Fare |
|
Host Agency Code |
10 |
Host Agency Code |
|
Hotel/Car Description |
10 |
'ICAR', etc. |
|
IC Code |
10 |
Independent Contractor Code |
|
Invoice Count |
5 |
Number of Invoices |
|
Invoice Group |
15 |
Invoice Group |
|
Invoice Number |
7 |
Numeric Invoice Number |
|
Invoice Pay Status |
6 |
Invoice Payment Status |
| Invoice Rec No | ||
|
Invoice Remarks |
80 |
Remarks |
|
Invoice Type |
10 |
Sort by the Invoice Type to get a transaction count based on the type of invoice (i.e., number of refunds, exchanges, sales) |
|
Issue Date |
8 |
Invoice Issue Date |
|
Itinerary |
19 |
ORG/DST |
|
Low Fare |
13 |
Booking Low Fare |
|
Masked CC No |
20 |
Only prints last 4 characters of cc # |
|
Net Fare |
13 |
Total Fare - Commission Amount |
|
Number In Party |
2 |
For Supplier/Comm Track bookings |
|
Number Of Days |
3 |
For Supplier/Comm Track bookings. (Calculated field using the Depart/Return dates). Example for hotel: Depart date (check in date)= 8/22/15, Return date (check out date)=8/24/15 = 2 nights |
|
Number of Rooms/Nights |
2 |
For Supplier/Comm Track bookings (Calculated field using the number of nights multiplied by the number of rooms in the expanded fare tab). Example for hotel: 2 nights X 2 rooms = 4 room nights |
|
Number Of Rooms/Cars |
2 |
For Supplier/Comm Track bookings (in the expanded fare tab) |
|
Original Ticket Number |
10 |
Original Ticket Number |
|
Outside Agent |
10 |
ID of Outside Agent for current Invoice |
|
Outside Agent Commission |
13 |
Outside Agent Rate x Total Commission for current booking |
|
Outside Agent Name |
30 |
Full Name of Outside Agent for current Invoice |
|
Outside Agent Rate |
6 |
Outside Agent Commission Rate |
|
Passenger Department |
20 |
From Invoice or Profile if box is checked |
|
Passenger Name |
25 |
LastName/FirstName |
|
Record Locator |
10 |
PNR Locator |
|
Return Date |
8 |
End/Return Date |
|
Segment Arrive City |
3 |
Arrive City |
|
Segment Arrive DateTime |
30 |
Arrive Date/Time |
|
Segment Class of Service |
2 |
Class of Service |
|
Segment Connection |
1 |
Connection |
|
Segment Count |
5 |
The # of city pairs in the current booking |
|
Segment Depart City |
3 |
Depart City |
|
Segment Depart DateTime |
30 |
Depart date/time |
|
Segment Fare |
8 |
Segment Fare |
|
Segment Fare Basis |
15 |
Fare Basis |
|
Segment Flight No |
4 |
Flight number |
|
Segment Flown Carrier |
3 |
Flown Carrier |
|
Segment IndexNo |
2 |
Index number |
|
Segment Mileage |
4 |
Mileage |
|
Segment Ticket Designator |
25 |
Ticket Designator |
|
Submit To |
3 |
Submit To: ARC/BSP, SUP or COMM |
|
Summary Count |
5 |
Used in Summary Reports. Shows count of items at current level. |
|
Tax 1 Amount |
13 |
Booking Tax 1 Amount |
|
Tax 2 Amount |
13 |
Booking Tax 2 Amount |
|
Tax 3 Amount |
13 |
Booking Tax 3 Amount |
|
Tax 4 Amount |
13 |
Booking Tax 4 Amount |
|
Tax Amount |
13 |
Booking Total Tax Amt |
|
Ticket Designator |
25 |
Indicates domestic or international ticket |
|
Ticket No |
10 |
Ticket Number |
|
Ticket Type |
11 |
Normal, Ex-Add Collect, Ex-Refund |
|
Ticket/Conf No |
15 |
Alphanumeric |
|
Ticketing Agent |
10 |
Ticketing Agent ID |
|
Ticketing Agent Name |
10 |
Ticketing Agent Name |
|
Ticketing Agent Commission |
10 |
Ticketing Agent Commission amount |
|
Total Fare |
13 |
Booking Total Fare |
|
Tour Code |
25 |
Indicated code for specific tour |
|
Travel Type |
9 |
Air, Car, Hotel, etc. |
|
UDID #xx |
60 |
UDID’s #1 to #999 |
|
Validating Carrier |
3 |
Validating Carrier |
|
Vendor Acct No. |
6 |
12345 |
|
Vendor Address 1 |
40 |
First line of Vendor address |
|
Vendor Address 2 |
40 |
Second line of Vendor address |
|
Vendor City |
40 |
Vendor City |
|
Vendor Country |
40 |
Vendor Country |
|
Vendor Name |
40 |
Name of Vendor |
|
Vendor Pay Status |
6 |
Vendor Payment Status |
|
Vendor Phone |
20 |
Vendor Phone Number |
|
Vendor Pymt Ck/CC No |
30 |
Vendor Payment Check or Credit Card Number |
|
Vendor Pymt Date |
8 |
Date of Vendor Payment for this booking |
|
Vendor Pymt Method |
9 |
Cash, Check, etc. |
|
Vendor Remarks |
30 |
Booking Vendor Remarks |
|
Vendor Remit Amount |
13 |
Vendor Net Remit Amount |
|
Vendor State |
5 |
Vendor State |
|
Vendor Zip |
15 |
Vendor Zip Code |
To print the report, go to Report Generator|Print Report and select the name assigned to the Report. Do this by clicking the Report Button. Complete the desired selection criteria in the General and/or Advanced Tab and process the report by clicking Print.
Report Examples
Creating and/or Modifying a Report
To help understand the information presented here, let's go through an example of building and printing a report using the Report Generator. The report we are building is called an Airline Productivity report showing activity grouped by Airline. This example covers the major aspects of Report Generator Programming.
Go to Reports|Report Generator|Build Report screen. Click File, then Open and select the name of an existing report to modify. Give the report a new name (see box below), a title that is descriptive of the report and then insert or delete to make changes. The possibilities are many.
|
Reminder: Rename the report before modifying when using a Report Generator Report so not to lose the canned report to the changes forever. |
Report Fields
Here is a list of the data items we want included in the Airline Productivity Report:
Issue Date
Invoice Number
Ticket Number
Itinerary
Passenger Name
Airline/Vendor Name
Total Fare
Commission
For this example, we go to Reports|Report Generator|Build Reports. Click File|Open and select the canned Air_com.rpt from the reports menu. Next, click File|Save As and rename the report Al-prod.rpt. In the Description field, type Airline Productivity Report. Next, open the new renamed Airline Productivity report (Al-prod.rpt). Now begin to modify the report.
On Field Level 1 we want the Airline/Vendor name. The field size of 20 characters can be adjusted to accommodate longer names if necessary. Since this is the only field that will be on Level 1, we do not need a gap between fields. We select Ascending to sort the airline by name and No for subtotal and total.
Report Fields Level 1 |
||||||
|
Field Name |
Field Size |
Gap |
Caption |
Sort |
Subtotal |
Total |
|
Airline/Vendor Name |
20 |
0 |
Airline |
Ascending |
No |
No |
Note: In the printout, the column header "Airline" is left justified, as are all the airline codes.
The remaining fields that we want to see on the report are on Level 2.
Sample Report Output
Airline Productivity Report
Save the created report by clicking File|Save As and checking to see if the name of the report appears correctly. If it does, click Save. In the above example, the report name would appear as Al-prod.rpt. To modify the report, select Report Generator|Build Report. Click File|Open and select Al prod.rpt, and modify the report. Remember to save the changes.
Mail Merge
Mail Merge is an option that takes the information stored in Reports and puts it into a format accepted by other software applications. To activate this option, go to the main Reports menu, then to Report Generator and to Print Report. Click Report and Select the desired report from the report menu. Click on the down-arrow on the Format field to select the option for Mail Merge. Complete the desired selection criteria fields and click Preview to process the report. Next, decide where to save the file and enter the folder in the Save In field. Enter the file name File Name field with a .txt extension. Click on Save.
|
Ben is using Microsoft Word to accept a mail merge from Trams Back Office. He is creating welcome home letters for all clients returning from their trip next week. He goes to the main Reports menu, then to Report Generator, and to Print Report. He selects one of his Client reports, and completes the Booking Dates/Return selection criteria from the drop-down menu and the Between and To fields to reflect next week's dates. He clicks Preview. and enters the path, directory and file name ((C:\Import\welcome.txt). Ben opens Microsoft Word and finds his letter. He uses the C:\Import\welcome.txt as the data source for the mail merge. |
Create a mail merge file from Reports|Clients|Lists and Labels and Reports|Vendor|Lists and Labels. To create a mail merge file, go to either the Client or Vendor subheading under the Reports menu and choose the Lists and Labels option. Select Mail Merge for Report Type and complete the desired selection criteria fields. Enter the file name for the data source for the mail merge.
The mail merge file is a tab-delimited file. Change this delimiter in Utilities|Setup|Global Defaults. Having access to all customer names in mail merge format means the agency can print letters to all its travelers.
|
Your agency uses Microsoft Word to create and print letters. You are preparing a master letter to everyone who has taken a cruise with you this past year, notifying them of your agency's discount plan for repeat cruisers. First you need to find out who your clients are who have taken a cruise this past year. Go to Reports|Report Generator|Print Reports and select a Client Activity Report (such as CL_AS.rpt). Enter the selection criteria for Submit To "Supplier/Comm Track", with a Travel Type of "Ship Final" and run the report for the last year to find all the clients who have taken cruises. Ensure that you select "Client Only" or "Client & Vendor" under the Cross Reference field on the Advanced Tab. Preview the report. No need to print it. To merge the names from this "Ship Final" query in Report Generator from Trams Back Office to your work processor, go to Reports|Client|Lists & Labels. Select "Mail Merge" in the for Format field, and check the Use Cross Reference Data box. Click Print and map to directory and folder in the Save To field (usually C:\Folder). Enter the name of the file cruise.txt in the File name field and save as a .txt file Click Save. You can now merge all selected client names and addresses into the master letter by accessing that saved file through your word processing software using their instructions. |
Backing Up Reports
When backing up the TBO database, Report Directory is not backed up. Make a separate backup for all the reports. Use the following instructions:
1. Select Start|Programs|Accessories|System Tools|Backup.
2. Follow the Backup Wizard, and place a checkmark in the Trams Reports folder found at C:\Users\Public\Documents\TRAMS\Reports\.
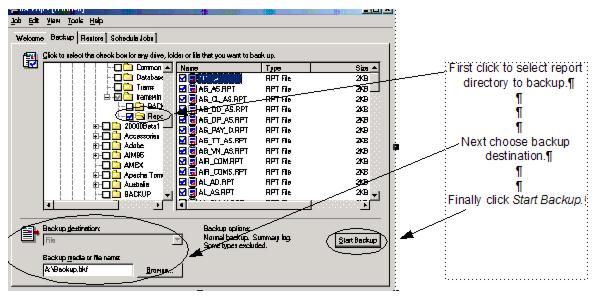
3. Then, browse for the backup destination found on the bottom of the backup screen. (Some versions of Windows may have the backup destination on the next screen.) Since reports fit nicely on a flashdrive, select this drive as the backup destination.
4. Click on Start Backup to start backing up, or Schedule Jobs. (If you select Schedule Jobs, backup files will be backed up as scheduled. Make sure that you have a diskette in the diskette reader and that the system time and data are correct when using this option.)
Tips and Tricks
Try breaking the report into multiple levels for easier reading. When designing a report, keep each line clear and simple. At a given level, move any constant information, such as Invoice Number or Issue Date, to a lower level.
Use UDID’s as a forced "field" to collect data not normally included in an invoice booking but wanted for reporting purposes. UDID’s (pronounced "U-DID's") are user-defined interface data entries captured in the UDID’s tab portion of an invoice booking. The format for entering UDID lines is as follows:
Un-Freeflow Text, (the "UDID" is the UDID field, and the "n" represents the UDID number). Where n= a UDID number (1 to 999) and free flow text is whatever text desired to associate with that UDID.
These UDID’s can be included as a data field when building a report and as selection criteria when printing a report. If you want a report from the Report Generator to be printed in Portrait mode (standard format), keep the number of characters on one line of the report to be 80 characters or less. (Eighty characters is an average and not a exact number. Some reports will convert to landscape mode (wide format) anywhere from 77 characters to 89 characters.)